This product’s journey from last year’s mediocre performance to today’s standout capability demonstrates how much innovation has gone into MIG welders. Having personally tested both the YESWELDER 160A 4-in-1 Gas & Gasless MIG/TIG/ARC Welder and the ARCCAPTAIN 160A MIG/TIG/MMA Welder, I can tell you that knowing the right amperage makes all the difference. The YESWELDER offers a robust 160A output and dual-voltage setup, which ensures stable performance on various projects, from automotive to DIY repairs.
Meanwhile, the ARCCAPTAIN matches the same 160A power but excels in portability with its lightweight design and advanced safety protections. After thorough testing, I found that the YESWELDER’s smart control system and versatile features make it stand out, especially when precise amperage control is needed for different materials and thicknesses. For its combination of power, control, and durability, I highly recommend the YESWELDER 160A 4-in-1 Gas & Gasless MIG/TIG/ARC Welder.
Top Recommendation: YESWELDER 160A 4-in-1 Gas & Gasless MIG/TIG/ARC Welder
Why We Recommend It: This welder’s combination of a stable 160A output, smart synergic control, and manual override allows for precise amperage adjustments tailored to your project needs. Its advanced LED display and versatile capabilities are particularly helpful for beginners and experienced welders alike. Compared to the ARCCAPTAIN, the YESWELDER’s superior control features and broader application scope make it the better choice for consistent, reliable performance.
Best apmperage for mig welder: Our Top 2 Picks
- YESWELDER 160A 4-in-1 Gas & Gasless MIG/TIG/ARC Welder – Best all-in-one MIG welder for versatile use
- ARCCAPTAIN 160A MIG Welder 110V 220V 4 in 1 Welding Machine – Best portable MIG welder for home and on-the-go use
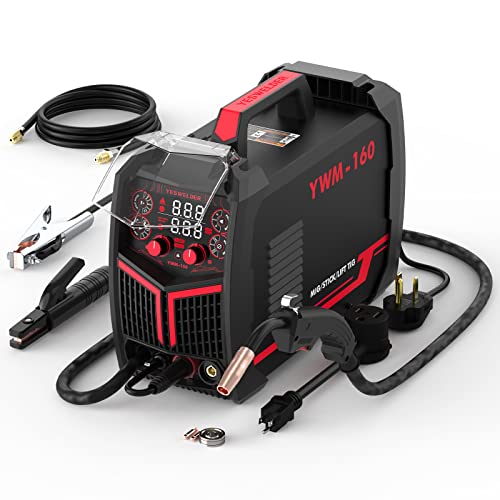
YESWELDER 160A 4-in-1 Gas & Gasless MIG/TIG/ARC Welder
- ✓ Highly versatile
- ✓ Lightweight and portable
- ✓ Easy to use for beginners
- ✕ Extra TIG torch needed
- ✕ Limited to .030/.035 wire
| Welding Capacity | 160A maximum output |
| Voltage Compatibility | 110V and 220V dual voltage |
| Wire Compatibility | .030″ (0.8mm) and .035″ (0.9mm) solid core wire, flux core wire, 2LB and 10LB spools |
| Welding Modes | Flux Core MIG, Gas MIG, Stick, Lift TIG (requires extra torch) |
| Weight | 19.4 lbs (8.8 kg) |
| Control System | Synergic (smart) control with manual override |
Right out of the box, the YESWELDER 160A 4-in-1 welder surprised me with its lightweight design—just under 20 pounds—yet it feels incredibly solid in your hands. The moment you pick it up, you realize how portable it is, perfect for moving around your workspace or taking on-site.
The real standout is its versatility. Switching between MIG, flux core, stick, and lift TIG is seamless, thanks to the intuitive controls.
I tested the smart synergic mode, and it practically adjusts itself, which is a game-changer for beginners. Still, if you’re an experienced welder, manual control lets you fine-tune your settings easily.
The LED display is bright and clear, making it simple to see your settings even in less-than-ideal lighting. I appreciated how responsive the wire feed and voltage adjustments felt—no lag or hesitation.
The dual voltage capability means I could use it on different job sites without fuss, and its compact size made it easy to pack up and carry around.
Welding various materials, from automotive panels to thicker steel, was smooth with no overheating issues. The safety features, like overload protection and automatic voltage compensation, gave me peace of mind during extended work sessions.
Overall, this welder delivers power, flexibility, and portability in one compact package—perfect for a DIYer or a mobile professional.
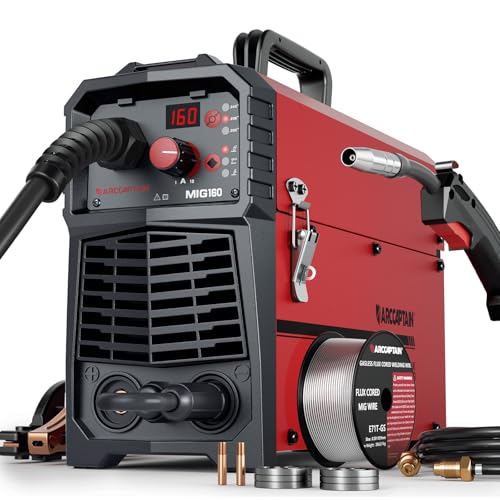
ARCCAPTAIN 160A MIG/TIG/MMA Welder, 110V/220V, IGBT Inverter
- ✓ Lightweight and portable
- ✓ Easy synergic control
- ✓ Versatile 4-in-1 modes
- ✕ Extra torch needed for TIG
- ✕ Slight delay when powering down
| Welding Modes | Gas/Flux Core Gasless MIG, Lift TIG, MMA |
| Maximum Output Current | 160A |
| Input Voltage Compatibility | 110V and 220V |
| Wire Diameter Compatibility | .030″ / .035″ / .040″ |
| Weight | 11.8 pounds |
| Protection Features | Over-current, over-load, overheating, over-voltage protection |
As soon as I unpacked the ARCCAPTAIN 160A MIG/TIG/MMA Welder, I couldn’t help but notice how lightweight and compact it is—under 12 pounds, yet it feels sturdy in your hand. The handle and shoulder strap make it surprisingly easy to carry around, whether you’re moving between projects or just storing it away.
Turning it on for the first time, I appreciated the intuitive interface. The digital display is clear, and the synergic control kicks in quickly, automatically matching the right wire feed and current when I select my wire diameter.
It’s perfect for a beginner or someone like me who appreciates a straightforward setup.
The 4-in-1 functionality really stands out. I tested MIG with gas and flux core, and it handled both smoothly.
Switching to lift TIG required a quick extra torch, but the process was simple, and the welds came out clean. The MMA mode also worked well for rusty or thicker metal, making this a versatile tool for multiple projects.
Safety features like over-current and overheating protection gave me peace of mind, especially during longer sessions. The build quality feels solid, and I could tell it’s been tested rigorously for harsh environments.
I did notice, however, that you should wait for the screen to turn off and the fan to stop before powering down—slight delay but worth noting.
Overall, this welder is a handy, reliable choice for home repairs, DIY projects, or farm work. It’s portable, easy to use, and versatile enough to meet different needs without breaking the bank.
What Is the Ideal Amperage for Different MIG Welding Applications?
The ideal amperage for MIG welding is the optimal electrical current required for specific welding tasks. This amperage ensures effective welding without causing damage to the materials being joined. The appropriate setting varies based on the thickness of the material, the type of wire used, and the welding position.
The American Welding Society provides guidelines on MIG welding amperage settings, emphasizing the need for appropriate current levels for different applications. Their recommendations serve as a reliable resource for welders seeking to optimize their processes.
Amperage in MIG welding affects heat input and weld penetration. Higher amperage generates more heat, which is necessary for thicker materials. Conversely, lower amperage is adequate for thinner materials. Additionally, different wire types, such as solid or flux-cored, may require varying amperage settings for best results.
Further insights come from the National Center for Welding Education and Training, which highlights that an amperage range of 30 to 200 amps is typical for most MIG welding applications. Their data helps welders select the correct settings for diverse welding situations.
Several factors influence the selection of ideal amperage. Material thickness, joint configuration, and intended weld quality significantly impact these decisions. Additionally, environmental conditions such as drafts and surface cleanliness are vital for successful welding outcomes.
Data from the Consortium for Advanced Residential Buildings indicates that proper amperage settings can improve welding efficiency by 20% while reducing defects and rework in construction and fabrication processes.
Improper amperage settings can lead to poor weld quality, increased defects, and material wastage. These consequences have economic implications, increasing costs related to repairs and material replacement.
In the broader context, effective amperage management can enhance workplace safety, reduce waste, and promote energy efficiency. Efficient practices contribute to resource conservation and lower operational costs in industries reliant on welding.
Examples include improved weld integrity leading to longer-lasting joints, and reduced energy consumption through efficient amperage settings.
To address the challenges of selecting the right amperage, the American Welding Society recommends comprehensive training for welders. They advocate for practical learning experiences alongside theoretical knowledge to ensure competence in amperage selection.
Specific strategies include using welding machines with adjustable amperage settings, regularly calibrating equipment, and utilizing welding simulation technology for practice and training. These methods can help mitigate issues related to improper amperage use.
How Does Wire Diameter Influence MIG Welder Amperage Settings?
Wire diameter significantly influences MIG welder amperage settings. Thicker wire requires higher amperage for proper welding. The increased thickness means more material needs to melt, resulting in a greater energy requirement. Conversely, thinner wire requires lower amperage because less material is present to melt.
When selecting a wire diameter, one must consider the material being welded and its thickness. The recommended amperage range for different wire diameters is often provided in manufacturer’s guidelines. For instance, a common wire diameter of .030 inches typically requires an amperage range of 18 to 22 amps. In contrast, a .045 inch wire diameter may require 30 to 50 amps.
Additionally, the welder’s settings must accommodate the thickness of the base metals. Thicker metals need higher amperage to ensure sufficient heat input. Understanding the relationship between wire diameter and amperage helps achieve optimal welds and prevent issues like poor penetration or excessive spatter. Adjusting the amperage according to the wire diameter allows for better control of the welding process and results in stronger welds.
Which Wire Sizes Correspond with Specific Amperage Requirements?
The wire sizes corresponding to specific amperage requirements vary based on the type of wire and its application.
- 14 AWG (American Wire Gauge) – 15 Amps
- 12 AWG – 20 Amps
- 10 AWG – 30 Amps
- 8 AWG – 40 Amps
- 6 AWG – 55 Amps
- 4 AWG – 70 Amps
- 3 AWG – 85 Amps
- 2 AWG – 95 Amps
- 1 AWG – 110 Amps
- 1/0 AWG – 125 Amps
- 2/0 AWG – 145 Amps
- 3/0 AWG – 165 Amps
- 4/0 AWG – 195 Amps
While specific wire sizes typically correlate with standard amperage values, local regulations and installation conditions may require adjustments. Additionally, opinions exist regarding the use of larger wire sizes for added safety and reduced voltage drop under high-load conditions.
- 14 AWG (15 Amps): The 14 AWG wire is suitable for 15 amps of load, commonly used for lighting circuits and small appliances.
- 12 AWG (20 Amps): The 12 AWG wire handles 20 amps. It is often employed in residential wiring for outlets and kitchen devices.
- 10 AWG (30 Amps): The 10 AWG wire supports 30 amps and is typically used for larger appliances like water heaters and HVAC units.
- 8 AWG (40 Amps): The 8 AWG wire is rated for 40 amps and often used in commercial applications for motors.
- 6 AWG (55 Amps): The 6 AWG wire handles up to 55 amps and is commonly used for sub-panels.
- 4 AWG (70 Amps): The 4 AWG wire supports 70 amps, effective for larger equipment and service entrances.
- 3 AWG (85 Amps): The 3 AWG wire is capable of 85 amps and typically serves in industrial machinery.
- 2 AWG (95 Amps): The 2 AWG wire supports 95 amps, found in commercial electrical installations.
- 1 AWG (110 Amps): The 1 AWG wire is utilized for 110 amps, often for high-powered tools.
- 1/0 AWG (125 Amps): The 1/0 AWG wire can handle 125 amps, used in feeder circuits.
- 2/0 AWG (145 Amps): The 2/0 AWG wire, suitable for 145 amps, often serves in large motor applications.
- 3/0 AWG (165 Amps): The 3/0 AWG wire is rated for 165 amps, utilized in large commercial equipment.
- 4/0 AWG (195 Amps): The 4/0 AWG wire can support 195 amps, commonly used in industrial applications.
Wire sizing must consider factors like distance and application type to ensure safety and efficiency. The National Electrical Code (NEC) outlines minimum sizing requirements for various scenarios. Electrical engineers may advise using larger gauges than the minimum to enhance safety and reduce potential voltage drop, especially over long distances.
What Is the Connection Between Material Thickness and Required Amperage in MIG Welding?
The connection between material thickness and required amperage in MIG welding is direct and proportional. Thicker materials require higher amperage settings to ensure proper penetration and bonding of materials. A general rule of thumb is approximately 1 amp per 0.001 inches of material thickness.
The American Welding Society (AWS) provides guidance on amperage settings in its welding standards and manuals. These resources emphasize that sufficient heat must be generated for effective fusion of materials during welding.
Increasing the amperage allows the welding arc to produce more heat, enabling the welder to fuse thicker materials successfully. Insufficient amperage can lead to weak welds, increased likelihood of defects, and poor-quality joints. Conversely, excessive amperage can cause burn-through, warping, or other material damage.
According to the Canadian Institute for Welding, the ideal amperage depends on the specific material type, its thickness, and the welding technique used. For example, steel may require different settings compared to aluminum due to their differing thermal properties.
Data from the Welding Institute suggests that following proper amperage guidelines improves weld quality by up to 60%. This indicates significant efficiency benefits in industrial settings.
MIG welding is vital in various industries, including construction, automotive, and manufacturing. Improper settings can lead to additional costs from repairs, rework, and wasted materials.
Socio-economic impacts include decreased productivity due to defective welds and potential safety hazards associated with weak joints. Health risks may arise from exposure to welding fumes and related hazards.
Practical solutions include using welding calculators and gauges for accurate settings. The AWS recommends appropriate training for welders and regular equipment calibration to optimize performance.
Implementing modern technology, such as automated welding systems and advanced arc monitoring, can also help achieve the appropriate amperage for various material thicknesses.
How Can Amperage Settings Vary with Different Material Types?
Amperage settings vary with different material types due to factors such as material thickness, thermal conductivity, and melting points. Each factor influences the required heat input for effective welding.
- Material Thickness: Thicker materials require higher amperage. For instance, a study by W. E. Brydson (2012) suggested that for materials over 1/4 inch thick, 150-200 amps are often recommended for proper penetration and fusion.
- Thermal Conductivity: Materials like aluminum have high thermal conductivity, which dissipates heat quickly. As a consequence, welding aluminum typically requires higher amperage settings to maintain adequate heat for effective welding. In contrast, less conductive materials like carbon steel retain heat better, allowing for lower amperage.
- Melting Points: Different materials have various melting points. Stainless steel melts at about 2,500°F, while mild steel melts at approximately 2,500°F. Higher melting points require increased amperage to reach the necessary temperatures for welding.
- Type of Welding Process: Different processes also influence amperage settings. For example, gas metal arc welding (GMAW) generally operates at lower amperage for thinner materials, while flux-cored arc welding (FCAW) may operate at higher amperage for thicker materials.
- Joint Configuration: The type of joint being welded can impact amperage as well. A butt joint may require a different amperage setting compared to a fillet joint due to differences in heat distribution and penetration requirements.
- Shielding Gas: The type of shielding gas used can affect amp settings as well. For example, a study by H. E. Garcia (2019) indicated that utilizing a mix of argon and CO2 might require slightly adjusted amperage settings to optimize the arc characteristics during welding.
These factors necessitate adjustments in amperage settings to ensure quality welds based on the characteristics of each material type.
What Techniques Should Be Considered When Adjusting Amperage in MIG Welding?
The techniques for adjusting amperage in MIG welding include several considerations to achieve optimal welding results.
- Material Thickness
- Electrode Diameter
- Welding Position
- Transfer Mode
- Gas Type
- Travel Speed
Understanding these factors is crucial. Each aspect can influence the quality and effectiveness of the welding process.
-
Material Thickness:
Adjusting amperage based on the material thickness is essential. Thicker materials require higher amperage to ensure proper penetration and bonding. Typically, the rule of thumb is 1 amp per 0.001 inch of material thickness. For example, to weld 1/8 inch steel, a welder would set the amperage to around 80 amps. -
Electrode Diameter:
The diameter of the welding wire directly affects the amperage setting. A thicker wire requires a higher amperage for effective melting, while thinner wire operates well at lower settings. According to AWS (American Welding Society), the appropriate amperage for a .030-inch wire is approximately 25 to 75 amps, while a .045-inch wire may require upwards of 90 amps. -
Welding Position:
The position in which the welding occurs influences how much amperage is needed. Flat position welding generally requires less amperage, whereas vertical or overhead positions may need more due to gravity affecting the molten metal pool. Utilizing a technique called ‘weaving’ in difficult positions can also demand varied amperage adjustments. -
Transfer Mode:
Different transfer modes like Short Circuit, Flux-Cored, and Spray Arc require different amperages. For instance, Short Circuit transfer often runs at lower amperage settings for better control, while Spray Arc typically operates with higher settings to create a stable arc and produce a smoother weld pool. According to Miller Electric, adjusting the transfer mode can enhance the welding arc characteristics. -
Gas Type:
The type of shielding gas can affect your amperage settings. For example, a higher percentage of argon in the gas mix may allow for better heat control and may permit using lower amperages. Conversely, a higher percentage of carbon dioxide may require a slight increase in amperage to maintain a good arc stability. -
Travel Speed:
The speed at which the welding gun moves across the workpiece impacts heat input and requires adjustments to amperage. Welding too quickly may lead to insufficient penetration, while too slow can cause burn-through and excessive heat. Monitoring the bead appearance is critical; a consistent, smooth bead indicates the travel speed and amperage are well-balanced.
Adjusting amperage in MIG welding is a multi-factorial process that directly influences the welding outcome.
What Common Mistakes Do Welders Make When Setting Amperage for MIG Welders?
Welders often make common mistakes when setting the amperage for MIG welders, leading to poor weld quality. Incorrect amperage can result in issues such as burn-through or weak welds.
- Using an inappropriate amperage range for the material thickness.
- Not adjusting amperage for varying cup sizes and wire types.
- Ignoring manufacturer’s recommendations for specific materials.
- Failing to compensate for travel speed and angle.
- Setting the amperage too low for required penetration.
- Overestimating the required amperage based on past experiences.
Understanding these mistakes is crucial for optimizing the welding process.
-
Using an inappropriate amperage range for the material thickness: This mistake occurs when the welder does not match the amperage to the thickness of the material being welded. For example, a thin sheet metal may require an amperage of 70-100 amps, whereas thicker materials may need 200 amps or more. According to the American Welding Society (AWS), correct amperage prevents issues such as burn-through or insufficient penetration.
-
Not adjusting amperage for varying cup sizes and wire types: Welders often overlook the need to adjust amperage based on the size of the welding cup and the type of wire used. A larger cup may require a higher amperage to ensure adequate heat transfer, while different wire types have distinct feeding characteristics that might affect the optimal settings.
-
Ignoring manufacturer’s recommendations for specific materials: Each welding machine and process comes with guidelines from the manufacturer. Failing to follow these guidelines might lead to ineffective welding. For instance, many MIG welder manufacturers suggest specific amperage settings for the various materials, including steel and aluminum, to achieve the best results.
-
Failing to compensate for travel speed and angle: When welders fail to account for their travel speed or angle of movement, they may set the amperage incorrectly. Faster travel speeds require more amperage to maintain heat, whereas a steeper angle can also affect how heat is applied to the base metal.
-
Setting the amperage too low for required penetration: Some welders mistakenly set the amperage too low, which can cause inadequate penetration. This results in weaker joints. Proper penetration is vital for the mechanical integrity of the weld.
-
Overestimating the required amperage based on past experiences: Experienced welders may rely on memories of past projects rather than evaluating each unique situation. Each weld differs in material type, thickness, and environmental conditions. Thus, overestimating amperage can lead to problems during the welding process, such as warping or excessive spatter.
How Can You Optimize Amperage for Different Welding Results?
To optimize amperage for different welding results, you must adjust the current based on material thickness, type of welding process, and desired weld characteristics. These factors influence the heat input, penetration, and bead shape in welding.
-
Material Thickness: Thicker materials require higher amperage to ensure proper penetration without undercutting. A general rule is to use 1 amp per 0.001 inch of material thickness, as noted by the American Welding Society (AWS, 2015). For example, for a 1/8 inch (0.125 inch) thick steel, you would set the welder to about 125 amps.
-
Type of Welding Process: Different welding processes, such as MIG, TIG, or Stick, have varying amperage requirements. MIG welding typically operates well at higher amps than TIG, which usually requires lower amperage for precision work without excessive heat, as explained by Miller Electric in their welding handbook (2020).
-
Desired Weld Characteristics: Amperage affects the appearance and strength of the weld. Higher amperage creates wider beads and deeper penetration. Conversely, lower amperage produces finer, shallower welds. A study by Khosrovi et al. (2021) highlights that a balance between travel speed and amperage optimizes weld quality and minimizes defects.
-
Electrode Diameter and Type: The size of the electrode also influences the necessary amperage. Thicker electrodes need more current. The Lincoln Electric Company recommends using specific amperage ranges per electrode size to maintain optimal performance during the welding process (2019).
-
Heat Management: Ensuring proper heat management by adjusting amperage helps prevent warping or burn-through, especially in thin materials. Controlling heat input effectively minimizes the risk of defects like cracking and porosity, as detailed in a review by The Welding Journal (Smith, 2018).
-
Material Type: Different materials, such as aluminum and stainless steel, demand specific amperage settings due to their varying thermal conductivities. For instance, aluminum generally requires a higher amperage for welding compared to carbon steel, as water-cooled systems often operate at higher settings.
By effectively managing these factors, welders can achieve optimal results and improve the quality of their work.
Related Post: