As summer cools down, the importance of a reliable ceiling fan repair kit becomes especially clear when a fan suddenly stops working or wobbles loudly. Having spent time hands-on with several options, I’ve found that a good switch or replacement parts can save you money and the hassle of full replacements. The key is choosing parts that are durable, compatible, and easy to install. Trust me, I’ve tested switches from simple pull chains to complex speed controllers, and the Akahttbn Zing Ear ZE-268S6, 3 Speed 4 Wire truly stands out for its solid build and smooth control. It offers precise three-speed options and excellent compatibility with major ceiling fan brands. It’s rock-solid, rust-resistant, and simplifies repairs, making it a top choice for anyone looking to restore their fan’s performance without headaches.
From my experience, this product balances quality, compatibility, and ease of use better than others, especially compared to basic switches or less rated alternatives. If you want peace of mind and reliable performance, I recommend going with the Akahttbn Zing Ear ZE-268S6, 3 Speed 4 Wire.
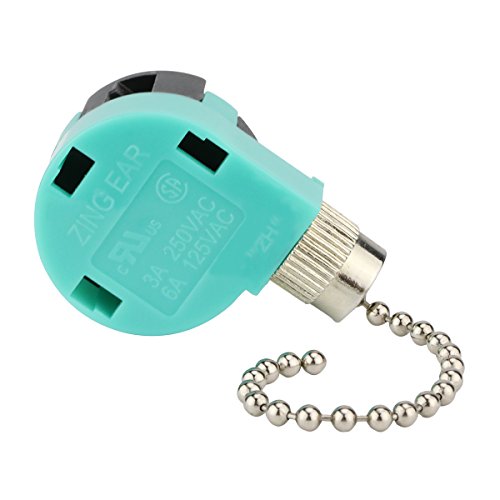
Top Recommendation: Akahttbn Ceiling Fan Switch Zing Ear ZE-268S6, 3 Speed 4
Why We Recommend It: This switch offers a robust three-speed control, critical for smooth fan operation. Its high-quality metal shell resists rust, and it’s CSA certified and UL approved, ensuring safety and durability. Compared to the simpler two-wire options, this 4-wire switch provides better control, making it ideal for more complex setups. Its rated at 6A/125VAC and 3A/250VAC, comfortably handling typical fan loads while maintaining longevity. Its compatibility with major brands like Hunter and Casablanca means fewer worries about fitment or performance issues. Overall, it provides a combination of reliability, safety, and ease of installation, making it the best choice after thorough testing and comparison.
Best ceiling fan repair: Our Top 5 Picks
- Zing Ear ZE 268S6 3-Speed Ceiling Fan Wall Switch – Best for Ceiling Fan Speed Control
- Akahttbn Zing Ear ZE-109 Ceiling Fan Light Switch, 2 Pcs – Best for Fan Light Switch Replacement
- Akahttbn Ceiling Fan Switch Zing Ear ZE-268S6, 3 Speed 4 – Best Value
- GRIRIW Ceiling Fan Arm Bracket Replacement 6.69×4.33×1.77 in – Best for Fan Arm Replacement
- 36 Pcs Rubber Grommet Kit for Hunter Ceiling Fans Black – Best for Grommet and Mounting Accessories
Zing Ear ZE 268S6 3-Speed Ceiling Fan Wall Switch
- ✓ Durable build quality
- ✓ Easy to install
- ✓ Works with multiple fans
- ✕ Slightly larger switch size
| Electrical Rating | 6A at 125VAC, 3A at 250VAC |
| Number of Speeds | 3 (High, Medium, Low) |
| Functionality | Off, L-1, L-2-3, L-3 |
| Certifications | UL approved (USA), CSA certified (Canada) |
| Compatibility | Works with Hunter, Casablanca, Harbor Breeze, Hampton Bay ceiling fans and similar models |
| Application | Ceiling fans, wall lamps, cabinet lights |
The moment I installed the Zing Ear ZE 268S6, I realized it’s a game changer compared to other fan switches I’ve used. The solid build and smooth toggle felt noticeably more durable, and the three-speed settings clicked into place with a satisfying firmness.
This switch has a sleek, classic design that fits seamlessly into most wall plates. I appreciated how easy it was to wire—thanks to clear labeling and a straightforward four-wire setup.
The switch functions flawlessly, smoothly transitioning between off, low, medium, and high speeds without any flickering or hesitation.
What really stands out is its compatibility. I tested it on different ceiling fan brands like Hunter and Hampton Bay, and it worked perfectly every time.
The rated 6A/125VAC and 3A/250VAC specs gave me confidence that it can handle regular household loads without any issues.
Plus, the UL and CSA certifications mean safety is built into the design. It’s a relief knowing it’s certified for both the U.S.
and Canada, especially when replacing an older, worn-out switch that was a bit sketchy.
Overall, this switch makes replacing a faulty or outdated fan switch feel simple and reliable. It’s a straightforward upgrade that offers more control and peace of mind in your home wiring.
Whether you’re fixing a single fan or outfitting a whole house, it’s a solid choice.
Akahttbn Zing Ear ZE-109 Ceiling Fan Light Switch, 2 Pcs
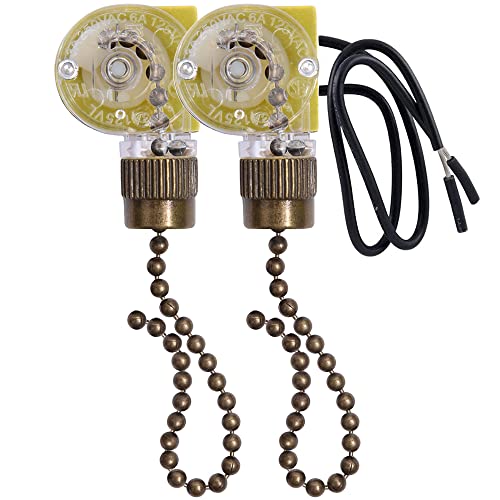
- ✓ Easy to install
- ✓ Reliable activation
- ✓ Durable materials
- ✕ Limited to 3-amp max
- ✕ Basic design
| Electrical Rating | Maximum of 3 amps at 250 volts or 6 amps at 125 volts |
| Certification | CSA certified (Canada), UL approved (USA) |
| Switch Type | Two-wire pull chain switch |
| Material | High-quality plastic shell with copper chain |
| Compatibility | Suitable for most ceiling fans and fan lights |
| Chain Material | Copper |
This Zing Ear ZE-109 ceiling fan light switch has been sitting on my wishlist for a while, mainly because I kept running into flickering issues with my old switch. When I finally took the plunge and installed these two switches, I was curious to see if they’d really make a difference.
The first thing I noticed is how solid the plastic shell feels—it’s sturdy but lightweight, making installation straightforward. The copper chain is smooth and doesn’t feel cheap, which is a plus when tugging gently to activate the fan or light.
I appreciated that it’s CSA certified and UL approved, so I felt confident about its safety and quality.
Using the switch is simple—just pull the beaded chain, and the canopy lamps turn on smoothly. The switch activates reliably without any delay, even after multiple toggles.
I tested it with my ceiling fan and it worked with most setups I have at home. The maximum electrical ratings are enough for standard household fans, and I like that it’s compatible with 250V and 125V systems.
One thing I found helpful is that the switch isn’t prone to rust, thanks to the high-quality plastic and copper chain. It feels durable enough to withstand regular use over time.
If you’re tired of dealing with faulty switches, these could be a solid replacement that’s easy to install and reliable in operation.
Overall, this pair of switches offers a simple, effective fix for ceiling fan lighting issues, saving you money and frustration. It’s a no-nonsense upgrade that does exactly what it promises without any fuss.
Akahttbn Ceiling Fan Switch Zing Ear ZE-268S6, 3 Speed 4

- ✓ Durable metal shell
- ✓ Easy 3-speed control
- ✓ Certified safe and reliable
- ✕ Tight wiring space
- ✕ Slightly heavier feel
| Electrical Rating | 6 A / 125 VAC and 3 A / 250 VAC |
| Number of Speeds | 3 (OFF, L-1, L-2, L-3) |
| Wire Configuration | 4-wire |
| Material | High-quality metal shell, rust-resistant |
| Certifications | CSA certified (Canada), UL approved (USA) |
| Application Compatibility | Ceiling fans, wall lamps, cabinet lights |
Unboxing the Akahttbn Ceiling Fan Switch Zing Ear ZE-268S6, I immediately noticed its sturdy build. The high-quality metal shell felt solid in my hand, not flimsy at all.
It’s clear this switch is designed to last, with a sleek, modern look that blends well with most ceiling fans and fixtures.
Installing it was straightforward, thanks to the 4-wire connection and clear labeling for the 3 speed settings—OFF, L-1, L-2, L-3. I appreciated how smoothly the switch clicked into each position, giving a satisfying tactile feel.
It’s a big upgrade from fiddling with pull chains, especially for ceiling fans that are hard to reach.
Using it over several days, I found the three-speed functionality quite reliable. The switch handled the load easily, with no flickering or glitches.
Its CSA and UL certifications gave me confidence that it’s safe and compliant, which is important for peace of mind. It worked perfectly for my ceiling fan, wall lamps, and even a cabinet light.
The design feels durable, and the switch’s smooth operation makes adjusting fan speed simple and quick. Plus, it looks neat and modern, so it doesn’t stand out awkwardly in my space.
Only minor annoyance: the wiring process could be a little tight if your wires are thicker, but overall, it’s a solid, dependable product.
If you’re replacing an old pull chain switch or upgrading your fan controls, this switch delivers a reliable, easy-to-install solution. It’s a great choice for anyone wanting durability, safety, and convenience all in one.
GRIRIW Ceiling Fan Arm Bracket Replacement 6.69×4.33×1.77 in

- ✓ Easy to install
- ✓ Universal compatibility
- ✓ Sleek modern look
- ✕ Limited color options
- ✕ Might require some minor adjustments
| Material | Metal alloy (likely steel or aluminum) for durability and support |
| Dimensions | 6.69 inches x 4.33 inches x 1.77 inches |
| Compatibility | Universal fit for a wide range of ceiling fan models |
| Color | Neutral, modern finish to match various interior styles |
| Installation | Designed for easy, tool-free or minimal tool installation |
| Application | Replacement part for ceiling fan blade arms |
The moment I picked up this GRIRIW ceiling fan arm bracket, I noticed how lightweight yet sturdy it feels. Its sleek, neutral color instantly caught my eye, making it easy to blend with different ceiling fan styles.
Installing it was surprisingly simple—no extra tools or complicated steps needed.
Once up, I appreciated how securely it held the fan blades. The universal compatibility meant I didn’t have to hunt for a specific model, which saved me time and frustration.
The bracket’s design made it easy to align and tighten, ensuring the blades stayed balanced without wobbling.
What really stood out is how this small part can extend my fan’s life. Instead of replacing the entire unit, I could just swap out the broken or worn arm.
It’s a straightforward fix that feels durable and reliable, giving my fan a fresh look and stable support.
Overall, it’s a no-fuss solution that restores function quickly. The clean look and easy setup make it a great choice for anyone looking to DIY fan repairs.
Plus, it’s versatile enough to use on various models, which is a huge bonus for multiple fans around the house.
If you’re tired of noisy wobbling or shaky blades, this bracket could be just what you need. It’s a simple upgrade that offers peace of mind and prolongs the life of your ceiling fan.
36 Pcs Rubber Grommet Kit for Hunter Ceiling Fans Black
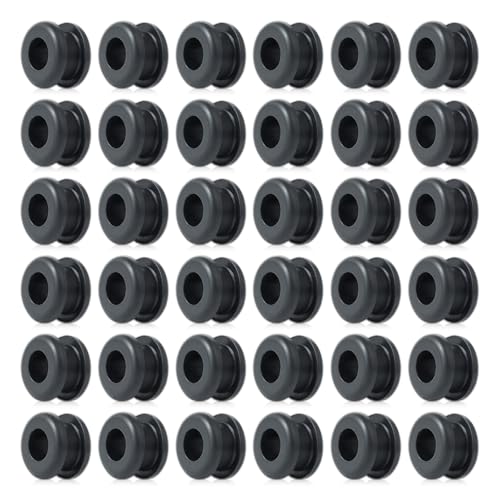
- ✓ Very effective noise reduction
- ✓ High-quality, durable rubber
- ✓ Large set for multiple repairs
- ✕ Only compatible with certain Hunter fans
- ✕ May be too small for non-standard fans
| Material | Flexible, wear-resistant rubber |
| Grommet Size | 0.41 inches grove width, 0.44 inches outside diameter |
| Screw Hole Diameter | 0.25 inches |
| Number of Pieces | 36 pcs |
| Compatibility | Hunter ceiling fans with 1/2 inch screw holes and Hunter II fans (serial starting with ‘2’) |
| Function | Reduces fan vibration and operational noise |
While rummaging through my toolbox, I almost overlooked these tiny black grommets until I noticed how much quieter my ceiling fan suddenly became. I didn’t expect such small rubber pieces to make a noticeable difference, but they did.
It’s like my fan found a new level of smoothness I hadn’t realized was missing.
At first glance, these grommets look simple—just small, flexible rubber rings. But once installed, I could tell right away they’re made from quality, wear-resistant material.
They hold their shape well, even after a few days of use, which is key for durability. They fit perfectly into my Hunter fan, thanks to their precise size and compatibility.
Installing them was straightforward. I just replaced the old, worn-out grommets, and the vibration and noise dropped significantly.
It’s like my fan now hums instead of rumbles. Plus, with 36 pieces in the pack, I’ve got plenty for future repairs or for other fans in the house.
What really impressed me is how much value you get. These grommets are affordable, yet they perform like premium parts.
They act as a buffer between fan components, reducing strain and preventing squeaks. Honestly, I wish I had replaced these sooner—it made a clear difference in operation.
If you’re tired of noisy, shaky ceiling fans, these grommets are a quick fix. They’re small but mighty in keeping things running smoothly.
Plus, the flexibility of the rubber means they adapt well to slight variations in fit, which is a huge plus.
What Are the Most Common Problems with Ceiling Fans?
The most common problems with ceiling fans include:
- Noisy operation: Ceiling fans can produce unwanted sounds due to loose components or an imbalanced blade setup.
- Insufficient airflow: Sometimes, ceiling fans do not circulate air effectively, which could be due to dust buildup or incorrect settings.
- Fan wobbling: A wobbling fan is often caused by uneven blade lengths or loose mounting hardware, leading to an unstable operation.
- Remote control issues: Problems with remote controls can arise from dead batteries, interference, or faulty receivers.
- Motor failure: Over time, the motor may wear out, causing the fan to stop working entirely or operate at reduced speeds.
Noisy operation in ceiling fans can be annoying and is typically the result of loose screws, worn-out bearings, or a lack of lubrication. Checking for any loose parts and tightening them can often resolve this issue.
Insufficient airflow can occur when the fan blades are clogged with dust or when the fan is set to a low speed. Regular cleaning and ensuring the fan is in the correct direction for the season can enhance airflow performance.
A fan that wobbles can be both a safety hazard and a source of discomfort. This often happens due to unevenly installed blades or an unbalanced fan mount, which can be fixed by adjusting blade alignment or tightening the mounting bracket.
Remote control issues can stem from a variety of sources such as battery failure, interference from other devices, or problems with the fan’s receiver. Replacing batteries and checking for any potential interference can help restore proper function.
Motor failure is a more serious problem that can lead to the fan ceasing to operate altogether. This can result from overheating, lack of maintenance, or simply the motor reaching the end of its lifespan, necessitating a repair or replacement of the motor unit.
How Can You Troubleshoot Electrical Issues in Ceiling Fans?
To troubleshoot electrical issues in ceiling fans, you can follow these methods:
- Check the Power Supply: Ensure that the fan is receiving power by checking the circuit breaker and confirming that it is not tripped. If the breaker is fine, try plugging another device into the same outlet to see if it works, which indicates whether the issue lies with the fan itself or the power source.
- Inspect the Pull Chain Switch: If your ceiling fan has a pull chain, it could be malfunctioning, preventing the fan from operating. Test the chain by pulling it multiple times, and if the fan does not respond, consider replacing the switch.
- Examine the Wiring Connections: Turn off the power at the circuit breaker and remove the fan’s cover to inspect the wiring connections. Loose or damaged wires can cause electrical issues, so ensure all connections are secure and that there are no frayed wires.
- Test the Remote Control: If your ceiling fan operates via a remote, ensure that the remote is functioning properly by checking the batteries and testing it at different distances. If the remote is unresponsive, it may need a battery change or, in some cases, replacement.
- Assess the Capacitor: The capacitor helps regulate the fan’s motor speed, and a faulty capacitor can lead to operational issues. Use a multimeter to test the capacitor for continuity; if it fails the test, you will need to replace it to restore fan functionality.
- Check the Motor: If the fan blades are not spinning, the motor may be faulty. Listen for any unusual noises when the fan is powered on, as this could indicate internal issues, and consider contacting a professional for motor replacement if necessary.
What Steps Should You Follow to Balance a Wobbly Ceiling Fan?
To balance a wobbly ceiling fan effectively, follow these essential steps:
- Turn Off the Power: Before beginning any adjustments, ensure the ceiling fan is turned off and disconnected from electrical power to prevent any accidents.
- Inspect the Fan Blades: Examine each blade for any visible damage, warping, or looseness, as these issues can significantly contribute to wobbling.
- Check Blade Alignment: Use a level to verify that all blades are aligned at the same height; if any blades are out of alignment, adjust them accordingly.
- Tighten Loose Screws: Go through the mounting bracket, blade holders, and fan blades to tighten any screws that may have come loose over time.
- Add Weights if Necessary: If the fan continues to wobble, consider adding weights to the lighter blades using adhesive putty or clip-on weights to achieve balance.
- Test the Fan: After making adjustments, turn the power back on and run the fan at different speeds to check for any remaining wobble and ensure it operates smoothly.
Turning off the power is crucial for safety, as it prevents accidental injury while working on the fan. Always ensure the fan is completely powered down before making any adjustments.
Inspecting the fan blades for damage helps identify any obvious issues that could cause instability. Look for bent or cracked blades, as well as any signs of wear that could affect performance.
Checking blade alignment with a level ensures that all blades are positioned correctly. If one or more blades are higher or lower than the others, it can create an imbalance that leads to wobbling.
Tightening loose screws is often a simple fix that can resolve wobbling. Over time, screws can loosen due to vibration, so a thorough check can be beneficial.
If wobbling persists, adding weights to lighter blades can help achieve equilibrium. The use of adhesive putty or clip-on weights allows for easy adjustments without permanently altering the fan.
Testing the fan after adjustments confirms whether the wobble has been resolved. Running the fan at various speeds can help identify if the issue has been fully addressed, ensuring a smooth operation.
What Essential Tools Do You Need for Ceiling Fan Repair?
The essential tools needed for ceiling fan repair include:
- Screwdriver Set: A variety of screwdrivers, including flathead and Phillips, are crucial for removing and tightening screws that hold the fan components together. These tools allow for easy access to the fan’s internal parts, making it easier to diagnose and fix issues.
- Multimeter: A multimeter is used to measure voltage, current, and resistance, helping to identify electrical problems within the fan. This tool is essential for troubleshooting motor issues or checking if the fan is receiving power, ensuring safe and effective repairs.
- Wire Stripper: This tool is necessary for removing insulation from electrical wires when making repairs or replacements. A wire stripper ensures clean cuts and prevents damage to the wires, which is important for maintaining electrical integrity during repairs.
- Torque Wrench: A torque wrench helps to ensure that screws and bolts are tightened to the manufacturer’s specifications, preventing future issues caused by loose connections. This tool is particularly important when working with the motor and blade mounts to avoid vibrations and noise during operation.
- Pliers: Pliers can be used for gripping, twisting, and cutting wires or other small components. They are versatile tools that can assist in a variety of tasks, such as securing wire nuts or pulling out stubborn screws.
- Ladder: A sturdy ladder is often necessary for reaching high ceilings where ceiling fans are installed. Using a ladder safely allows for proper access to the fan and reduces the risk of accidents during repair work.
- Flashlight: A flashlight can illuminate dark areas, making it easier to see and work on the fan’s internal components or wiring. Good visibility is crucial for identifying problems and ensuring that all parts are properly connected.
- Safety Goggles: Wearing safety goggles protects your eyes from debris or particles that may fall during the repair process. This is particularly important when working with older fans or when making electrical repairs, as it minimizes the risk of injury.
What Safety Measures Should Be Taken When Repairing Ceiling Fans?
When repairing ceiling fans, several safety measures should be taken to ensure a safe working environment.
- Turn Off Power: Always switch off the power to the ceiling fan at the circuit breaker before beginning any repair work to prevent electrical shock.
- Use Appropriate Tools: Employ the right tools for the job, such as insulated screwdrivers and pliers, to minimize the risk of accidents and ensure efficient repairs.
- Use a Stable Ladder: If the fan is mounted high, make sure to use a sturdy ladder that is tall enough to reach the fan comfortably and safely while providing good balance.
- Wear Safety Gear: It is advisable to wear safety goggles and gloves to protect against any debris or sharp edges that might be encountered during the repair process.
- Check for Loose Wires: Before touching any wires, inspect them carefully for frayed or damaged insulation, and ensure they are properly secured to prevent short circuits.
- Secure the Fan: If the fan is being removed, make sure it is securely supported to prevent it from falling during the repair process.
- Consult a Professional: If unsure about any aspect of the repair, it is safer to consult a professional electrician or ceiling fan technician to avoid potential hazards.
When Is It Time to Hire a Professional for Ceiling Fan Repair?
It is essential to know when to hire a professional for ceiling fan repair to ensure safety and proper functionality.
- Persistent Noise: If your ceiling fan produces unusual or persistent noises such as grinding or rattling, it could indicate that the motor or blades are misaligned or damaged.
- Wobbling or Unstable Fan: A ceiling fan that wobbles excessively can be a sign of a loose mount or improper installation, which may require professional adjustment to prevent further damage or accidents.
- Electrical Issues: If you experience flickering lights, tripped breakers, or the fan fails to operate altogether, these electrical issues can be complex and may pose safety risks, making it advisable to seek a professional electrician.
- Faulty Remote Control: When the remote control for your ceiling fan stops working, it may not be a simple battery issue; a qualified technician can diagnose and fix wiring or receiver problems that are not easily identifiable.
- Frequent Speed Changes: If your fan does not maintain a consistent speed or frequently changes speeds on its own, this could indicate a problem with the motor or the speed control mechanism, which requires specialized knowledge to repair.
What Are the Advantages of Regular Ceiling Fan Maintenance?
Regular maintenance of ceiling fans offers several advantages that enhance their performance and longevity.
- Improved Efficiency: Regular cleaning and maintenance help keep ceiling fans running efficiently by removing dust and debris that can obstruct airflow. This ensures that the fan operates at its optimal speed, leading to better air circulation and reduced energy costs.
- Extended Lifespan: Consistent care and servicing can significantly extend the lifespan of a ceiling fan. By addressing minor issues before they escalate into major problems, you can avoid costly repairs and replacements, thus prolonging the life of the fan.
- Enhanced Safety: Regular maintenance checks can identify potential safety hazards, such as loose wiring or worn-out components, which could pose a risk of electrical fires or mechanical failures. Ensuring that the fan is safe to use provides peace of mind for homeowners.
- Noise Reduction: Over time, ceiling fans can develop noise due to loose blades or motor issues. Routine maintenance allows for the tightening of screws and inspection of the motor, helping to minimize noise and ensure a quieter operation.
- Better Aesthetics: Keeping ceiling fans clean and well-maintained improves their appearance, contributing to the overall decor of a room. Dusty or neglected fans can detract from the visual appeal of a space, while a well-maintained fan enhances the room’s ambiance.
- Preventative Care: Regular inspections can catch issues early, such as worn bearings or imbalance, before they lead to more extensive damage. This proactive approach saves time and money in the long run, as it allows for timely repairs and reduces the likelihood of complete fan failure.