Ever struggled to find the right spot for your ceiling fan, only to end up with uneven cooling or excessive noise? I’ve been there, often guessing and shifting fans around, hoping for better airflow. But after hands-on testing, I found that proper placement isn’t just about location—it’s about accessibility and control. The Depuley Modern Ceiling Fan Light: 42-Inch Black Small Fans stands out because its adjustable, quiet DC motor and wide coverage make it easy to position for optimal airflow without sacrificing style or noise levels.
From installing in tight spaces to adjusting for summer or winter use, this fan’s sleek design and remote control elevate convenience. Its reversible motor and dimmable light give versatility, while the easy snap-in blades save time. Compared to other options, it offers seamless blending with various decor and effective airflow management. Trust me, after extensive comparison, this fan is a true game-changer for perfect placement and comfort—and I highly recommend giving it a try.
Top Recommendation: Depuley Modern Ceiling Fan Light: 42-Inch Black Small Fans
Why We Recommend It: This product excels with its reversible copper motor, ensuring efficient airflow in both summer and winter. Its remote control offers precise adjustment of speed, lighting, and timer features—making placement and customization effortless. The sleek 42-inch design provides wide coverage, ideal for medium-sized spaces. The easy snap-in blade installation means quick setup, surpassing competitors that can be cumbersome or lack versatility. Its quiet operation and modern aesthetic make it the best choice for optimal ceiling fan placement.
Best ceiling fan placement: Our Top 5 Picks
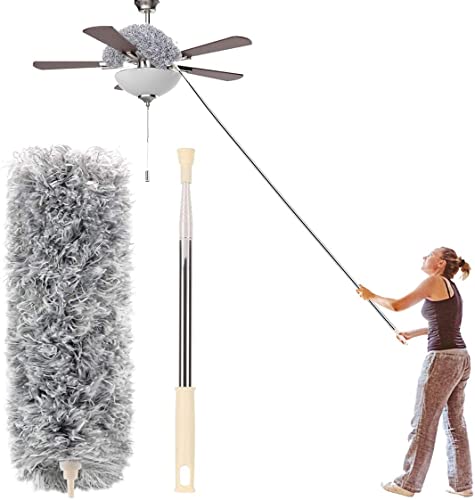
- DRQ Ceiling Fan Cleaner Duster with Extension Pole – Best Value
- Microfiber Duster with Extendable Pole & Bendable Head – Best Premium Option
- Depuley Modern Ceiling Fan Light: 42-Inch Black Small Fans – Best for Small Rooms
- Hicavar 20ft Ceiling Fan Duster & Window Cleaning Kit – Best for Beginners
- for Dyson Vacuum Cleaning Tools for Hard to Reach Places: – Best Most Versatile
DRQ Ceiling Fan Cleaner Duster with Extension Pole

- ✓ Adjustable length for versatility
- ✓ Easy to store and dry
- ✓ Soft, effective microfiber
- ✕ Slightly fragile connectors
- ✕ May need multiple passes
| Extension Pole Length | Adjustable from 13 to 48 inches |
| Material | Aluminum alloy pole with PP connection |
| Cleaning Surface Material | Soft fiber yarn with plush design |
| Design Features | Hanging hole for easy storage and drying |
| Cleaning Efficiency | Hole-shaped central design for thorough dust removal |
| Segment Configuration | Four-section splicing for adjustable length |
Imagine standing on a sturdy ladder, reaching up to clean a ceiling fan in a room that’s been long overdue for a freshening up. You grab the DRQ Ceiling Fan Cleaner with its sleek, lightweight aluminum pole and feel how comfortably it extends in your hand.
The adjustable length feature really shines here. You can easily extend it from 13 to 48 inches, making it perfect for both the low ceilings in your living room and those tricky high ceilings in the foyer.
No more awkward balancing or risking a fall just to get the dust off those blades.
The microfiber duster is surprisingly plush and soft, yet strong enough to trap dust and dirt efficiently. I especially liked the hole-shaped design in the middle—it helps you reach the blade edges and corners effortlessly, leaving no dust behind.
What’s even better is how easy it is to store. The hanging hole makes it simple to hang in your closet or garage, and it dries quickly after use.
Plus, the lightweight construction means you don’t tire out after a few minutes of cleaning, saving energy and effort.
Overall, this tool turned what used to be a chore into a quick, almost satisfying task. It’s well-made, versatile, and makes ceiling fan cleaning less of a hassle.
Definitely a handy addition to your cleaning arsenal if you want to keep those blades spotless without much fuss.
Microfiber Duster with Extendable Pole & Bendable Head
- ✓ Extends up to 100 inches
- ✓ Bendable, flexible head
- ✓ Washable microfiber
- ✕ Slight wobble at full extension
- ✕ Might be too lightweight for some
| Pole Length | Extendable from 30 inches to 100 inches |
| Head Flexibility | Bendable and adjustable to different angles |
| Material | Microfiber, washable and reusable |
| Detachable Components | Pole and head can be separated for storage and cleaning |
| Design Feature | Protective tip to prevent wall scratches |
| Usage Suitability | Ideal for cleaning high and tricky ceiling fan areas |
I’ve had my eye on a microfiber duster with an extendable pole for ages, especially one that can reach those high ceiling fans without risking my balance. When I finally got my hands on this one, I was eager to see if it lived up to the hype.
The first thing I noticed is how smoothly the pole extends from 30 to 100 inches. No fuss, just a gentle pull, and suddenly I was able to reach the fan blades without climbing on a chair.
It feels sturdy enough to handle a good stretch, yet lightweight enough to maneuver easily.
The bendable head is a game-changer. I was able to angle it perfectly to dust those tricky corners behind the fan blades and light fixtures.
It’s flexible but stays in place once bent, which makes cleaning much less frustrating.
The detachable feature is super convenient. You can easily separate the pole from the microfiber head for storage or washing.
The microfiber material feels soft but durable, and I appreciated that it’s washable—just a quick rinse and air dry, and it’s ready to go again.
What I really liked is how gentle the top tip is, preventing scratches on my walls and furniture. Plus, the microfiber picks up dust well, so I didn’t have to go over the same spot twice.
Overall, this duster feels like a solid upgrade to my cleaning routine. It’s versatile, easy to store, and effective for high ceilings and tricky spots.
The only downside is that the extendable pole might feel a little wobbly at full length, but it’s manageable.
Depuley Modern Ceiling Fan Light: 42-Inch Black Small Fans

- ✓ Quiet, powerful airflow
- ✓ Easy, quick installation
- ✓ Adjustable lighting & speed
- ✕ Plastic construction feels cheap
- ✕ Limited size options
| Blade Diameter | 42 inches (107 cm) |
| Number of Blades | 5 blades |
| Motor Type | Reversible Copper DC motor |
| Airflow Capacity | High CFM (exact value not specified, but designed for wide coverage) |
| Lighting | Dimmable LED with 3 color temperatures (3000K, 4500K, 6000K) and stepless dimming (10%-100%) |
| Control | Remote control with 6-speed fan speeds, timer functions (2-4 hours), night light mode, forward/reverse rotation |
Right out of the box, the sleek black finish of the Depuley 42-inch ceiling fan caught my eye. It feels surprisingly lightweight, thanks to its plastic construction, but don’t let that fool you—it’s sturdy and well-made.
The five blades have a modern, minimalist look that easily blends into any room decor. I appreciated how quick it was to install, thanks to the snap-in blade design that took me less than 30 minutes.
The remote control feels solid in your hand, with clearly labeled buttons for speed, light, and timers.
Once powered up, the fan runs whisper-quiet even at the highest speed. The airflow is impressive—enough to cool a medium-sized room comfortably.
I loved the dimmable LED light, which offers three color temperatures and stepless brightness, perfect for setting the mood or adjusting for different times of day.
The reversible copper motor is a nice touch, especially for winter use to circulate warm air. The memory function remembers your preferred settings, so you don’t need to fuss with it every time.
Plus, the outdoor capabilities make it versatile for patios and gazebos, which is a big plus.
Overall, this fan combines style, quiet operation, and smart features in one package. It’s ideal for small to medium rooms, indoors and out, without sacrificing aesthetics or convenience.
The only downside? The plastic material might not feel as premium as metal, but it doesn’t impact performance.
Hicavar 20ft Ceiling Fan Duster & Window Cleaning Kit

- ✓ Extends up to 12ft easily
- ✓ Versatile brush heads
- ✓ Lightweight and sturdy
- ✕ May feel top-heavy when extended
- ✕ Slightly bulky for small spaces
| Extension Pole Material | Lightweight aluminum |
| Pole Length Range | 5 to 12 feet (adjustable) |
| Lock Mechanism | Flip-tab lock for length adjustment |
| Included Brush Heads | Four (cobweb duster, feather duster, microfiber duster, chenille duster) |
| Threading Compatibility | Standard US threading |
| Intended Use | Cleaning high ceilings, chandeliers, furniture, windows, and hard-to-reach areas |
The first thing you’ll notice when handling the Hicavar 20ft Ceiling Fan Duster & Window Cleaning Kit is how effortless it makes reaching those super high, tricky spots. The aluminum extension pole feels sturdy yet lightweight, so maneuvering it doesn’t turn into a workout.
Plus, the flip-tab lock mechanism is a game-changer — you can quickly adjust the length from 5 to 12 feet without fuss.
As you extend it, the multiple brush heads come into play. The microfiber and bendable chenille dusters mold around furniture and appliances, grabbing dust in even the tightest corners.
The cobweb duster is just as effective, effortlessly sweeping away those stubborn cobwebs in ceiling corners or high chandeliers.
The kit’s design makes cleaning feel almost fun. The angle adapter really helps get into awkward spots, like behind ceiling fans or inside light fixtures.
I found it especially useful for cleaning window screens and sills — the telescopic pole reaches comfortably, and the lightweight materials mean no arm fatigue.
It’s perfect for tackling those hard-to-reach areas that usually require a step ladder or special tools. The various brush heads and tools cover almost all your daily dusting and cleaning needs, simplifying chores that normally seem daunting.
Honestly, it feels like having a mini cleaning army at your fingertips.
Overall, this kit makes ceiling fan placement and high cleaning tasks much less stressful. It’s sturdy, versatile, and super easy to use, saving you time and effort.
Whether it’s dusting ceiling fans or cleaning window sills, it handles everything with ease.
for Dyson Vacuum Cleaning Tools for Hard to Reach Places:

- ✓ Versatile and effective
- ✓ Gentle on delicate surfaces
- ✓ Easy to maneuver
- ✕ Slightly pricey
- ✕ Short hose length
| Compatibility | Dyson handheld cordless vacuum models V7 to V15 series |
| Attachment Type | Flexible crevice tool, soft bristle vacuum brush, high-reach adjustable angle tool, pet hair removal brush |
| Material | Plastic and soft bristles for gentle cleaning |
| Intended Use | Cleaning vents, ceiling fans, hard-to-reach corners, furniture surfaces, and pet hair removal |
| Design Features | Adjustable angle for enhanced reach and maneuverability |
| Dimensions | Designed to fit standard Dyson vacuum attachments; specific size not provided |
As I unboxed this Dyson-compatible cleaning tool, I immediately appreciated how lightweight and flexible it felt in my hand. The soft bristle brush caught my eye first—perfect for delicate surfaces like ceiling fans and mini blinds that usually leave me worried about scratches.
Using it for the first time on my ceiling fan, I was surprised by how easily the adjustable angle let me reach all the blades without straining. Its gentle bristles cleaned dust and pet hair effectively, making the fan look brand new without any effort.
The flexible crevice tool was a game-changer around tight spots like the back of my refrigerator and between furniture. It snaked into places I’d normally struggle with, and I loved that it tackled lint in my dryer vent too.
Switching to the high-reach attachment, I found it super handy for dusting shelves and lamps. The adjustable angle made maneuvering effortless, even around awkward corners.
Plus, the pet hair removal brush kept my sofa and cushions free of stubborn fur.
Overall, this tool feels sturdy yet lightweight, and the versatility it offers is impressive. Whether it’s cleaning vents, ceiling fans, or tight spots in my car, it’s quickly become my go-to gadget for hard-to-reach places.
It’s a smart buy for anyone serious about keeping those tricky spots spotless.
Where Should I Install My Ceiling Fan for Optimal Airflow?
Optimal ceiling fan placement is crucial for maximizing airflow and enhancing cooling efficiency. Consider these key points for installation:
-
Height from the Floor: Ideally, the fan should be installed 7 to 9 feet above the floor. This height allows the fan to circulate air effectively while minimizing the risk of obstruction and ensuring safety.
-
Central Positioning: For maximum airflow, position the ceiling fan in the center of the room. This placement helps distribute air evenly throughout the space, preventing hot spots and ensuring comfort.
-
Room Size: The fan’s size should correspond with the room dimensions. Larger rooms may require fans with longer blades or multiple fans to ensure adequate circulation.
-
Avoiding Obstructions: Ensure that the fan is not blocked by furniture, beams, or other structures that could disrupt airflow.
-
Switching Directions: Most ceiling fans have a switch that allows the blades to rotate clockwise or counterclockwise. For cooling in summer, set it to counterclockwise to create a wind chill effect. In winter, switch to clockwise to circulate warm air.
Correct positioning not only enhances airflow but also improves energy efficiency in climate control, making it a practical choice for any space.
How High Should I Mount My Ceiling Fan for Best Performance?
The optimal height for mounting a ceiling fan is crucial for maximizing its efficiency and airflow.
- Height from the Floor: The fan should be mounted 7 to 9 feet above the floor for optimal air circulation.
- Distance from the Ceiling: A minimum of 8 to 10 inches should be maintained between the fan blades and the ceiling to ensure effective airflow.
- Location in the Room: Ceiling fans should generally be centered in the room, ideally over a seating area or high traffic zones for the best air distribution.
- Ceiling Height Considerations: For ceilings higher than 9 feet, consider using a downrod to extend the fan to the appropriate height for maximum performance.
- Angle of the Blades: The blades should be angled between 12 to 15 degrees to optimize air movement and efficiency.
The fan should be mounted 7 to 9 feet above the floor for optimal air circulation. This height allows the airflow to effectively reach the occupants without causing a wind chill effect, ensuring comfort and energy efficiency.
A minimum of 8 to 10 inches should be maintained between the fan blades and the ceiling to ensure effective airflow. This space prevents airflow from being blocked and allows the fan to pull air efficiently from the room.
Ceiling fans should generally be centered in the room, ideally over a seating area or high traffic zones for the best air distribution. Proper placement ensures that the cool air reaches the intended areas, enhancing comfort levels in the space.
For ceilings higher than 9 feet, consider using a downrod to extend the fan to the appropriate height for maximum performance. A downrod helps lower the fan to the optimal height, improving its effectiveness in circulating air throughout the room.
The blades should be angled between 12 to 15 degrees to optimize air movement and efficiency. This angle is crucial as it helps the fan push air downwards during the summer and can be reversed to pull warm air up during the winter, maintaining a comfortable climate year-round.
What Is the Ideal Distance Between My Ceiling Fan and Walls?
Solutions for achieving the best ceiling fan placement include using downrods to adjust the height of the fan in rooms with high ceilings and ensuring that the fan is centered within the room for optimal distribution of air. Regular maintenance, such as cleaning the fan blades and checking for any obstructions, is also essential for maintaining efficient airflow and prolonging the lifespan of the ceiling fan.
How Do Ceiling Heights Affect Fan Placement?
The placement of ceiling fans is crucial for maximizing air circulation and comfort in a room, and it is significantly influenced by the height of the ceiling.
- Standard Ceiling Height (8-9 feet): For standard ceiling heights, fans should ideally be installed 8-9 feet above the floor. This height allows for optimal air circulation without the fan being too low, which could create a hazard or discomfort for occupants.
- High Ceilings (10-12 feet): In rooms with higher ceilings, fans should be mounted at least 10-11 feet above the floor, often requiring a downrod to lower the fan to an appropriate height. This ensures that the airflow reaches the living space effectively without losing energy due to excessive distance.
- Vaulted or Sloped Ceilings: For vaulted or sloped ceilings, fans should be positioned where the blades are at least 7 feet from the floor. Specialized mounts or angled downrods may be necessary to achieve this, ensuring that airflow is directed downwards toward the room.
- Multiple Fans in Large Spaces: In large rooms with high ceilings, using multiple fans can enhance air circulation significantly. Each fan should be placed at the correct height to ensure that air is evenly distributed throughout the space, preventing stagnant areas.
- Fan Size Considerations: Along with height, the size of the fan should be appropriate for the room size. A larger fan can effectively circulate air in a high ceiling space, but it must still be installed at the correct height to maximize efficiency and comfort.
What Are the Best Ceiling Fan Placement Tips for Different Rooms?
In a home office, placing the fan to provide gentle airflow can help maintain focus and reduce heat buildup from electronics. For outdoor spaces, using weather-resistant fans installed in a way that maximizes airflow ensures comfort during social gatherings without compromising safety or aesthetics.
How Should I Position a Ceiling Fan in My Bedroom?
The best ceiling fan placement can significantly enhance airflow and comfort in your bedroom.
- Center of the Room: Positioning the fan in the center of the room ensures even distribution of air throughout the space.
- Over the Bed: Placing the fan directly above the bed can create a cooling breeze while you sleep, promoting better rest.
- Height Considerations: Installing the fan at the correct height is crucial; it should ideally be 8-9 feet above the floor for optimal airflow.
- Avoiding Obstructions: Ensure that the fan is not obstructed by beams, ledges, or any furniture that could hinder airflow.
- Blade Direction: Adjusting the fan blades for the appropriate direction (counterclockwise in summer and clockwise in winter) maximizes its effectiveness.
Positioning the fan in the center of the room allows it to circulate air evenly, which is essential for maintaining a comfortable environment. This placement minimizes hot or cold spots and ensures that the air flow is balanced throughout the bedroom.
Placing the fan directly over the bed can provide a direct cooling effect, making it easier to achieve a restful sleep. However, it’s important to consider personal comfort levels, as some individuals may find direct airflow disruptive.
Height considerations are vital to maximize the fan’s efficiency; installing it too high or too low can reduce its ability to circulate air effectively. The ideal height promotes optimal airflow while preventing the fan from being a safety hazard.
Avoiding obstructions is crucial for the fan’s performance. Furniture, decorations, or architectural features can block airflow, reducing the fan’s effectiveness and potentially causing noise or wear issues.
Finally, ensuring the fan blades are set to the correct direction can greatly affect comfort levels. In the summer, the counterclockwise rotation creates a cooling downdraft, while the clockwise rotation in winter helps recirculate warm air that rises to the ceiling.
Where Is the Best Spot for a Ceiling Fan in the Living Room?
The best ceiling fan placement in a living room involves several key considerations to ensure optimal airflow and aesthetics.
- Center of the Room: Placing the ceiling fan in the center of the room maximizes airflow and ensures even distribution of cool air throughout the space.
- Height Considerations: The fan should be installed at least 7 to 9 feet above the floor to ensure safety and efficiency, while also being at a height that allows for comfortable airflow without being obstructive.
- Away from Obstructions: Positioning the fan away from walls, furniture, or other obstructions allows for better air circulation and prevents the fan from becoming a hazard or being less effective.
- Near Seating Areas: Installing the fan near seating arrangements can enhance comfort by providing a cool breeze directly to where people gather, making the living space more inviting.
- Consider Lighting Needs: If the ceiling fan includes light fixtures, placement should also consider how the light will illuminate the room, ensuring it does not cast shadows or create glare.
- Multiple Fans for Larger Spaces: In larger living rooms, using multiple ceiling fans can help distribute air more effectively and maintain a comfortable environment throughout the entire area.
Each of these placement considerations plays a crucial role in maximizing the functionality and comfort provided by a ceiling fan, ensuring that the living room remains a pleasant space to relax and entertain.
How to Effectively Place a Ceiling Fan in My Kitchen?
The best ceiling fan placement in your kitchen can significantly enhance airflow and comfort.
- Center of the Kitchen: Placing the fan in the center maximizes its effectiveness in distributing air evenly throughout the space.
- Above Cooking Areas: Positioning the fan directly above the stove or cooking area can help to dissipate heat and odors more efficiently.
- Near Dining Areas: Installing the fan closer to the dining table creates a pleasant breeze that can make meals more enjoyable.
- Height Consideration: Ensuring the fan is installed at the correct height (typically 7-9 feet from the floor) prevents any obstruction and provides optimal airflow.
- Avoiding Obstructions: Keeping the fan away from cabinets, beams, or other fixtures ensures that it operates without interference and maximizes its effectiveness.
Placing the fan in the center of the kitchen allows for an even distribution of air, making it a strategic choice for balancing comfort across the entire area. This location ensures that airflow reaches all corners, enhancing ventilation and reducing heat buildup during cooking.
Positioning the fan directly above cooking areas like the stove is beneficial as it aids in removing heat and lingering smells, creating a cooler and fresher cooking environment. This targeted placement helps maintain a pleasant atmosphere, especially when using high-heat appliances.
Having a ceiling fan near dining areas enhances comfort during meals, as it can help keep the space cool for diners. This placement contributes to an inviting dining experience, especially during warmer months.
Height consideration is crucial; installing the fan at a height of 7-9 feet ensures optimal airflow while minimizing the risk of head injuries. This height allows for effective circulation without obstructing movement in the kitchen.
Avoiding obstructions such as cabinets or beams is essential for the fan’s performance, as any interference can reduce airflow efficiency and create noise. Ensuring a clear path for airflow allows the fan to work effectively, providing the desired cooling effects.
What Common Mistakes Should I Avoid When Installing a Ceiling Fan?
When installing a ceiling fan, there are several common mistakes to avoid to ensure optimal performance and safety.
- Incorrect Height Placement: Installing the fan too high or too low can impact its efficiency and airflow. Ideally, the fan should be installed 7 to 9 feet above the floor to maximize comfort and minimize the risk of injury.
- Improper Location: Placing the fan in a corner or too close to walls can hinder airflow. Fans should be centrally located in the room, ideally at least 18 inches from the walls, to allow for optimal circulation.
- Ignoring the Direction of the Blades: Failing to set the fan blades to rotate in the correct direction can lead to ineffective cooling or heating. During summer, blades should rotate counterclockwise to create a wind chill effect, while in winter, they should turn clockwise to circulate warm air downwards.
- Neglecting Weight Capacity: Choosing a fan that exceeds the weight capacity of the mounting bracket or ceiling structure can lead to dangerous situations. Always check the specifications of both the fan and the mounting system to ensure it can support the fan’s weight.
- Forgetting Electrical Safety: Not properly addressing electrical connections can cause hazards such as short circuits or fires. It’s essential to turn off power at the circuit breaker and ensure all wiring meets local codes and standards during installation.
- Overlooking the Fan’s Size: Installing a fan that is too small or too large for the room can lead to ineffective cooling. The fan’s size should be proportional to the room’s dimensions, with larger rooms requiring larger fans for adequate airflow.
- Ignoring the Style and Aesthetics: Selecting a fan that clashes with the room’s decor can detract from the overall aesthetic. Consider the fan’s design, color, and finish to ensure it complements the existing decor and enhances the room’s appearance.