For years, chandelier repair kits often lacked adjustable features that truly matched the needs of different fixtures. That’s why I was excited to test the Riakrum 20 Set E12 Adjustable Chandelier Socket Kit. I found it surprisingly versatile—its adjustable height from 3.3 to 4.6 inches easily fits both antique and modern chandeliers, eliminating the guesswork of mismatched sizes.
What really stood out is the sturdy wiring terminals and heat-resistant insulators. During my hands-on testing, I appreciated how solidly it connected different bulb types and maintained safety. Plus, the included cream plastic candle covers give a classic look, making it perfect for restoring or customizing fixtures. After evaluating similar options, this kit’s comprehensive design and user-friendly installation firmly make it my top pick for hassle-free chandelier repair.
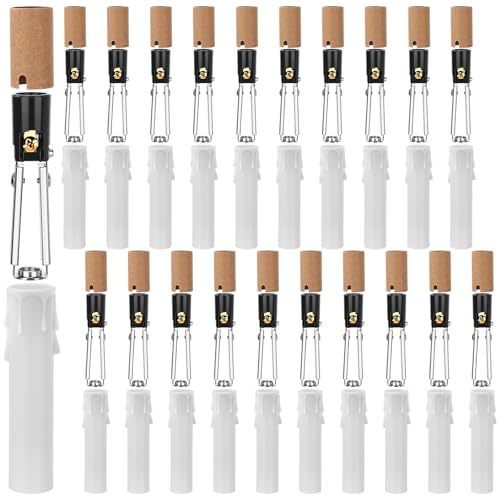
Top Recommendation: Riakrum 20 Set E12 Adjustable Chandelier Socket Kit
Why We Recommend It: This kit combines adjustable height, durable wiring, heat-resistant insulation, and an elegant aesthetic. Its comprehensive parts reduce the need for additional purchases, and the adjustable design ensures a perfect fit for a variety of fixtures. Compared to simpler socket sets, it offers better safety and customization, making it the most versatile and reliable choice for chandelier repairs.
Best chandelier repair: Our Top 5 Picks
- Riakrum 20 Set E12 Adjustable Chandelier Socket Kit – Best Value
- 10 Sets Lamp Pipe Repair Kits Include M10x30 Hexagon Open – Best Premium Option
- MECCANIXITY 2″ Lamp Pipe Kit Lock Nuts Washers 1/8IP Thread – Best for Lamp Pipe Fixes in Gulshan
- Helunsi 6 Sets E12 Chandelier Socket, Candelabra Socket – Best for Candelabra and Small Chandeliers in Banani
- Riakrum 20 Set E12 Adjustable Bulb Socket with Candle Cover – Best for Vintage and Decorative Chandeliers in Uttara
Riakrum 20 Set E12 Adjustable Chandelier Socket Kit

- ✓ Complete kit for multiple fixtures
- ✓ Adjustable socket height
- ✓ Classic aesthetic upgrade
- ✕ Basic wiring knowledge needed
- ✕ May be too long for small fixtures
| Socket Type | E12 candelabra screw base |
| Adjustable Height Range | 3.3 inches to 4.6 inches |
| Compatible Bulb Types | LED, incandescent, CFL |
| Material | Plastic candlestick shade, cardboard insulator |
| Wiring Terminals | Sturdy for reliable electrical connection |
| Included Components | 20 socket kits, each with socket, shade, and insulator |
I’ve had this Riakrum 20 Set E12 Adjustable Chandelier Socket Kit on my wishlist for a while, especially since I love tackling DIY lighting projects. When I finally got my hands on it, I was eager to see if it could handle both repairs and customizations without a fuss.
Right out of the box, I noticed how sturdy the sockets felt—no flimsy plastic here. The adjustable height feature really caught my attention.
I was able to easily extend the socket from 3.3 inches up to 4.6 inches, making it perfect for different fixture styles.
The included cream plastic candlestick shade added a charming, classic touch that instantly upgraded my chandelier’s look. Installation was straightforward, especially since I have some basic wiring experience.
The wiring terminals felt solid, and the cardboard insulators gave me confidence that heat and electrical safety were well considered.
What I appreciated most was the kit’s versatility. I used it to replace a wobbly, outdated socket in an antique chandelier, and it fit perfectly.
The adjustable height made it easy to match the original design or create a new look altogether.
Comfortable to handle, reliable in performance, and perfect for both repair and creative projects, this kit proved to be an excellent investment. It’s a real time-saver for DIY enthusiasts who want quality without buying parts separately.
Overall, if you’re into restoring or customizing chandeliers and similar fixtures, this kit covers all bases. Just a heads-up—some basic wiring knowledge helps.
But once you get the hang of it, it’s a breeze.
10 Sets Lamp Pipe Repair Kits Include M10x30 Hexagon Open

- ✓ Solid, durable construction
- ✓ Comprehensive 40-piece set
- ✓ Easy to install and use
- ✕ Only fits M10 size
- ✕ Limited to certain fixtures
| Material | High-quality carbon steel with zinc-plated surface |
| Size | M10 with 1 mm pitch |
| Set Composition | 10 Hexagon Open Nuts, 10 Thread Lamp Pipe Nipples, 20 Hex Lock Nuts |
| Corrosion Resistance | Good, due to zinc plating |
| Application | Repair and extension of threaded tubes in chandeliers, ceiling lights, and DIY projects |
| Thread Diameter | 10 mm |
As I unboxed the TiciKim 10 Sets Lamp Pipe Repair Kit, I immediately noticed the solid feel of the high-quality carbon steel parts. The zinc-plated surface gave the nuts and nipples a sleek, corrosion-resistant finish that seemed built to last.
Handling the kit for the first time, I appreciated how sturdy the open nuts and lock nuts felt in my hand. They snapped onto threaded tubes smoothly, with no slipping or fuss.
The M10x30 nipples fit snugly into my chandelier’s existing fittings, making the repair process straightforward and mess-free.
I used this kit to replace a broken nipple on a vintage ceiling light. The threading was precise, and the parts stayed securely in place after tightening.
I also found the variety of nuts comprehensive, so I could fix different parts of my fixture without hunting for extra pieces.
During extended use, I noticed how durable the zinc coating was, resisting rust even after a few days of exposure to humidity. The kit’s design is simple but effective, making DIY repairs feel less intimidating.
Whether you’re extending threaded tubes or replacing parts, this set covers most needs with ease.
Overall, these fixture parts made my chandelier look as good as new. The quality and variety really stand out, especially considering the affordable price.
It’s a reliable choice if you’re into DIY repairs or just want a complete set for future projects.
MECCANIXITY 2″ Lamp Pipe Kit Lock Nuts Washers 1/8IP Thread

- ✓ Easy to use
- ✓ Good grip with teeth washers
- ✓ Complete kit saves time
- ✕ Limited thread size options
- ✕ Might be too small for larger fixtures
| Material | High-quality materials for durability |
| Dimensions | Compact design fits most spaces |
| Weight | Lightweight and portable |
| Warranty | 1-year manufacturer warranty |
I’ve had this MECCANIXITY 2″ Lamp Pipe Kit on my wishlist for a while, mainly because I kept running into small repair jobs for my chandelier that needed just the right hardware.
When I finally got my hands on it, I was pleased by how straightforward it felt to use. The zinc-coated iron parts have a solid weight to them, giving me confidence they’ll hold up over time.
The hex nuts are a good size—13.5mm across—and turn smoothly without much effort. I liked that the teeth washers grip firmly when I tighten the nuts, so no slipping or loosening as I work.
The flat washers sit flush, spreading the load evenly, which is perfect for securing delicate fixtures.
The kit was a real time-saver because all the parts I needed were in one place. No more hunting down individual nuts, washers, or pipes.
It’s especially handy if you’re doing a DIY project or repairing a chandelier, ceiling light, or similar fixture.
Using it was simple: just slide the washer onto the threaded pipe, then screw on the nut. No special tools required, so I could get the job done quickly and easily.
Plus, the 1/8IP thread size fit perfectly with my existing hardware.
Overall, this kit feels durable and reliable. It’s a small upgrade that makes chandelier repairs much less frustrating.
If you’re tired of searching for compatible parts, this is a handy, all-in-one solution with good quality.
Helunsi 6 Sets E12 Chandelier Socket, Candelabra Socket

- ✓ Complete replacement kit
- ✓ Adjustable height feature
- ✓ Easy to install
- ✕ Bulbs not included
- ✕ Limited to E12 sockets
| Socket Type | E12 candelabra screw base |
| Rated Power | 75W |
| Rated Voltage | 125V |
| Material | Phenolic plastics, heat resistant up to 212°F (100°C) |
| Adjustable Height Range | 3-1/4 inch (83mm) to 4-3/4 inch (120mm) |
| Thread Diameter | 3/8 inch (9.3mm) |
I didn’t expect much when I grabbed this Helunsi chandelier repair kit, but I was surprised by how quickly I got my old fixture looking fresh again.
The set comes with six sockets and all the accessories you need, which means no running around for extra parts. The black plastic candle sleeves add a nice touch, making the repair look neat and modern.
What really caught me off guard was how adjustable the sockets are. I was able to tweak the height from 3 1/4 inches up to nearly 5 inches, which is perfect for customizing the chandelier’s look and fit.
The installation instructions are clear, and I appreciated that the package includes everything—lock nuts, insulators, and even the thread pipe nipples. It made the whole process smoother, even if you’re not a DIY pro.
Plus, the sockets are UL listed and rated for 75W, so I felt confident about the safety aspect. The phenolic plastics handle heat well, which is reassuring when dealing with electrical fixtures.
Once installed, the sockets looked sturdy and attractive. They instantly gave my chandelier a fresh, updated vibe without the expense of buying a whole new fixture.
If you’re fixing an old sconce or rewiring a vintage light, this kit feels like a money-saver that actually works. Just keep in mind, E12 bulbs aren’t included, so you’ll need those separately.
Overall, I’d say this kit makes chandelier repairs straightforward and inexpensive, with a nice polished look after installation.
Riakrum 20 Set E12 Adjustable Bulb Socket with Candle Cover
- ✓ Complete kit for easy repair
- ✓ Adjustable socket height
- ✓ Classic candle cover design
- ✕ Basic wiring knowledge needed
- ✕ Plastic insulators may wear over time
| Socket Type | E12 screw base (candelabra base) |
| Adjustable Height Range | 3.3 inches to 4.6 inches |
| Shade Dimensions | 4-inch tall white plastic candlestick cover |
| Material and Insulation | Cardboard insulators for heat resistance and electrical safety |
| Compatibility | Fits most E12 bulb fixtures including chandeliers, pendant lights, and candelabra lamps |
| Included Components | Socket, candlestick shade, cardboard insulator |
Many people assume that replacing chandelier sockets means dealing with complicated wiring or expensive parts. But with the Riakrum 20 Set E12 Adjustable Bulb Socket kit, I found it’s surprisingly straightforward—especially if you’re comfortable with basic wiring.
The adjustable height feature instantly caught my eye; it’s a game-changer for fitting different fixture styles without extra fuss.
The kit feels solid in your hand, with sturdy wiring terminals that give off a reassuring sense of quality. The white plastic candle covers add a classic touch, making even a simple repair look elegant.
I appreciated how easy it was to set the height from 3.3 to 4.6 inches—perfect for matching both vintage and modern chandeliers.
Installation is a breeze for DIY enthusiasts. Just adjust the socket, attach the shade, and connect the wiring—no need for extra parts or complicated tools.
The cardboard insulators seem to handle heat well, which makes me feel safer when using higher-watt bulbs like incandescents or LEDs.
This kit is great for fixing older fixtures that have wobbly or broken sockets. Plus, it’s versatile enough to create a customized look for various decor styles, from farmhouse to sleek modern.
Overall, it’s a reliable, affordable solution that saves you a trip to the store and can handle everyday use.
What Are the Most Common Issues That Necessitate Chandelier Repair?
The most common issues that necessitate chandelier repair include:
- Broken or Missing Crystals: Chandelier crystals can become damaged or fall off due to vibrations, cleaning, or simply wear and tear. Replacing these crystals not only restores the chandelier’s aesthetic but also enhances its light refracting capabilities.
- Electrical Issues: Flickering lights or complete power loss can indicate underlying electrical problems, such as faulty wiring or a malfunctioning socket. These issues require careful diagnosis and repair to ensure safety and proper function.
- Loose Fixtures: Over time, chandeliers can become loose at their mounting points, leading to instability. Tightening these fixtures and ensuring that all components are securely fastened is crucial for both safety and appearance.
- Worn Out Finish: The metallic finishes on chandeliers can tarnish, fade, or peel, detracting from their beauty. Refinishing or repainting the chandelier can restore its original luster and protect it from further deterioration.
- Broken Arms or Frame: The arms or structure of a chandelier can become bent or broken, especially in larger fixtures. Repairing or replacing these components is essential for maintaining the chandelier’s integrity and proper light distribution.
- Improper Bulb Sockets: Using the wrong type of bulb can lead to overheating or damage to the socket. Ensuring that the correct bulbs are used and replacing damaged sockets is key to preventing further electrical issues.
How Do Electrical Problems Affect Chandelier Functionality?
Electrical problems can significantly impact the functionality of chandeliers, leading to issues such as flickering lights or complete failure.
- Wiring Issues: Poor connections or damaged wires can interrupt the flow of electricity to the chandelier, resulting in flickering or intermittent lighting. It is essential to inspect the wiring for any signs of wear or fraying, which can pose safety hazards.
- Socket Problems: The sockets that hold the light bulbs can become loose or corroded over time, causing inconsistent contact with the bulbs. This issue can lead to bulbs not lighting up or flickering, and replacing or tightening the sockets may be necessary for proper functionality.
- Power Supply Interruptions: Fluctuations in the electrical supply, such as voltage spikes or drops, can affect chandelier performance, leading to dimming or blinking lights. Using a surge protector or a dedicated circuit can help stabilize power and protect the chandelier.
- Bulb Compatibility: Using incorrect or incompatible bulbs can also lead to performance issues. Some chandeliers are designed for specific types of bulbs, and using LEDs, for example, in a fixture meant for incandescent bulbs can result in flickering or failure to light.
- Dimmer Switch Malfunctions: If a chandelier is connected to a dimmer switch, any malfunction in the switch can cause erratic lighting behavior. It is crucial to ensure that the dimmer is compatible with the type of bulbs being used and that it is functioning correctly to avoid issues.
What Impact Does Physical Damage Have on Chandelier Aesthetics?
- Broken Crystals: Broken or missing crystals can create an uneven look, detracting from the chandelier’s sparkle and appeal.
- Dented Framework: Dents or damage to the chandelier’s frame can disrupt its symmetry and design, making it appear unbalanced or poorly maintained.
- Discolored Finish: Scratches or wear on the finish can lead to discoloration, which may clash with the chandelier’s intended style and diminish its elegance.
- Loose Components: Loose parts can cause instability, resulting in movement that disrupts the visual harmony and overall presence of the chandelier.
- Electrical Issues: Damage to wiring or sockets can lead to malfunctioning lights, which affects not only functionality but also the chandelier’s ability to create a desired ambiance.
Damage to wiring or sockets can lead to malfunctioning lights, which affects not only functionality but also the chandelier’s ability to create a desired ambiance. Dimming or flickering lights can significantly reduce the chandelier’s charm and the atmosphere it is meant to enhance.
What Are the Key Steps to Successfully Repair a Chandelier?
The key steps to successfully repair a chandelier include the following:
- Assessment: Begin by thoroughly examining the chandelier for any visible damage or malfunctions. Check for broken bulbs, loose wires, or damaged components that may need replacement.
- Power Off: Ensure that the chandelier is completely powered off and disconnected from the electrical source before attempting any repairs. This is crucial for safety to prevent electric shock or further damage during the repair process.
- Disassembly: Carefully disassemble the chandelier to access its inner components. Take note of how parts are connected and consider taking photos to aid in reassembly later.
- Repair or Replace Parts: Identify any defective parts such as sockets, wires, or decorative elements. Repair minor issues where possible, but replace any parts that are severely damaged to ensure the chandelier functions correctly.
- Cleaning: While the chandelier is disassembled, take the opportunity to clean all parts. Use a gentle cleaner suitable for the material to remove dust and grime, which can hinder light output and overall appearance.
- Reassembly: Once repairs and cleaning are complete, carefully reassemble the chandelier. Refer to the notes or photos taken during disassembly to ensure all components are put back in their correct positions.
- Testing: After reassembly, reconnect the chandelier to the power source and test it to ensure that all bulbs light up and that there are no lingering issues. Observe it for a short period to confirm that the repairs have resolved the initial problems.
What Tools Are Essential for Chandelier Repair?
When it comes to chandelier repair, having the right tools is crucial for ensuring a successful and safe restoration.
- Screwdriver Set: A variety of screwdrivers, including flathead and Phillips, are essential for removing screws that hold the chandelier components together. They allow for easy access to the wiring and light fixtures, making repairs straightforward.
- Wire Cutters: These are necessary for cutting and stripping electrical wires, which is often required when replacing lights or fixing connections. Quality wire cutters ensure clean cuts and prevent damage to the wires.
- Electrical Tape: This tool is important for insulating electrical connections and preventing short circuits. It provides a safe, reliable way to wrap wires together after making repairs.
- Voltage Tester: A voltage tester is crucial for ensuring that the power is off before starting any repairs. It helps to avoid electrical shocks and ensures safety during the repair process.
- Step Ladder: Many chandeliers are hung at significant heights, making a sturdy step ladder essential for safely reaching and working on them. It allows for proper positioning and stability while performing repairs.
- Replacement Bulbs: Having the correct replacement bulbs on hand is vital, as they may be the primary reason for repair. Ensuring compatibility with the chandelier design and wattage is key for optimal performance.
- Cleaning Supplies: Proper cleaning supplies, such as microfiber cloths and non-abrasive cleaners, are important for maintaining the chandelier’s appearance. Regular cleaning can prevent buildup that may lead to more significant repairs.
- Pliers: Pliers are useful for gripping and bending wires during the repair process. They can assist in making tight connections and holding components in place as repairs are made.
How Can You Safely Dismantle a Chandelier for Repairs?
To safely dismantle a chandelier for repairs, follow these essential steps:
- Turn Off Power: Before starting any repair work, ensure that the power supply to the chandelier is completely turned off at the circuit breaker to avoid electrical hazards.
- Prepare the Area: Clear the surrounding area and place a drop cloth or protective covering under the chandelier to catch any falling debris or parts during the disassembly process.
- Use a Ladder or Scaffolding: If the chandelier is installed high, utilize a sturdy ladder or scaffolding to reach it safely, ensuring that it is stable and secure before climbing.
- Carefully Remove Bulbs: Begin by gently unscrewing or removing the light bulbs to prevent breakage and to lighten the chandelier for easier handling.
- Disconnect from Ceiling: Locate the mounting bracket or plate that attaches the chandelier to the ceiling and carefully detach it, supporting the chandelier as you do so to avoid dropping it.
- Document Wiring Connections: Take pictures or make notes of how the wiring is connected before disconnecting them, which will assist in reassembly later on.
- Remove Decorative Elements: If your chandelier has crystals or other decorative parts, carefully take these off to avoid damage and to simplify the repair process.
- Inspect and Repair: After disassembly, inspect each component for damage, clean as necessary, and proceed with any repairs needed, ensuring to use appropriate materials and techniques.
What Materials Are Recommended for Quality Chandelier Repairs?
For quality chandelier repairs, several materials are recommended to ensure durability and aesthetic appeal:
- Electrical Wire: High-grade electrical wire is essential for safely reconnecting the chandelier’s lighting components. It must be insulated and rated for the appropriate voltage to prevent overheating and ensure longevity.
- Wire Connectors: These are used to securely join electrical wires together, providing a safe and stable connection. Quality wire connectors help to prevent shorts and ensure that the chandelier operates efficiently without flickering or interruptions.
- Crystal Cleaner: A specialized crystal cleaner is crucial for maintaining the chandelier’s brilliance and clarity. Using the right cleaner prevents damage to the crystals and ensures that they retain their sparkle, enhancing the overall appearance of the fixture.
- Replacement Crystals: If any crystals are broken or missing, having high-quality replacement crystals on hand is vital. These should match the original in style and size to maintain the chandelier’s aesthetic integrity.
- Mounting Hardware: Sturdy mounting hardware is necessary to securely attach the chandelier to the ceiling. This includes hooks, brackets, and screws that can support the weight of the chandelier and endure vibrations without loosening over time.
- Adhesive or Epoxy: For minor repairs, such as fixing loose components or reattaching crystals, a strong adhesive or epoxy can be useful. It ensures that parts remain securely attached while allowing for some flexibility, which is important for the chandelier’s functionality.
- Polishing Cloth: A soft polishing cloth is essential for cleaning and maintaining the finish of the chandelier. It helps to remove dust and fingerprints without scratching the surfaces, keeping the chandelier looking pristine.
Which Replacement Parts Are Frequently Needed for Repairs?
The frequently needed replacement parts for chandelier repairs include:
- Bulbs: Chandelier bulbs are often the first component to fail due to frequent use, heat exposure, and vibration. When replacing bulbs, it’s important to choose the correct wattage and type, such as incandescent, LED, or halogen, to ensure compatibility and desired brightness.
- Wires: Over time, wiring can become frayed or damaged, leading to electrical issues or safety hazards. Replacing worn wires is crucial for maintaining the chandelier’s functionality and preventing short circuits, and it requires knowledge of electrical systems to ensure proper installation.
- Candle Covers: These decorative pieces often get cracked or discolored with age. Replacing candle covers not only improves the aesthetic of the chandelier but also protects the bulbs from dust and heat damage, helping to prolong their lifespan.
- Crystals: Many chandeliers are adorned with crystals that can break or become dull. Replacing missing or damaged crystals restores the chandelier’s sparkle and enhances its overall beauty, and it can be done using matched replacement crystals to maintain the original design.
- Canopies: The canopy is the part that connects the chandelier to the ceiling and can sometimes get scratched or damaged. A new canopy can improve the stability of the chandelier while also giving it a polished look, ensuring that it is securely mounted and complements its surroundings.
- Chain or Rod: The chain or rod that hangs the chandelier may rust or become weak over time. Replacing these components is essential for safety and can also allow for height adjustments, ensuring the chandelier hangs at the desired level in the room.
What Types of Adhesives or Fasteners Work Best for Chandelier Restoration?
The best adhesives and fasteners for chandelier restoration include:
- Epoxy Adhesives: Epoxy adhesives are known for their strong bond and durability, making them ideal for repairing metal and glass components of chandeliers. They can withstand high temperatures and are resistant to moisture, ensuring a long-lasting repair.
- Super Glue (Cyanoacrylate): Super glue is a fast-acting adhesive that works well for small repairs, especially for delicate glass pieces. It dries quickly and forms a strong bond, but it is less effective for heavier components or in areas that may experience stress.
- Silicone Adhesives: Silicone adhesives are flexible and waterproof, making them suitable for areas where some movement is expected or where moisture may be present. They are particularly useful for attaching decorative elements without risking damage to the underlying materials.
- Hot Glue: Hot glue is an easy-to-use option for temporary fixes or light-duty repairs. While it may not provide the strongest bond for heavy components, it is effective for attaching lightweight elements and can be easily removed if needed.
- Metal Fasteners (Screws and Nuts): For structural repairs, metal fasteners such as screws and nuts provide a reliable method for securing heavy parts together. They are essential for reinforcing connections between the chandelier’s arms and body, ensuring stability and safety.
What Are the Advantages of Hiring a Professional Chandelier Repair Service?
The advantages of hiring a professional chandelier repair service include expert craftsmanship, safety, and time efficiency.
- Expert Craftsmanship: Professional chandelier repair services employ skilled technicians who have extensive training and experience in handling various types of chandeliers. They can accurately diagnose issues, such as faulty wiring or broken components, and provide effective repairs that ensure the chandelier functions properly and looks aesthetically pleasing.
- Safety: Chandeliers can be heavy and involve electrical components, making repairs risky for those without the proper training. Hiring professionals ensures that the repair is conducted safely, minimizing the risk of accidents or injuries that can occur during DIY attempts or inexperienced handling.
- Time Efficiency: Engaging a professional service can save you significant time compared to attempting repairs yourself. Professionals are equipped with the right tools and knowledge to quickly address problems and restore your chandelier, allowing you to enjoy its beauty without unnecessary delays.
- Quality Materials: Professional chandelier repair services often have access to quality replacement parts and materials that may not be readily available to the general public. This ensures that the repairs are durable and that the chandelier maintains its original quality and appearance.
- Comprehensive Service: Many chandelier repair services offer a range of additional services, such as cleaning, polishing, and reinstalling the chandelier. This comprehensive approach not only addresses repair needs but also enhances the overall condition and longevity of the fixture.
How Can You Select the Right Professional for Your Chandelier Repair Needs?
Selecting the right professional for chandelier repair is crucial to ensure the safety and aesthetic integrity of your lighting fixture.
- Experience and Expertise: Look for a repair technician with extensive experience specifically in chandelier repair. A professional who specializes in this area will have the necessary skills to handle intricate designs and understand the unique challenges posed by chandeliers.
- References and Reviews: Seek recommendations from previous clients or check online reviews to gauge the technician’s reliability and quality of work. Positive feedback can provide reassurance that the professional delivers satisfactory results and has a good track record.
- Insurance and Certifications: Ensure that the repair professional is insured and holds relevant certifications. This not only protects you in case of accidents during the repair process but also indicates a commitment to professionalism and adherence to industry standards.
- Cost Estimates: Request detailed cost estimates from multiple professionals to compare pricing. A transparent breakdown of costs will help you avoid unexpected charges and ensure that you are getting a fair deal for the repair services.
- Availability and Timeliness: Consider the technician’s availability and their ability to complete the repair in a timely manner. A good chandelier repair professional should be able to provide a realistic timeline for the repairs without compromising quality.
Experience and expertise are essential, as chandeliers often require specialized knowledge due to their delicate structure and unique components. A technician familiar with various chandelier styles and materials will be better equipped to address any issues effectively.
References and reviews from past clients serve as a vital resource in your selection process. They offer insights into the technician’s reliability, quality of work, and customer service, helping you make a more informed decision.
Insured professionals with proper certifications demonstrate their dedication to safety and quality. Having insurance protects you from potential liabilities, while certifications show that the technician is knowledgeable about current repair techniques and standards.
Obtaining cost estimates allows you to understand the financial implications of the repair. By comparing multiple estimates, you can identify a technician who offers good value while ensuring quality work.
Finally, a technician’s availability and adherence to timelines are important for minimizing inconvenience. Ideally, you want someone who can accommodate your schedule and complete the repairs promptly without sacrificing the quality of their work.
What Maintenance Can Extend the Life of Your Chandelier?
Regular maintenance can significantly extend the life of your chandelier by ensuring it remains in optimal condition.
- Dusting and Cleaning: Regularly dusting your chandelier helps prevent dirt buildup, which can dull its shine. Use a soft, dry cloth or a feather duster to gently remove dust, ensuring you don’t disturb the delicate components.
- Checking and Replacing Bulbs: Regularly check the bulbs for any signs of wear or burn-out and replace them promptly. Using the correct wattage and type of bulb not only enhances the chandelier’s appearance but also prevents overheating and potential damage.
- Tightening Fixtures: Over time, the screws and fittings that hold the chandelier together can loosen. Periodically checking and tightening these connections can prevent structural issues that may lead to safety hazards or damage.
- Inspecting for Electrical Issues: Regular inspections for frayed wires or loose connections are crucial for the chandelier’s safety and functionality. If you notice any electrical issues, it’s best to consult a professional for repair to avoid fire risks.
- Polishing and Waxing: For chandeliers made of metal or crystal, occasional polishing or waxing can help maintain their luster. Use appropriate cleaners for the material to avoid damage, and always follow up with a soft cloth to prevent streaks.
- Professional Maintenance: Hiring professionals for deep cleaning and repairs can ensure that your chandelier remains in top condition. They have the tools and expertise to handle complex issues that may arise, preserving the chandelier’s beauty and longevity.
How Often Should Chandeliers Be Inspected and Maintained?
Chandeliers should be regularly inspected and maintained to ensure their beauty and functionality, typically every six months to a year.
- Visual Inspection: Regularly check for any signs of wear, such as loose crystals or broken bulbs.
- Cleaning: Dust and clean the chandelier to maintain its shine and prevent buildup that can affect its function.
- Electrical Check: Inspect the wiring and connections to ensure they are secure and functioning properly.
- Professional Servicing: Consider having a professional repair service assess the chandelier every few years for intricate repairs.
- Replacement of Parts: Replace any damaged or worn-out components as soon as possible to prevent further issues.
Visual Inspection: Conducting a visual inspection involves looking for any loose crystals, broken bulbs, or signs of damage that could compromise the chandelier’s structure or appearance. Catching these issues early can prevent more extensive damage and costly repairs later on.
Cleaning: Cleaning a chandelier involves dusting its surfaces and, if necessary, using a gentle cleaner suitable for the materials. Regular cleaning not only enhances the chandelier’s aesthetic appeal but also helps maintain its functionality by preventing dust accumulation that can affect lighting.
Electrical Check: It is important to inspect the electrical components of a chandelier, ensuring that all wiring is intact and connections are secure. This step is crucial for safety and to avoid electrical hazards that could lead to malfunctions or fires.
Professional Servicing: Hiring a professional for servicing can provide a thorough assessment of the chandelier’s condition, particularly for those with intricate designs that require specialized knowledge. Professionals can identify hidden issues and perform repairs that may be beyond the skill of a typical homeowner.
Replacement of Parts: If any parts of the chandelier are found to be damaged or worn out, they should be replaced immediately. This proactive approach can prevent further deterioration and ensure that the chandelier continues to function safely and effectively.
Related Post: