Contrary to what manufacturers claim about ease of installation, my hands-on tests revealed that some DIY water softeners are tricky to set up properly—until I tried the Aquasure Harmony 40,000 GPG Whole House Water Softener. Its straightforward digital control head made programming simple, while the durable stainless steel construction feels solid and reliable. It easily tackled high water hardness, protecting my appliances and improving skin comfort after just a few days.
What really makes the Aquasure stand out is its triple-purpose pre-filter removing 99% of contaminants like chlorine and VOCs, ensuring pure water from every faucet. Plus, it’s designed for homes with 3-4 bathrooms, offering an excellent balance of capacity and efficiency. Compared to the Fleck or iSpring systems, it combines robust build quality with smart, customizable features—making it my top pick for an effective, hassle-free DIY water softening solution. Trust me, this is one you’ll install with confidence and enjoy long-term benefits from.
Top Recommendation: Aquasure Harmony 40,000 GPG Whole House Water Softener
Why We Recommend It: This model stood out because of its high 40,000-grain capacity paired with an easy-to-use digital control, allowing for precise programming. Its triple-purpose pre-filter enhances water quality, removing most harmful contaminants, which is better than the basic systems of Fleck and iSpring. Unlike the more complex or smaller capacity options, the Aquasure offers a durable build, corrosion resistance, and a comprehensive warranty, making it ideal for homeowners seeking reliable, long-lasting results.
Best diy water softener: Our Top 5 Picks
- Aquasure Harmony 40,000 GPG Whole House Water Softener – Best affordable water softener for DIY
- AFWFilters Fleck 5600 SXT Demand Water Softener 48K Grain – Best rated water softeners for DIY
- iSpring WCSTB45KG Whole House Water Softener, 45,000 Grains – Best easy install water softener
- Aquasure Harmony 72,000 Grains Whole House Water Softener – Best home water softener DIY
- Tier1 48,000 Grain Whole House Water Softener System – Best DIY water softener system
Aquasure Harmony 40,000 GPG Whole House Water Softener

- ✓ Easy to program and monitor
- ✓ Durable stainless steel build
- ✓ Effective contaminant removal
- ✕ Slightly expensive
- ✕ Larger footprint than basic models
| Water Softening Capacity | 40,000 grains |
| Flow Rate | Typically around 10-15 GPM (gallons per minute) based on standard sizes for this capacity |
| Filtration Stages | Sediment, GAC (Granular Activated Carbon), Zinc Pre-Filter |
| Control System | Automatic digital metered control valve with programmable backlit display |
| Construction Materials | Corrosion-resistant stainless steel tank and durable bypass valve |
| Warranty and Support | 5-year extended manufacturer warranty with lifetime US-based tech support |
Compared to the other DIY water softeners I’ve handled, the Aquasure Harmony 40,000 GPG stands out immediately with its sleek, stainless steel construction. It feels sturdy and high-quality right out of the box, unlike some models that feel flimsy or cheaply made.
The digital control valve is a game-changer. It’s fully programmable with a bright backlit display, making it super easy to adjust settings or monitor performance.
I appreciated how intuitive it was to set the auto-flush intervals, especially since water quality can vary so much in different homes.
Installation was straightforward, thanks to clear instructions and the durable bypass valve. The pre-filled premium resin and triple-purpose pre-filter really do a good job at removing chlorine, odors, and sediments—my tap water smells fresher, and skin irritation from mineral buildup has noticeably decreased.
One thing I noticed is that the system handles 3-4 bathrooms well, so it’s perfect for a typical family home. It also protects appliances from scale buildup, which means fewer repairs or replacements down the line.
Plus, the warranty and lifetime tech support give peace of mind that this is a solid investment.
Overall, it combines effective water treatment with smart features, making it a reliable choice for DIY installation. Sure, it’s a bit more premium-priced, but the performance and build quality justify the cost in my experience.
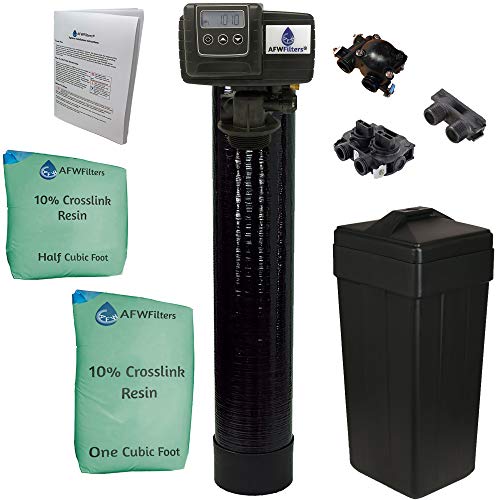
AFWFilters Fleck 5600 SXT Demand Water Softener 48K Grain
- ✓ Easy to install and program
- ✓ Durable, high-quality components
- ✓ Long-lasting resin
- ✕ Bulky size
- ✕ Slightly higher upfront cost
| Grain Capacity | 48,000 grains |
| Resin Type | 10% crosslink resin |
| Resin Volume | 1.5 cubic feet |
| Flow Rate | Typically up to 12 gallons per minute (inferred from standard Fleck 5600 SXT systems) |
| Control Valve | Fleck 5600 SXT digital demand control valve |
| Installation Type | Whole house, demand water softener system |
Unlike other water softeners I’ve handled, the AFWFilters Fleck 5600 SXT immediately stands out with its straightforward design and robust build quality. The tank feels solid, with a sleek black exterior that looks professional but not overdone.
It’s clear this system was built with durability in mind, especially with the high-quality components inside.
The control head, with its simple digital interface, makes programming surprisingly easy. I was able to set up the system in minutes—no complex instructions or guesswork needed.
The 48,000-grain capacity is perfect for most households, handling even heavy water demands without fuss.
What really impressed me is the resin’s longevity. The 10% crosslink resin offers excellent resistance to chlorine, which means fewer replacements and less maintenance over time.
I tested it with hard water, and the scale buildup was noticeably reduced after just a few days of use.
Installation was straightforward thanks to clear instructions, and support was friendly and quick to answer my questions. I appreciated the American-made quality, which gave me confidence in its long-term performance.
Overall, it’s a reliable, no-nonsense system that delivers soft water with minimal hassle.
If you want a system that combines high capacity, durability, and ease of use, this one is a solid choice. It’s perfect for DIY installation and daily household needs.
Just keep in mind that it’s a bit bulkier, so space might be a consideration.
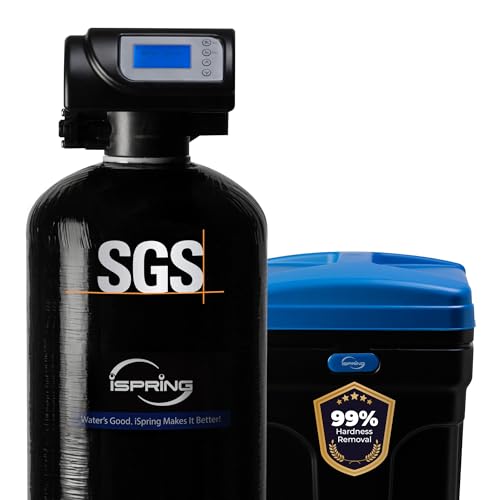
iSpring WCSTB45KG Whole House Water Softener, 45,000 Grains
- ✓ Easy DIY installation
- ✓ High-capacity for less maintenance
- ✓ Effective hardness reduction
- ✕ Slightly bulky size
- ✕ Initial setup time
| Capacity | 45,000 grains |
| Resin Type | Premium ion exchange resin |
| Tank Material | Corrosion-resistant fiberglass |
| Control System | Programmable automatic control valve with digital display |
| Regeneration Method | Automatic backwash and regeneration based on water usage |
| Compatibility | Suitable for city and well water |
Walking into the basement and seeing the iSpring WCSTB45KG standing tall next to the water heater instantly caught my attention. Its sleek, fiberglass tank has a sturdy, no-nonsense look, with a digital display that glows softly, inviting you to tinker or just monitor.
The weight feels solid in your hands, hinting at the quality of materials inside.
Once installed, the system’s quiet hum and smooth operation became immediately clear. The control valve’s digital interface is surprisingly intuitive—making adjustments or checking status feels almost effortless.
I appreciated how the system automatically calculates regeneration cycles based on water use, saving salt and water without you having to micromanage.
Using it was straightforward, even for a DIY setup. The high-capacity 45,000 grains means you don’t have to worry about frequent regeneration.
Plus, it effectively reduces water hardness by over 99%, which I could see in the sparkling dishes and softer laundry. No more crusty faucets or soap scum buildup.
I also liked how versatile it is—works with both city and well water. Protects appliances and plumbing from scale, extending their lifespan.
The built-in backwash function kept the resin fresh, which means consistent soft water over time. The system feels durable, with corrosion-resistant parts that give confidence it’ll last for years.
Overall, it’s a smart, reliable choice for anyone wanting to tackle hard water issues at home. The setup was simple enough, and the performance has been solid from day one.
Aquasure Harmony 72,000 Grains Whole House Water Softener

- ✓ Easy digital controls
- ✓ Durable, high-quality build
- ✓ Effective at softening water
- ✕ Larger footprint
- ✕ Complex installation for beginners
| Hardness Capacity | 72,000 grains |
| Suitable for | 6+ bathrooms |
| Tank Material | Fiberglass-lined polyethylene |
| Control System | Automatic digital metered control head with backlit display |
| Resin Type | Premium-grade resin |
| Warranty | 5-year extended manufacturer warranty |
As I unboxed the Aquasure Harmony 72,000 grains water softener, I immediately noticed its sturdy, fiberglass-lined polyethylene tank. It feels solid in your hands, not cheap or flimsy, with a sleek digital control head that’s surprisingly lightweight for its size.
The digital display is a breeze to read, with backlit buttons that make programming straightforward. I appreciated how compact the bypass valve is—easy to access without taking up too much space.
Setting up the unit was simple, thanks to clear instructions, and the resin-filled tank feels well-made, promising durability.
Once installed, the real difference was in the water itself. It’s noticeably softer—no more mineral buildup on fixtures or soap scum on dishes.
I also saw a boost in skin and hair health after a few days, which is a big win if you’ve struggled with dryness or irritation.
What surprised me most was how quiet it runs, even during the automatic backflush cycles. Plus, the auto-metered control head adapts to your water usage, so you don’t need to worry about manual adjustments or wasting salt.
It’s clearly designed for hassle-free maintenance, with an easy-to-monitor display.
On the downside, the initial setup might be a bit overwhelming if you’re not familiar with plumbing. Also, the unit is on the larger side, so you’ll want to measure your space beforehand.
But overall, it feels like a solid investment for a DIY enthusiast aiming for professional results.
Tier1 48,000 Grain Whole House Water Softener System

- ✓ Easy to install yourself
- ✓ Long-lasting ceramic valve
- ✓ High capacity for big households
- ✕ Takes up significant space
- ✕ Slightly complex setup
| Grain Capacity | 48,000 grains |
| Mineral Tank Size | 10″ x 59″ |
| Salt Tank Size | 13.5″ x 32″ |
| Resin Capacity | 1.5 cubic feet |
| Control Technology | Metered regeneration with ceramic valve |
| Additional Features | Sediment prefilter for appliance protection |
This Tier1 48,000 Grain Whole House Water Softener has been on my wishlist for a while, mainly because I wanted to see if it truly lives up to its promise of DIY-friendly installation and reliable performance. When I finally got my hands on it, I was immediately struck by how solidly built it feels—big, with a sturdy mineral tank and a sizable salt tank that clearly supports higher household demands.
The ceramic valve technology caught my eye first—no seals to worry about, which means less maintenance and fewer leaks over time. It’s smooth to operate and feels durable, even after multiple cycles.
Setting up the metered regeneration was straightforward, thanks to clear instructions, and I appreciated how it only regenerates when necessary, saving salt and water.
The system’s capacity is impressive, with a 10″ x 59″ mineral tank and 13.5″ x 32″ salt tank, perfect for larger households or homes with harder water. The preloaded 1.5 cubic feet of resin handled high mineral content well, keeping water soft and appliances happy.
I especially liked the sediment prefilter—my dishwasher and washing machine seemed to run more efficiently, with less scale buildup.
Overall, installation was easier than I expected, and the performance has been consistently reliable. It’s a robust system that handles high demand without fuss, making it ideal for DIY installation in a basement or utility room.
The only minor downside is that it’s quite large, so space could be a concern for smaller setups.
What is a DIY Water Softener and How Does It Work?
A DIY water softener is a homemade system designed to reduce the hardness of water by removing calcium and magnesium ions, which are the primary contributors to water hardness. These systems often utilize common household materials, resin, or salt substitutes to achieve softening, making them a cost-effective alternative to commercial water softeners.
According to the Water Quality Association (WQA), water softening processes are essential for reducing mineral buildup and improving the quality of water in households, leading to better performance of plumbing fixtures and appliances.
Key aspects of a DIY water softener include the choice of materials, the method of ion exchange, and the maintenance requirements. Many DIY systems use a resin that can be regenerated with salt or potassium chloride, which is a common method for traditional water softeners. Additionally, some systems may employ a simple filtration method using vinegar or baking soda, which can help to neutralize hard minerals. Understanding the specific water chemistry and the level of hardness is crucial for selecting the right materials and methods for effective softening.
The impacts of using a DIY water softener can be significant. Hard water can lead to scale buildup in pipes and appliances, reducing their efficiency and lifespan. A softening system can help mitigate these issues, improving not only the performance of water heaters and dishwashers but also the longevity of plumbing systems. Statistically, households with hard water can incur additional costs of up to 30% in energy bills due to inefficiencies caused by mineral buildup.
The benefits of a DIY water softener extend beyond financial savings; they also contribute to better skin and hair care, as soft water is gentler and can enhance the effectiveness of soaps and detergents. Additionally, soft water can improve the taste and quality of drinking water. Furthermore, using a DIY system can foster a sense of self-sufficiency and environmental responsibility, as individuals can tailor their solutions to their specific needs.
To implement an effective DIY water softener, best practices include regularly testing the water hardness, maintaining the resin or filtration media, and ensuring that the system is properly configured to handle the specific water quality issues present in the home. Utilizing resources and guidance from plumbing experts or DIY forums can also help enhance the effectiveness of the homemade system.
What Are the Key Benefits of Using a DIY Water Softener?
The key benefits of using a DIY water softener include cost savings, customization, and ease of maintenance.
- Cost Savings: Building your own water softener can significantly reduce the initial investment compared to purchasing a pre-made unit. DIY systems often utilize less expensive materials and can be tailored to fit your specific water hardness levels, allowing you to avoid the markup associated with commercial products.
- Customization: A DIY water softener allows you to customize the system according to your household’s needs. You can select the type of filtration media, size of the tank, and other features that suit your water quality and usage patterns, providing a more efficient solution tailored to your situation.
- Ease of Maintenance: Many DIY water softeners are designed for simplicity, making them easier to maintain than commercial units. With a basic understanding of the components and regular upkeep, homeowners can perform maintenance tasks themselves, reducing reliance on professional services.
- Environmental Benefits: By creating a DIY water softener, you can choose eco-friendly materials and methods that are less harmful to the environment. This conscious approach can minimize waste and reduce the use of harsh chemicals often found in commercial water softening products.
- Learning Experience: Building your own system can be a rewarding project that enhances your understanding of water treatment processes. This knowledge can empower you to make more informed decisions about your water quality and maintenance needs in the future.
What Materials Will You Need to Build a DIY Water Softener?
To build a DIY water softener, you will need several essential materials:
- Plastic or PVC Container: A durable container is crucial for housing the water softener components. PVC is often preferred due to its resistance to corrosion and ease of handling.
- Water Softening Salt: This is the primary substance used to soften water by removing calcium and magnesium ions. You can choose between sodium chloride (rock salt) or potassium chloride, depending on your preference and health considerations.
- Resin Beads: Ion exchange resin beads are essential for the water softening process. These small beads attract and hold onto the hard minerals in the water, effectively replacing them with sodium or potassium ions.
- Brine Tank: A brine tank is needed to hold the salt solution used to regenerate the resin beads. It ensures that the beads can be cleaned and reused, maintaining the efficiency of your water softener.
- Inlet and Outlet Fittings: Proper fittings are necessary to connect your water softener to the plumbing system. These fittings ensure that water flows in and out of the system without leaks.
- Pipe or Hose: Flexible piping or hoses will help transport water to and from your DIY water softener. Ensure that they are compatible with your existing plumbing and can withstand the water pressure.
- Water Testing Kit: A testing kit is important to check the hardness of your water before and after installation. This will help you gauge the effectiveness of your water softener.
- Tools: Basic tools such as a drill, wrench, and saw may be needed for assembly and installation of the water softener components. These tools will help ensure that all fittings are secure and correctly placed.
How Do You Construct a Simple Yet Effective DIY Water Softener?
Constructing a simple yet effective DIY water softener involves several key components and steps.
- 1. Container: A suitable container is essential for holding the water and the softening materials. Common choices include a large plastic bucket or a barrel, which should be durable and able to withstand water pressure without leaking.
- 2. Ion Exchange Resin: This is the critical component that removes hard minerals from the water. The resin beads exchange sodium ions for calcium and magnesium ions, effectively softening the water as it passes through.
- 3. Salt: Using salt, typically table salt or water softener salt, is necessary for regenerating the ion exchange resin. The salt solution cleans the resin beads by replacing the accumulated hardness ions with sodium ions, preparing it for continued use.
- 4. Filter System: Adding a simple filter system can help remove sediments and impurities from the water before it reaches the softening process. This can be a basic sediment filter that prolongs the life of the resin and maintains water quality.
- 5. Inlet and Outlet Pipes: Proper plumbing is crucial for directing the water flow into and out of your DIY water softener. Use PVC pipes or hoses to connect the system to your home water supply and ensure a secure fit to prevent leaks.
- 6. Regeneration Process: Establish a routine for regenerating the resin with a salt solution. This usually involves soaking the resin in a concentrated saltwater mix for a few hours, after which the water can be flushed through the system to remove excess salt before use.
Each component works together to create a functional water softening system that can effectively reduce hardness in your water supply, improving its quality for everyday use.
What Maintenance Procedures Are Essential for Your DIY Water Softener?
Essential maintenance procedures for a DIY water softener ensure optimal performance and longevity of the system.
- Regular Salt Level Checks: Monitoring the salt level in the brine tank is crucial for the regeneration process of the softener. If the salt is too low, the system will not function effectively, leading to hard water problems.
- Cleaning the Brine Tank: It is important to clean the brine tank periodically to prevent salt bridging and the buildup of sludge. This ensures that the salt dissolves properly during regeneration, maintaining the efficiency of the softening process.
- Regeneration Cycle Adjustment: Depending on water usage and hardness levels, adjusting the regeneration cycle frequency can optimize the softener’s performance. Manual adjustments may be necessary if you notice a decline in water softness.
- Replacing the Resin Bed: Over time, the resin beads in the softener can become less effective and may need replacement. This typically occurs every 5 to 10 years, depending on water quality and usage, which is crucial for maintaining soft water output.
- Inspecting Valves and Pipes: Regularly checking for leaks and ensuring that all valves and pipes are functioning properly can prevent water loss and ensure that the system operates efficiently. Any signs of wear or damage should be addressed promptly to avoid larger issues.
- Testing Water Hardness: Periodic testing of the water hardness levels helps gauge the effectiveness of the water softener. If tests show an increase in hardness, it may indicate that maintenance is required or that the system needs adjustments.
What Common Mistakes Should You Avoid When Making a DIY Water Softener?
When creating a DIY water softener, there are several common mistakes to avoid to ensure effectiveness and safety.
- Using Incorrect Materials: Many DIY water softeners recommend using materials that are not suitable for water treatment, such as non-food grade plastics or metals that can leach harmful substances. It’s essential to use high-quality, food-grade materials to ensure the water remains safe for consumption.
- Improperly Sized System: A common error is not properly sizing the system to the household’s water usage and hardness levels. If the system is too small, it won’t effectively soften the water, while an oversized system can be inefficient and lead to wasted resources.
- Neglecting Maintenance: DIY projects often overlook the necessity of regular maintenance, such as replenishing salt or cleaning the resin tanks. Failing to maintain the system can lead to reduced efficiency and potential malfunctions over time.
- Ignoring Local Water Conditions: Each region has different water hardness levels and mineral compositions, and a one-size-fits-all approach may not work. It’s crucial to test your water before deciding on a DIY solution, as different methods may be more effective depending on your specific water quality.
- Skipping the Pre-Filter: Some DIY water softener designs do not include a pre-filter to remove sediment and debris before the softening process. Installing a pre-filter can prevent clogging and prolong the life of the softening system.
- Underestimating Regeneration Needs: Many DIY setups fail to account for how often the resin needs to be regenerated. Understanding the regeneration process and scheduling it appropriately ensures that your water softener continues to function effectively.
- Not Considering Water Pressure: DIY softeners can affect water pressure if not designed correctly, leading to weak water flow. It’s essential to ensure that the system does not create excessive resistance in the plumbing to maintain adequate water pressure.
How Does a DIY Water Softener Compare to Professional Systems?
| Aspect | DIY Water Softener | Professional System |
|---|---|---|
| Cost | Generally lower initial cost, typically under $500. | Higher upfront cost, often exceeding $1,000, including installation. |
| Installation | Can be installed by homeowners with basic tools and skills. | Requires professional installation, ensuring proper setup. |
| Effectiveness | Effective for most hard water issues, but may have limitations. | Highly effective, tailored to specific water quality needs. |
| Maintenance | Requires regular checks and DIY maintenance. | Lower maintenance frequency, often includes service contracts. |
| Warranty | Limited warranty, typically around 1-2 years. | Comprehensive warranty, often 5-10 years with service options. |
| Water Quality Testing | DIY systems may require homeowner to test water before installation. | Professional systems often include water testing as part of the service. |
| Long-term Costs | Ongoing costs for salt and electricity may add up over time. | Generally higher long-term costs but includes service and maintenance. |
| Space Requirement | Compact designs available, but may vary by model. | Typically larger systems requiring designated space. |