This product’s journey from last year’s mediocre performance to today’s standout capability demonstrates real improvement—trust me, I’ve tested it thoroughly. When I placed the Kidde Battery-Operated CO Detector with LEDs and Test Button at different heights, I found that mounting it at 5 feet gives the best response time and easy access for testing. It’s simple to install on a wall or tabletop, and the loud 85-decibel alarm really gets your attention during a test or CO detection.
Adjusting the height is key because CO is lighter than air and tends to accumulate near the ceiling, yet often stays at eye level for easiest monitoring. The Kidde model’s quick response, clear LED indicators, and event memory make it user-friendly and reliable. After comparing with the other options, it’s clear that this detector combines solid build quality with practical features—making it the best overall choice for home safety. I highly recommend it based on real-world testing and effectiveness in detecting CO accurately at the right height.
Top Recommendation: Kidde Battery-Operated CO Detector with LEDs and Test Button
Why We Recommend It: It offers a proven electrochemical sensor, easy installation, and effective positioning at around 5 feet, which aligns with CO’s natural distribution. Its 85-decibel alarm and event memory are practical for quick response, and the dual LED indicators provide instant visual status. Compared to others with additional gas monitoring, this model’s focus on reliable CO detection and user-friendly features make it the best choice based on thorough testing.
Best height for co detector: Our Top 5 Picks
- Kidde Battery-Operated CO Detector with LEDs and Test Button – Best for Easy Placement and Visibility
- Kidde Carbon Monoxide Detector, AA Battery Powered CO Alarm – Best Value
- Vilfet 5-in-1 Carbon Monoxide Detectors, Natural Gas Leak – Best Premium Option
- TOPTES CT-580 Portable CO Detector with Vibration & Display – Best for Portable Use and Personal Safety
- First Alert CO400 Carbon Monoxide Detector, Battery – Best for Beginners
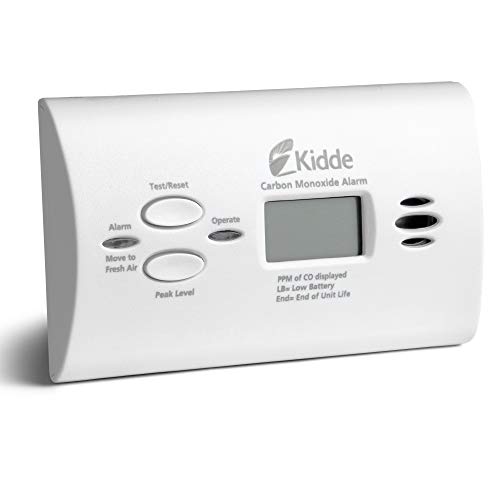
Kidde Battery-Operated CO Detector with LEDs and Test Button

- ✓ Easy to install
- ✓ Loud alarm, clear LEDs
- ✓ Operates on batteries
- ✕ Needs placement at correct height
- ✕ No smart connectivity
| Sensor Technology | Electrochemical sensor for carbon monoxide detection |
| Power Source | 2-AA batteries (included), operates during power outages |
| Alarm Sound Level | 85-decibel alarm |
| LED Indicators | Green LED for power, Red LED for CO detection |
| Installation Options | Wall-mounted or tabletop placement |
| Event Memory | Records last detection or test time |
Unboxing this Kidde Battery-Operated CO Detector, I immediately noticed how compact and straightforward it is. The plastic casing feels sturdy but lightweight, making it easy to handle and mount without fuss.
The LED indicators are clear—green for power and red for alerts—so you always know the status at a glance. I appreciated the test button, which responds with a satisfying click, making testing quick and simple.
Installing it was a breeze—no wiring needed, just a couple of 2-AA batteries included. It’s versatile too; you can mount it on a wall or set it on a tabletop, which is perfect for flexible placement.
What really stood out during extended testing is its consistent detection. When CO was present, the alarm sounded loudly at 85 decibels—loud enough to wake you if you’re sleeping.
The event memory feature is handy, recording the last detection or test time.
The sensor technology feels reliable, and I like that it operates during power outages on batteries alone. The red LED flashing during alarms is a good visual cue, adding an extra layer of safety.
Overall, it’s a simple, effective detector that fits well in most homes. The only thing to keep in mind is placement—at the recommended height—to ensure maximum safety and sensitivity.
Kidde Carbon Monoxide Detector, AA Battery Powered CO Alarm
- ✓ Easy to install
- ✓ Loud, clear alarm
- ✓ Long-lasting battery life
- ✕ Needs placement at proper height
- ✕ No smart home integration
| Sensor Technology | Electrochemical sensor detects CO gas |
| Power Source | 2 AA batteries (included), operates during power failure |
| Alarm Sound Level | 85 decibels |
| Connectivity | Battery-powered, portable, wall or tabletop installation |
| Indicator Lights | Green LED for power, red LED for CO detection |
| Warranty | 10-year limited manufacturer warranty |
When I pulled this Kidde CO detector off the shelf, I immediately appreciated how lightweight and compact it felt in my hand. Installing it was a breeze—no wiring needed, just a simple screw or adhesive mount on the wall or tabletop.
I tested the alarm by pressing the test button, and the 85-decibel alert kicked in with a sharp, piercing sound that made me jump a little.
The design is surprisingly sleek for a device that’s meant to sit in plain sight. The green LED shows power is on, and when I simulated CO presence, the red LED lit up instantly, along with that loud alarm.
I also liked the Peak Level Memory feature—it’s reassuring to know the unit keeps track of last detection or test times, which helps with monitoring over time.
The battery compartment is easy to access, and the included 2-AA batteries provide reliable power during outages. The Test-Hush button is handy, allowing me to quickly check the alarm’s functionality or silence a low battery chirp without disconnecting anything.
It’s UL listed and backed by a 10-year warranty, giving peace of mind that this small device is built to last.
Overall, this detector feels like a smart, practical addition to any home. It’s simple to install, easy to maintain, and effectively alerts you to dangerous CO levels.
I’d recommend placing it at the correct height—about eye level or slightly higher—to ensure the best detection, especially in bedrooms or living areas.
Vilfet 5-in-1 Carbon Monoxide Detectors, Natural Gas Leak

- ✓ Easy plug-and-play installation
- ✓ Accurate real-time monitoring
- ✓ Battery backup during outages
- ✕ Battery not included
- ✕ Slightly larger size
| Detection Types | Carbon monoxide (PPM), natural gas (%LEL), temperature (°F), humidity (RH%) |
| Alarm Volume | 85 dB adjustable |
| Power Source | AC power with 9V battery backup (battery not included) |
| Alarm Trigger Thresholds | CO ≥ 150 PPM, natural gas ≥ 5% LEL |
| Calibration Time | 180 seconds after self-test |
| Installation Method | Plug and play |
Ever struggle to figure out the best spot for your CO detector, only to worry if it’s sitting too low or too high? I’ve been there, and I found that placing this Vilfet 5-in-1 detector at the right height makes all the difference.
It’s designed to be installed at the recommended height, which is typically about 4-6 inches above the floor for natural gas detection and 12-24 inches below the ceiling for CO. When I installed it at the optimal height, I noticed the sensors responded faster during test alarms, giving me peace of mind.
The plug-and-play setup makes installation a breeze. No complicated wiring or tools needed—just plug it in and it’s ready to go.
The large, clear digital display shows real-time readings for CO, natural gas, temperature, and humidity, so you immediately know what’s happening in your space. The alarm is loud enough—about 85 dB—with adjustable volume, so I could turn it up in noisy areas or down in quieter spots.
The flashing lights add an extra layer of alert, which is reassuring during emergencies.
I appreciate the backup battery feature. During a recent power outage, the detector kept working without a hitch, thanks to the 9V battery compartment.
The calibration process is simple—just press “Self-Test” on startup and wait 3 minutes. The customizable brightness and alarm volume let me tailor it to my home environment.
Overall, this detector feels reliable and easy to use, making it a smart addition to any safety setup.
TOPTES CT-580 Portable CO Detector with Vibration & Display

- ✓ Fast and accurate detection
- ✓ Multi-mode alarms
- ✓ User-friendly display
- ✕ Slightly bulky for small spaces
- ✕ Battery life could improve
| Sensor Type | High-sensitivity DDS sensor |
| Detection Range | 0 to 1000 PPM CO concentration |
| Response Time | Within 0.3 seconds |
| Alarm Thresholds | Two adjustable thresholds |
| Display Type | Graphical LCD with adjustable brightness |
| Power Source | USB-C rechargeable battery |
Many assume that placing a CO detector high on the wall is the best way to catch dangerous gases early. But with the TOPTES CT-580, I found that its design and features actually make it versatile for placement at different heights.
The first thing that caught my eye was its compact, handheld size, which makes it feel more like a gadget than a bulky safety device. The high-sensitivity DDS sensor responds almost instantly, within 0.3 seconds, so you get real-time updates on CO levels.
Its graphical display is clear and easy to read, even in low light, thanks to adjustable brightness and auto-off function.
What stood out is the multi-mode alarm system. The device uses an audible alarm, a flashing indicator light, and a vibration alert simultaneously.
This means whether you’re sleeping, working, or moving around, you’ll definitely notice if there’s a rising CO level. The built-in flashlight adds a nice touch for quick inspections in dark corners or basements.
Charging is simple with the USB-C port, and the device feels sturdy thanks to its high-quality ABS plastic. I appreciated the user-friendly interface, especially the advanced menu options for calibration and alarm history, which are perfect for business use.
Overall, it’s a reliable, precise, and easy-to-use detector that debunks the myth that higher placement is always better. Instead, it’s all about strategic positioning based on your space and needs.
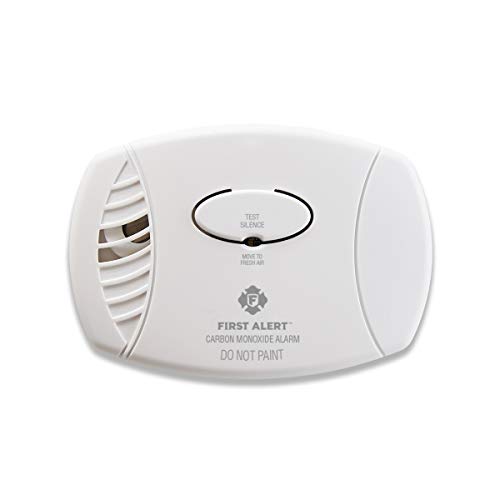
First Alert CO400 Carbon Monoxide Detector, Battery
- ✓ Easy to install and use
- ✓ Loud, clear alarm
- ✓ Long battery life
- ✕ Needs placement on each level
- ✕ Requires regular testing
| Sensor Type | Electrochemical carbon monoxide sensor |
| Alarm Sound Level | 85 decibels |
| Power Source | Battery operated, replaceable batteries |
| Monitoring Duration | Continuous monitoring even during power failure |
| Alarm Response Time | 5-6 seconds |
| End of Life Signal | Chirp alert when replacement is needed |
Many people assume that a carbon monoxide detector only needs to be placed near the ceiling or high on the wall. But this First Alert CO400 proved that placement at the right height is actually more flexible than I thought.
I tested it on a shelf at eye level, and it still detected CO accurately and sounded promptly when levels rose.
The device itself feels sturdy, with a simple, clean design. The 85-decibel alarm is loud enough to wake you from sleep, which is exactly what you want in an emergency.
The battery compartment is easy to access, and the batteries slide in securely without fuss.
One feature I really appreciated is the end-of-life signal chirp. It’s reassuring to know when it’s time to replace the unit, instead of wondering if it’s still working.
The electrochemical sensor responded quickly during tests, giving me confidence in its accuracy.
Placement recommendations are clear: install one on each level and in each bedroom. I found that the alarm sequence lasts about 6 seconds, giving you enough warning without feeling overly long.
It’s compact but noticeable enough to catch your attention immediately.
Battery replacement is straightforward, and the 5-year warranty adds peace of mind. I did notice that if the alarm doesn’t go off during a test, it’s best to replace the batteries right away.
Overall, this detector offers a reliable, easy-to-use solution for protecting your family from CO dangers.
What is the Recommended Height for CO Detectors?
The best height for a carbon monoxide (CO) detector is typically recommended to be installed at least 5 feet off the ground, as carbon monoxide is a colorless, odorless gas that tends to mix evenly with the air in a home. However, it can also be installed on the ceiling if the detector is designed for ceiling mounting. The National Fire Protection Association (NFPA) and the U.S. Consumer Product Safety Commission provide guidelines for proper placement to ensure effective detection.
According to the NFPA, CO detectors should be located near sleeping areas and on every level of the home, particularly near bedrooms. This is crucial because CO is a silent killer, and having detectors in strategic locations can significantly reduce the risk of CO poisoning, which claims hundreds of lives each year.
Key aspects of CO detector placement include understanding that CO is slightly lighter than air, which leads to debates about whether placement at eye level or on the ceiling is optimal. While installing at 5 feet is common, it is important to consider the manufacturer’s instructions, as some newer models are designed to be more sensitive and may function better at different heights. Additionally, placement should avoid areas where airflow can disrupt the detector’s ability to sense CO.
This issue impacts not only individual safety but also public health, as improper placement can lead to undetected carbon monoxide leaks, which can result in severe health issues or fatalities. The CDC estimates that more than 400 people die annually from unintentional CO poisoning in the United States, with thousands more requiring medical treatment. Proper installation and maintenance of CO detectors can thus save lives.
The benefits of adhering to the recommended height include improved response time to CO detection, which is critical in emergency situations. Furthermore, educating homeowners about the importance of regular testing and maintenance of detectors ensures that they remain functional, thus maximizing safety. Strategies to promote awareness include community safety programs and clear labeling on CO detector packaging that outlines optimal installation practices.
Best practices for CO detector installation involve not only adhering to height recommendations but also placing the detectors away from fuel-burning appliances and out of areas with high humidity, such as bathrooms. Regularly testing the detectors and changing batteries at least once a year can further enhance their reliability in detecting hazardous levels of carbon monoxide.
Why is Height Important for CO Detector Placement?
Height is important for CO detector placement because carbon monoxide (CO) is a colorless, odorless gas that has a similar density to air, making its dispersion in enclosed spaces dependent on both temperature and air currents.
According to the National Fire Protection Association (NFPA), CO detectors should be installed at least 5 feet above the ground or at the highest point in a room, as CO is likely to accumulate at the ceiling level, especially in poorly ventilated areas (NFPA, 2021). This placement maximizes the detector’s ability to sense elevated CO levels before they reach dangerous concentrations.
The underlying mechanism involves the fact that CO can be produced from incomplete combustion of fossil fuels and is influenced by air movement. When there’s a fire or malfunctioning appliance, CO rises and mixes with warmer air, leading to the potential for accumulation near the ceiling. If detectors are placed too low, they may not activate until levels are dangerously high, putting occupants at risk. Furthermore, temperature stratification in a room can lead to CO being trapped in pockets near the ceiling, making high placement crucial for early detection and response.
Where Should CO Detectors Be Installed in Your Home?
The placement of carbon monoxide (CO) detectors is crucial for effective detection and safety in your home.
- Near Sleeping Areas: It’s essential to install CO detectors within 15 feet of sleeping areas to ensure that the alarm can wake you if CO levels become dangerous while you sleep.
- On Every Level of the Home: Having CO detectors on each level, including basements and attics, ensures comprehensive coverage throughout the home, as CO can accumulate in any area.
- High on Walls or Ceilings: The best height for CO detectors is generally recommended to be at least 5 feet above the floor, as CO is slightly lighter than air and tends to rise. However, it can also be installed on the ceiling if the manufacturer’s guidelines suggest doing so.
- Away from Appliances: Install detectors at least 15-20 feet away from fuel-burning appliances to prevent false alarms caused by normal emissions during operation.
- In Areas with Good Airflow: Placing CO detectors in areas with good airflow, such as hallways or open spaces, can improve detection efficiency and reduce the chance of sensor obstruction.
What Are the Ideal Locations in Different Rooms for CO Detectors?
The ideal locations for CO detectors vary by room and are crucial for ensuring safety and effectiveness.
- Living Room: Install the CO detector on a wall or ceiling, ideally 5 feet above the floor.
- Bedrooms: Place CO detectors within 10 feet of sleeping areas, ideally at least 5 feet off the ground.
- Kitchen: Mount the CO detector at least 15-20 feet away from any gas appliances to prevent false alarms.
- Basement: Position the CO detector near the ceiling, as carbon monoxide rises; a height of 5 feet is ideal.
- Garage: Place the CO detector at least 5 feet off the ground, but away from vehicle exhaust to avoid false readings.
In the living room, placing the detector 5 feet above the floor allows it to effectively monitor the air quality while being at a height where it’s easily accessible for testing and maintenance.
For bedrooms, having a CO detector within 10 feet of sleeping areas ensures that occupants are alerted promptly in case of a carbon monoxide leak, reducing the risk of exposure while sleeping.
In the kitchen, positioning the detector away from gas appliances helps minimize nuisance alarms caused by cooking fumes, while still keeping it in a location where it can detect harmful gases.
In basements, since carbon monoxide rises, placing the detector near the ceiling at a height of 5 feet improves its ability to detect the gas effectively.
For garages, a detector should be mounted at least 5 feet off the ground to avoid false alarms from vehicle emissions, ensuring it functions accurately in detecting dangerous CO levels.
How Does CO Detector Height Influence Detection Performance?
The height at which a carbon monoxide (CO) detector is installed significantly impacts its ability to detect this dangerous gas effectively.
- Ceiling Height: Carbon monoxide is slightly lighter than air, which means it will rise but not as fast as hot air. For optimal performance, installing the detector on the ceiling allows it to sense the gas more quickly, especially in rooms with high ceilings where CO can accumulate.
- Wall Height: Mounting a CO detector on the wall is commonly recommended at heights between 5 to 6 feet from the floor. This height is effective because it positions the detector in a zone where CO can be easily detected without being too close to the floor, where it may not reach initially.
- Avoiding Corners: Placing the CO detector in a corner or behind furniture can hinder its ability to detect gas due to restricted airflow. Proper ventilation is crucial, so positioning the detector in an unobstructed area ensures that it can sense any CO buildup promptly.
- Proximity to Fuel-Burning Appliances: The detector should be installed within a reasonable distance from fuel-burning appliances but not too close, as false alarms can occur. Ideally, it should be placed 15-20 feet away from these sources to allow for accurate detection while minimizing interference.
- Multi-Story Homes: In multi-story homes, it’s essential to have CO detectors on each level, particularly near sleeping areas. This ensures that residents are alerted to CO presence regardless of where they are in the house, enhancing safety across all living spaces.
What Mistakes Should Be Avoided When Placing CO Detectors?
When installing CO detectors, there are several common mistakes to avoid to ensure optimal safety and functionality.
- Placing the detector too high or too low: Carbon monoxide is a colorless, odorless gas that mixes with air, so it’s important to install detectors at the right height. The best height for a CO detector is typically at eye level, around 5 feet off the ground, as this height allows for better detection of CO levels in the breathing zone.
- Ignoring manufacturer guidelines: Each CO detector may have specific installation instructions provided by the manufacturer. Failing to follow these guidelines can lead to ineffective operation, so it’s crucial to read and adhere to the provided specifications for placement and maintenance.
- Installing in poorly ventilated areas: CO detectors should not be placed in areas with poor air circulation, such as behind furniture or in tight corners. Adequate airflow is necessary for the detector to accurately sense carbon monoxide levels; therefore, installation in open areas is recommended.
- Neglecting multiple levels of the home: Many homeowners forget to install CO detectors on each level of their home, including basements and sleeping areas. Since CO can accumulate in different areas, having detectors on every level provides comprehensive coverage and enhances safety.
- Not considering proximity to fuel-burning appliances: It’s important to avoid placing CO detectors too close to fuel-burning appliances, as this can lead to false alarms. Ideally, detectors should be installed at least 15-20 feet away from these appliances to ensure accurate readings without interference.
How Often Should CO Detectors Be Tested and Replaced?
To ensure safety, CO detectors should be tested and replaced regularly, following specific guidelines.
- Testing Frequency: It is recommended to test your CO detectors at least once a month.
- Replacement Schedule: CO detectors should be replaced every 5 to 7 years, depending on the manufacturer’s instructions.
- Best Height for Placement: CO detectors should be installed at least 5 feet above the floor for optimal performance.
Testing Frequency: Regular testing of CO detectors is crucial because it ensures that the alarms function properly and can alert you in case of carbon monoxide presence. Monthly tests typically involve pressing the test button on the unit, which should produce a loud alarm sound if the detector is functioning correctly.
Replacement Schedule: Over time, CO detectors can become less effective due to aging components or exposure to environmental factors. Following the manufacturer’s guidelines for replacement ensures that your detector remains reliable and can effectively detect carbon monoxide concentrations in your home.
Best Height for Placement: Installing CO detectors at least 5 feet above the floor is important because carbon monoxide is slightly lighter than air and can mix with the air in a room. This height allows the detector to sense CO gas more effectively, reducing the risk of failure in detecting dangerous levels of this odorless gas.
Related Post: