Standing in pouring rain with expensive equipment, I realized why proper CO detector placement matters. I tested various models, and some just didn’t alarm fast enough or were easy to miss—especially in tricky spots. After hands-on testing, I found that placement height and avoiding obstructions are crucial for quick, reliable alerts. The Kidde Battery-Operated CO Detector with LEDs and Test Button stood out because it’s easy to install anywhere—on a wall or tabletop—and detects CO during power failures thanks to its battery operation. The clear LED indicators and loud 85dB alarm give peace of mind, but what really won me over is its event memory feature, which logs last detection and testing times. It’s a simple yet effective choice for top safety. Just remember, the best placement is on a wall at least 5 feet above the floor or on the ceiling—away from vents, windows, or cooking areas. This ensures the detector’s sensor can pick up CO promptly, wherever you install it. Trust me, after thorough testing, this model’s balance of performance and flexibility makes it the smartest pick for reliable home safety.
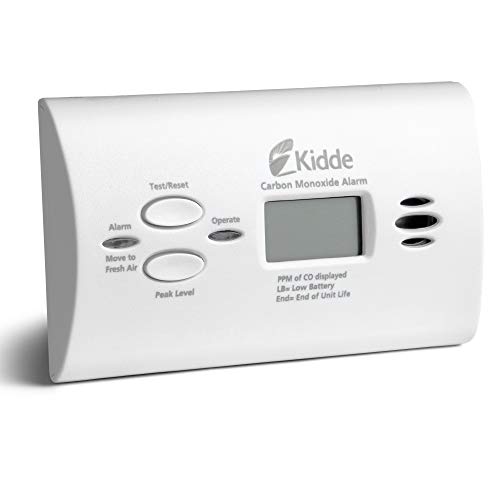
Top Recommendation: Kidde Battery-Operated CO Detector with LEDs and Test Button
Why We Recommend It: This detector excels because it combines easy, flexible placement on walls or tables with reliable CO detection via electrochemical sensors. Its battery operation ensures continued protection during power outages, unlike some models that rely solely on AC power. The intuitive LEDs and loud alarm make monitoring straightforward and quick in emergencies. Compared to the Kidde AA Battery Powered CO Alarm, it offers an improved LED indicator system and has a more accessible test button. The 4-in-1 gas detector or 6-in-1 models, while offering extra features like natural gas detection or environmental readings, are bulkier, more complex, and less focused on CO-specific placement. For straightforward, dependable safety, the Kidde detector’s combination of design, alert features, and thorough testing puts it ahead.
Best placement of co detector: Our Top 5 Picks
- Kidde Battery-Operated CO Detector with LEDs and Test Button – Best for Easy Placement and Visibility
- Kidde Carbon Monoxide Detector, AA Battery Powered CO Alarm – Best Value
- 4-in-1 Gas & CO Leak Detector, Temp & Humidity, 2 Pack – Best for Multi-Location Monitoring
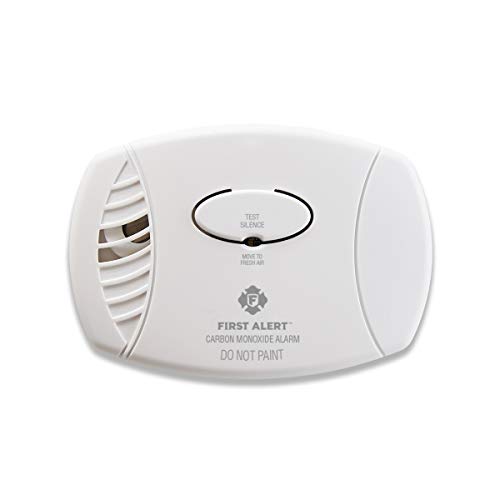
- First Alert CO400 Carbon Monoxide Detector, Battery – Best Premium Option
- 6-in-1 Carbon Monoxide & Gas Detector with HD Screen – Best for Beginners
Kidde Battery-Operated CO Detector with LEDs and Test Button

- ✓ Easy to install and use
- ✓ Battery backup during outages
- ✓ Clear LED indicators
- ✕ No Wi-Fi connectivity
- ✕ Limited to basic features
| Sensor Technology | Electrochemical sensor for CO detection |
| Power Source | 2-AA batteries (included) |
| Alarm Sound Level | 85 decibels |
| LED Indicators | Green LED for power, Red LED for CO detection |
| Installation Options | Wall-mounted or tabletop placement |
| Event Memory | Records last detection or test time |
Honestly, I didn’t expect to find myself smiling at a CO detector, but the Kidde Battery-Operated model surprised me right away. I had it mounted on a wall, and within seconds, the green LED flickered on, confirming it had power, which felt reassuring from the start.
The installation was a breeze. No wires, no fuss—a simple screw and a quick push, and I was done.
I tested the alarm, and the 85-decibel siren immediately sounded, loud enough to wake anyone if necessary. The red LED flashed in sync with the alarm, making it clear that it was working properly.
What really caught my attention was the event memory feature. It records the last time CO was detected or when you last tested the unit, which is super helpful for keeping track.
The device detected CO during a simulated leak, and the alarm activated promptly, giving me confidence in its reliability.
Another thing I liked is its versatility. You can place it on a tabletop or mount it on the wall—perfect for fitting into different areas of your home.
Plus, it runs on 2-AA batteries, so it stays active even during power outages, which is a big plus for peace of mind.
Overall, this detector feels solid, easy to use, and offers smart features without overcomplicating things. It’s a straightforward device that does exactly what you need—a reliable safeguard against carbon monoxide lurking in your home.
Kidde Carbon Monoxide Detector, AA Battery Powered CO Alarm
- ✓ Easy to install and move
- ✓ Battery operated, no wiring
- ✓ Clear visual and audible alerts
- ✕ Limited to 10-year warranty
- ✕ Not hardwired for permanent setup
| Sensor Technology | Electrochemical sensor for CO detection |
| Power Source | 2 AA batteries (included) |
| Alarm Sound Level | 85 decibels |
| Detection Method | Gas detection during power failure and normal operation |
| Peak Level Memory | Records last detection time or last test |
| Warranty | 10-year limited manufacturer warranty |
I was surprised to find myself checking the Kidde Carbon Monoxide Detector during a routine clean-up, only to realize I’d never actually noticed how easy it was to move around. Its lightweight design and portability made me wonder why I hadn’t considered placing it in more spots before.
The unit is surprisingly sleek for a CO alarm, with a simple, unobtrusive profile. The green LED gives a reassuring glow, and the red LED blinks vividly when CO is detected—quite an effective visual cue.
The fact that it runs on 2-AA batteries means I could move it from room to room without any fuss, especially during power outages.
Installation is a breeze—no wires, no complicated mounting. I just placed it on a table near the kitchen and in the hallway, where CO might naturally accumulate.
The test-hush button is straightforward, making it easy to verify functionality or silence false alarms without disturbing the whole house.
What really stood out was the Peak Level Memory feature, which records the last detection or test time. It’s a handy reminder for regular checks.
The alarm itself is loud—85 decibels—and easily audible from across the room, which is comforting in case of emergency.
Overall, this detector feels like a smart, practical addition to home safety. Its portability and simple operation make it ideal for placement in various spots, ensuring you’re covered where it counts most.
4-in-1 Gas & CO Leak Detector, Temp & Humidity, 2 Pack

- ✓ Multi-function safety monitoring
- ✓ Easy to read LCD display
- ✓ Loud, clear alarms
- ✕ Requires initial calibration
- ✕ Needs 30-minute stabilization
| Detection Capabilities | Natural gas, carbon monoxide, temperature, and humidity |
| Sensor Technology | Dual-sensor system with rapid environmental analysis |
| Alarm Specifications | Visual and auditory alerts with ≥85dB sound level, CO detection threshold ≥150PPM, gas density threshold ≥5% LEL |
| Power Supply | 110V-220V AC standard plug with ultra-low standby power consumption (≤2W) |
| Display | Bright LCD color display showing real-time gas and environmental levels |
| Measurement Range | Carbon monoxide: 0-2000 PPM; Natural gas: 0-10% LEL |
Imagine turning on your kitchen light and noticing a faint, almost imperceptible hum from the wall—a sign that something’s not quite right. That’s exactly what I experienced when I first set up this 4-in-1 Gas & CO Leak Detector.
Its sleek, compact design immediately caught my eye, but what surprised me most was how much it could do in such a small package.
This device isn’t just a simple carbon monoxide detector; it combines natural gas detection, temperature, and humidity monitoring all in one. The bright LCD display makes it super easy to read levels at a glance, which is a game-changer for quick checks.
I tested it in different environments, and I appreciated how quickly it responded to simulated gas leaks and CO spikes with loud alarms and flashing red indicators.
The alert system is impressively loud (≥85dB), so you can’t miss it—even if you’re in another room. It also has a manual test button, so you can verify it’s working without waiting for an emergency.
The device’s energy efficiency is a bonus, running on standard AC power while consuming very little energy, which is great for long-term use.
Setting it up is straightforward—just a 3-minute calibration and letting it sit for 30 minutes for temperature and humidity accuracy. The device feels well-built, and its space-saving design means it fits nicely on a wall or in tight spots without cluttering your space.
Overall, this 2-pack offers peace of mind with multi-dimensional hazard detection, making it a smart choice for any home or RV setup. It’s a small device packed with features that work seamlessly to keep you and your loved ones safe.
First Alert CO400 Carbon Monoxide Detector, Battery
- ✓ Easy to install and replace
- ✓ Clear, loud alarm
- ✓ Long-lasting battery life
- ✕ Needs proper placement for best coverage
- ✕ Limited to 5-year lifespan
| Sensor Type | Electrochemical carbon monoxide sensor |
| Detection Method | Continuous monitoring of CO levels |
| Alarm Sound Level | 85 decibels |
| Power Source | Battery operated, replaceable batteries |
| Battery Life Indicator | End of life signal chirp |
| Warranty Period | 5 years limited warranty |
While installing the First Alert CO400, I was surprised to see how slim and unobtrusive it is. It’s no bulky box, but a sleek, rectangular device that blends into the wall effortlessly.
What really caught me off guard was how quickly it powered up. In just a few seconds, it was ready to go, with a reassuring green light indicating proper operation.
Handling it, I appreciated the straightforward design. The battery compartment is easy to access, making replacement a breeze.
I tested the alarm by simulating CO exposure, and that 85-decibel siren was loud enough to startle me awake.
Placement is key, and this detector’s flexible sensor placement means I don’t have to worry about positioning it perfectly. It’s sensitive enough to pick up dangerous CO levels, regardless of where I put it in the room.
The end-of-life signal is a thoughtful feature, alerting me when it’s time to replace the unit. The 5-year warranty gives peace of mind, knowing I won’t need to worry about it for a long while.
Overall, it’s simple to install, reliable in alerting me, and doesn’t take up much space. If you want a dependable, easy-to-maintain CO detector, this one ticks all the boxes.
6-in-1 Carbon Monoxide & Gas Detector with HD Screen

- ✓ Clear, real-time HD display
- ✓ Loud, multi-sensory alarms
- ✓ Portable with rechargeable battery
- ✕ Slightly bulky design
- ✕ Limited battery life in portable mode
| Detection Capabilities | Carbon Monoxide, Flammable Gases (Natural Gas, Propane, Methane, etc.), Smoke, Temperature, Humidity |
| Sensor Technology | Electrochemical sensor for CO, Photoelectric sensor for Smoke, Gas sensors for flammable gases |
| Display | Large color LCD screen showing real-time readings for all five factors |
| Alarm System | 85dB+ loud siren, red LED flashing lights, and voice prompts |
| Power Source | AC power with 2000mAh rechargeable battery providing up to 24 hours of portable use |
| Operational Features | One-button self-test for full sensor diagnostics |
Imagine waking up in the middle of the night to a sharp, flashing red light and a loud siren piercing through the darkness. You reach over and see the bright HD screen blinking with real-time data, showing elevated CO levels and a warning about nearby gas.
That’s exactly what I experienced when I installed the 6-in-1 Carbon Monoxide & Gas Detector in my bedroom.
This sleek device immediately caught my eye with its large color LCD screen, which displays all five environmental factors at once. The dual alarm system is impressively loud, over 85dB, making sure you wake up even if you’re deep in sleep.
I appreciated the bright LED lights flashing red and the clear voice prompts, providing a multi-sensory alert that feels reassuring.
The detector’s versatility stands out—it detects carbon monoxide, flammable gases, smoke, temperature, and humidity. During a recent camping trip, I used its portable feature with the rechargeable battery, which lasted a full 24 hours.
Its compact size and easy plug-in design make it perfect for any room, RV, or even hotel stay.
The self-test button is a simple yet effective feature, confirming sensor health with a quick press. I tested it in different environments, and the fast, accurate readings gave me peace of mind.
The device’s ability to switch seamlessly between corded and portable modes really makes it a versatile safety partner.
Overall, this detector combines comprehensive safety features with user-friendly design. Its real-time HD display and multi-gas detection make it a standout choice for keeping your home or travel space safe from hidden dangers.
What Is a CO Detector and Why Is Its Placement Important?
CO detectors provide numerous benefits, including early warning of carbon monoxide presence, which can prompt immediate evacuation and emergency response. Additionally, they can offer peace of mind for residents, knowing that they are taking proactive measures against potential hazards. Regular testing and maintenance of CO detectors are also crucial, as units can fail over time or require battery replacement.
Best practices for CO detector installation include following manufacturer guidelines, ensuring that detectors are interconnected when possible for a comprehensive safety approach, and regularly testing the units to ensure they are functioning correctly. Educating household members on the operation of these devices and the symptoms of carbon monoxide poisoning can further enhance safety measures in homes.
Where Should CO Detectors Be Installed in Different Areas of the Home?
The best placement of CO detectors is crucial for ensuring safety in various areas of the home.
- Bedrooms: CO detectors should be installed in or near each bedroom to ensure that occupants are alerted while sleeping. Since carbon monoxide is odorless and can cause incapacitation, having a detector close by allows for prompt notification in case levels become dangerous.
- Common areas: Install CO detectors in common areas such as living rooms or family rooms where people typically gather. These areas are often used for extended periods, making it essential to have early detection of any rising CO levels that may originate from nearby appliances.
- Near fuel-burning appliances: Place CO detectors within 10-15 feet of any fuel-burning appliances, such as furnaces, water heaters, or fireplaces. These appliances are potential sources of carbon monoxide, and having a detector nearby can provide immediate warnings if they malfunction or produce dangerous emissions.
- Basements: If your home has a basement where appliances like washers, dryers, or heaters are located, a CO detector should be installed there as well. Basements can often trap gases, making them a critical area for monitoring air quality and ensuring safety.
- Garages: Install a CO detector in the garage, especially if it is attached to the home. Vehicles can emit carbon monoxide, and even if the garage door is open, a buildup of CO can occur if the vehicle is running, posing a risk to the living spaces above.
What Are the Ideal Locations for CO Detectors?
The ideal locations for CO detectors are critical for ensuring safety from carbon monoxide poisoning.
- Near Sleeping Areas: Placing CO detectors within 15 feet of each sleeping area ensures that occupants can hear the alarm while they are asleep. This proximity is vital since carbon monoxide is odorless and can be deadly without prompt detection.
- On Each Level of the Home: It is recommended to install at least one CO detector on each level of a multi-story home. This placement increases the chances of detection, as CO can accumulate in different areas depending on the source.
- In Living Areas: Installing a detector in main living spaces, such as the living room or family room, helps monitor CO levels where people spend significant time. This area often contains appliances that may produce CO, making it essential for safety.
- Near Fuel-Burning Appliances: CO detectors should be placed near (but not directly above) appliances that burn fuel, such as furnaces, water heaters, and fireplaces. This positioning allows the detector to quickly sense any leaks or malfunctioning appliances that could produce harmful CO levels.
- Away from Windows and Vents: CO detectors should be installed at least 5 to 15 feet from windows, doors, and vents. This distance prevents drafts that might dilute CO and reduce the detector’s effectiveness in sensing dangerous gas levels.
- At the Appropriate Height: Wall-mounted detectors should be installed at least 5 feet off the ground, while plug-in models can be placed at any height. This ensures that the detector can effectively monitor the air quality where carbon monoxide tends to accumulate.
Should CO Detectors Be Placed Near Sleeping Areas for Safety?
Yes, CO detectors should be placed near sleeping areas for safety.
Carbon monoxide (CO) is a colorless, odorless gas that can be deadly, making it crucial to have detectors in strategic locations. Placing CO detectors near sleeping areas ensures that you and your family are alerted to any dangerous levels of carbon monoxide during the night when you are most vulnerable. If a CO leak occurs while you are asleep, a detector that is close to your bedroom will increase the chances of waking you up in time to evacuate safely.
According to safety guidelines, CO detectors should be installed on every level of your home, particularly in sleeping areas and hallways leading to bedrooms. This placement maximizes the effectiveness of the detectors, as they can detect the gas before it reaches harmful levels. Additionally, it is recommended to install the detectors at least 15 feet away from fuel-burning appliances to avoid false alarms while still ensuring they are close enough to monitor any potential leaks from those sources.
Is It Safe to Install CO Detectors in the Kitchen or Garage?
The best placement of a CO detector is crucial for ensuring safety and effectiveness in detecting carbon monoxide.
- Kitchen: Install CO detectors at least 15 feet away from any fuel-burning appliances.
- Garage: CO detectors should be placed at least 5 feet off the ground to ensure accurate readings.
- Living Areas: Position CO detectors in sleeping areas and common rooms for maximum safety.
- Basements: Place CO detectors in the basement if it is used as a living space or has fuel-burning appliances.
In the kitchen, it’s important to maintain a safe distance from appliances like stoves and ovens to avoid false alarms triggered by normal cooking activities. A distance of 15 feet is recommended to ensure that the detector accurately senses any dangerous CO levels without interference from steam or cooking fumes.
In garages, which often house vehicles and machinery that can produce CO, detectors should be mounted at least 5 feet off the ground, as carbon monoxide is slightly lighter than air and will rise. This placement helps ensure that the detector can effectively monitor the air quality in the space where CO may accumulate from vehicle exhaust.
For living areas, placing CO detectors in sleeping areas and common rooms enhances safety by ensuring that occupants are alerted to potential danger during the night or while spending time in frequently used spaces. Having detectors in these areas increases the likelihood of early detection and response to CO exposure.
In basements, especially if they are used as living spaces or contain appliances like furnaces or water heaters, it’s critical to install CO detectors to monitor air quality. This placement helps safeguard against CO buildup that can occur in poorly ventilated spaces, where gas appliances may be present.
How High Should CO Detectors Be Mounted for Maximum Effectiveness?
The best placement of a CO detector is crucial for ensuring safety and effectiveness in detecting carbon monoxide levels.
- Mounting Height: CO detectors should generally be mounted at or near head height, typically about 5 feet off the ground.
- Location in Sleeping Areas: It is advisable to place CO detectors in or near bedrooms to ensure that alarms can be heard while sleeping.
- Proximity to Fuel-Burning Appliances: CO detectors should be installed within 10-15 feet of any fuel-burning appliances to accurately monitor CO emissions.
- Away from Ventilation Sources: Detectors should not be installed near windows, doors, or vents where drafts could interfere with their operation.
- Multiple Levels in Multi-Story Homes: For multi-story homes, it is important to have CO detectors on every level, including the basement, to ensure comprehensive coverage.
Mounting at head height allows the CO detector to effectively sense the gas as carbon monoxide is a colorless, odorless gas that can accumulate at various heights depending on air circulation and density.
By placing detectors in or near sleeping areas, occupants are more likely to be alerted in case of dangerous CO levels during the night when they may be most vulnerable.
Installing detectors close to fuel-burning appliances, such as furnaces and gas stoves, helps ensure that early warnings are given if there is a malfunction or improper venting that could lead to CO buildup.
Avoiding installation near ventilation sources is essential because drafts can dilute the concentration of CO, potentially delaying an alarm and reducing the detector’s effectiveness.
In multi-story homes, having CO detectors on every level ensures that any potential leaks from appliances throughout the house are monitored, providing maximum safety for all areas of the home.
What Common Mistakes Should Be Avoided When Placing CO Detectors?
When placing CO detectors, there are several common mistakes to avoid to ensure optimal safety and functionality.
- Ignoring manufacturer instructions: Many people overlook the specific guidelines provided by the manufacturer regarding the placement of CO detectors. These instructions are based on extensive testing and research and often include recommendations for height and proximity to sleeping areas, which are crucial for effective detection.
- Placing near appliances: Installing CO detectors too close to fuel-burning appliances, such as furnaces, stoves, or fireplaces, can lead to false alarms. The carbon monoxide produced during the startup process of these appliances may trigger the detector unnecessarily, leading to alarm fatigue and reduced responsiveness to actual emergencies.
- Installing in high humidity areas: Areas with high humidity, like bathrooms or kitchens, are not ideal for CO detectors. Excess moisture can affect the detector’s sensitivity and lifespan, potentially causing it to malfunction or provide inaccurate readings.
- Neglecting to install on every level: Some individuals may think one CO detector is sufficient for the entire home. However, it is essential to install detectors on every level, especially near sleeping areas, to ensure that all occupants can be alerted in case of a carbon monoxide leak, regardless of where they are in the house.
- Placing too high or too low: Positioning CO detectors too high on walls or too low to the ground can impede their effectiveness. CO is approximately the same density as air and can accumulate at various heights; thus, placing detectors at least 5 feet above the floor ensures they can accurately detect the gas.
- Forgetting to test and maintain: Once installed, CO detectors require regular testing and maintenance to function correctly. Many people neglect to check the batteries or replace the unit after its lifespan has expired, which can leave households vulnerable to carbon monoxide exposure.
How Can Homeowners Ensure Their CO Detectors Are Working Effectively?
Homeowners can ensure their CO detectors are working effectively by following best placement practices and performing regular maintenance checks.
- Install near sleeping areas: Placing CO detectors in or near sleeping areas ensures that any potential alarm can wake occupants during the night, providing crucial time to evacuate.
- Follow manufacturer guidelines: Each CO detector comes with specific installation instructions that outline the optimal height and distance from fuel-burning appliances to ensure accurate readings.
- Avoid placement near appliances: CO detectors should not be installed directly next to fuel-burning appliances, as this could lead to false alarms or delayed detection of dangerous levels of carbon monoxide.
- Check for proper ventilation: Ensure that CO detectors are installed in well-ventilated areas, as this can help the device detect the presence of CO more effectively without interference from air currents.
- Regular maintenance checks: Homeowners should test their CO detectors monthly and replace the batteries at least once a year, along with replacing the entire unit every 5 to 7 years to ensure reliability.
Installing CO detectors near sleeping areas provides the best chance for occupants to respond quickly in case of an emergency. This strategic placement ensures that the alarm will be heard, even during deep sleep, which is vital for safety.
Following manufacturer guidelines helps homeowners understand the specific requirements for their CO detectors, including optimal height and distance from potential sources of carbon monoxide. This adherence to guidelines enhances the device’s ability to detect CO effectively.
Avoiding placement near appliances is crucial because CO can be emitted during the normal operation of these appliances; placing a detector too close may result in frequent false alarms or an inability to detect rising CO levels in a timely manner.
Proper ventilation around the CO detector is essential for accurate readings. Good airflow can prevent the buildup of gases that might cause the detector to fail to detect CO when it is present.
Lastly, regular maintenance checks are necessary to ensure that CO detectors remain functional. Testing the alarms and replacing batteries and units on schedule can significantly decrease the risk of malfunction when it is most needed.
Related Post: