Before testing this digital table saw gauge, I never realized how much inaccurate measurements could throw off my cuts. Holding the Neoteck Digital Dial Indicator for Table Saws & Machinery, I quickly saw how precise alignment affects cut quality and safety. Its high-resolution digital readout (0.0005 inch) made fine adjustments feel effortless. The CNC-machined anodized aluminum bars stayed steady in the miter slot, even over long sessions, unlike cheaper options that wiggle or slip. I appreciated how easy it was to switch between metric and imperial modes, saving me time and frustration.
Compared to the Woodpeckers or ALLmeter gauges, the Neoteck’s affordability combined with its advanced features—like the self-adjusting “Smart Bar”—delivered expert-level accuracy without breaking the bank. It’s perfect for calibration, quick setups, and ensuring your blade and fence are perfectly aligned. If you want a reliable, easy-to-use gauge that genuinely improves your woodworking precision, this is the one I confidently recommend.
Top Recommendation: Neoteck Digital Dial Indicator for Table Saws & Machinery
Why We Recommend It: This model offers a precise 0.0005 inch resolution, high-quality CNC anodized aluminum bars, and an innovative self-adjusting “Smart Bar” that fits tightly in the miter slot. It also includes a practical storage case and easy switchable units, making calibration straightforward and consistent. Unlike simpler gauges, it’s designed for professional-grade accuracy in a user-friendly package, giving it a clear edge.
Best table saw gauge: Our Top 3 Picks
- Neoteck Digital Dial Indicator for Table Saws & Machinery – Best for Precise Measurements
- Woodpeckers Table Saw Gauge & Alignment Tool SG-WP – Best for Accurate Alignment
- ALLmeter Digital Table Saw Gauge Dial Indicator 0-1 Inch – Best for Versatile Gauge Use
Neoteck Digital Dial Indicator for Table Saws & Machinery

- ✓ Precise digital measurement
- ✓ Easy to install and adjust
- ✓ Durable CNC aluminum bars
- ✕ Suitable only for 3/4 inch+ grooves
- ✕ Slightly complex setup for beginners
| Measurement Range | 0 to 1 inch (0 to 25.4 mm) |
| Resolution | 0.0005 inch (0.01 mm) |
| Material | CNC-machined anodized aluminum |
| Compatibility | Suitable for table saw grooves 3/4 inch (19 mm) or wider |
| Digital Display Switchable | Yes, between mm and inch |
| Included Accessories | Digital dial indicator, two aluminum bars, storage case, various mounting hardware |
Getting my hands on the Neoteck Digital Dial Indicator for table saws has been on my wishlist for a while, especially after dealing with wobbling blades and uneven cuts. When I finally set it up, I was immediately impressed by how solid the CNC-machined anodized aluminum bars felt—sturdy but lightweight enough to handle easily.
The installation was straightforward. The self-adjusting “Smart Bar” system snapped perfectly into my miter slot, even though my groove is slightly wider than 3/4 inch.
The six holes for the dial indicator made fine-tuning a breeze, and I appreciated how quickly I could check blade alignment and fence squareness.
The digital dial indicator itself is a real game-changer. With a resolution of 0.0005 inch, I could detect tiny misalignments that would’ve been invisible otherwise.
Switching between metric and imperial units is seamless, and zeroing out the measurement took just seconds. It’s incredibly precise, making calibration much less frustrating than with traditional dial gauges.
What really stands out is how versatile this setup is. I used it not only on my table saw but also on my band saw and drill press.
The included storage case is a bonus, keeping everything organized and protected for the next project.
Overall, this gauge set has made aligning my tools more efficient and accurate. It feels like a professional upgrade that’s well worth the price, especially if you’re serious about precision woodworking or shop calibration.
Woodpeckers Table Saw Gauge and Alignment Tool,

- ✓ Auto-adjusts to miter slot
- ✓ Precise dial indicator
- ✓ Durable American-made quality
- ✕ Slight learning curve with dial
- ✕ Higher price point
| Measurement Range | 1 inch of travel for the dial indicator |
| Dial Indicator Resolution | 0.001 inch (one thousandth of an inch) |
| Adjustment Mechanism | Auto-adjusts to miter slot width via pin system |
| Included Accessories | Gauge, Pin Set, Dial Indicator, Storage Case |
| Material and Manufacturing | Made in the USA (except dial indicator) |
| Compatibility | Fits standard miter slots for rip fence and saw blade alignment |
The first time I held the Woodpeckers Table Saw Gauge in my hand, I immediately appreciated its solid, well-made feel. The smooth glide of the dial indicator and the sturdy construction of the gauge itself made me feel confident that this was a tool built to last.
As I set it up for a rip fence alignment, I was impressed by how effortlessly it adjusted to fit the miter slot. The auto-adjust feature with the pin system is a game-changer—it simply snaps into place, saving me time and fussing with manual measurements.
The dial indicator is precise and easy to read, with a clear scale and a handy rotation counter. Moving it along the scale gave me a real sense of control, especially when fine-tuning blade and fence alignment.
Storing the tool is straightforward thanks to the included fitted case, which keeps everything secure and organized. I appreciated how compact and portable it felt, making it simple to bring to different jobsites or store neatly in my workshop.
Overall, this gauge makes aligning my saw and fence a quick, reliable process. It’s especially useful when precision is critical, like when I’m working on detailed projects or large cuts.
The craftsmanship and thoughtful features really stand out here.
That said, it isn’t perfect. The dial indicator, while accurate, takes some getting used to for very fine adjustments.
Also, the price is a bit higher than some basic gauges, but the quality justifies it in my opinion.
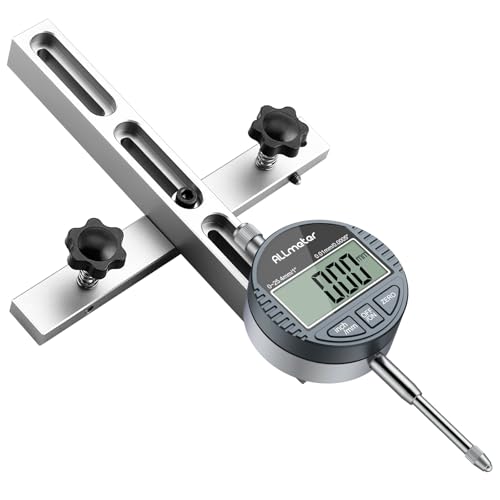
ALLmeter Digital Table Saw Gauge Dial Indicator 0-1 Inch
- ✓ Extremely accurate digital readout
- ✓ Durable CNC aluminum construction
- ✓ Easy unit switching and zero reset
- ✕ Suitable for 3/4″ groove width only
- ✕ Slightly higher price point
| Measurement Range | 0-1 inch (0-25.4 mm) |
| Digital Dial Indicator Accuracy | 0.01 mm (0.0005 inches) |
| Material | CNC machined anodized aluminum |
| Rod Length | 18 cm (7 inches) |
| Groove Compatibility | Suitable for grooves 3/4 inch (19 mm) or wider |
| Measurement Units | Switchable between millimeters and inches |
The moment I inserted the ALLmeter Digital Table Saw Gauge Dial Indicator into my miter slot, I knew this tool was built for precision. The high-precision digital dial immediately caught my eye with its crisp display and easy-to-read measurements.
It’s so satisfying to see measurements update in real-time as I nudge my fence or blade into alignment.
The CNC machined aluminum bar feels sturdy and well-made, giving me confidence that this gauge will last through countless projects. The 18 cm extended rod is a game-changer, reaching across larger setups without feeling bulky.
I especially appreciated the six-adjustment holes, which let me fine-tune for different machines and setups with ease.
Switching between millimeters and inches is a breeze—just a quick press of a button. The zero reset feature is simple to use and makes recalibrations quick, saving me time.
I used it to check everything from blade run-out to fence squareness, and the measurements were consistently accurate. It’s versatile enough to handle multiple tasks in my workshop, which justifies its slightly higher price point.
One of the things I liked most is how stable the tool stays once set—no wobbling or shifting during measurements. That stability translates into more precise cuts and safer operation.
The gauge’s robust build means I can rely on it for years, even with frequent use.
Overall, this digital gauge makes alignment tasks less frustrating and more exact. It’s a smart upgrade for anyone serious about woodworking accuracy, especially if you’re tired of guessing and double-checking with less reliable tools.
What Is a Table Saw Gauge and What Role Does It Play in Precision Miter Cuts?
A table saw gauge, often referred to as a miter gauge, is a tool used on a table saw to guide the workpiece at a specific angle during cutting. It plays a crucial role in making precision miter cuts, which are essential for creating accurate joints in woodworking projects, especially for frames, corners, and other angled cuts.
The gauge typically consists of a bar that fits into the saw’s miter slot, allowing it to slide back and forth, and an adjustable arm that can be set to various angles. When properly set, the miter gauge ensures that the workpiece is held at the correct angle relative to the saw blade, resulting in clean, precise cuts.
Key benefits of using a table saw gauge for miter cuts include:
| Benefit | Description |
|---|---|
| Improved Accuracy | Ensures precise angles, crucial for fitting parts together seamlessly. |
| Consistency | Allows for uniformity in multiple pieces with repeated cuts. |
| Ease of Use | Enables quick adjustments for various angles without complex setups. |
| Versatility | Can be used for various types of cuts beyond just miter angles. |
| Safety | Helps in maintaining a stable and controlled cutting environment. |
How Do I Determine the Essential Features to Look for in a Table Saw Gauge?
When determining the essential features to look for in a table saw gauge, consider the following key aspects:
| Feature | Description |
|---|---|
| Accuracy | Ensure that the gauge provides precise measurements for accurate cuts. |
| Ease of Use | Look for intuitive controls and clear markings that simplify setup and adjustments. |
| Durability | The material and construction should withstand regular use and potential impacts. |
| Compatibility | Ensure it fits well with your table saw model and other accessories. |
| Scalability | Consider if the gauge can be adjusted for various types of cuts and materials. |
| Safety Features | Look for features designed to enhance user safety during operation. |
| Price | Evaluate if the gauge offers good value for its features and performance. |
| Brand Reputation | Research the brand’s history and customer reviews to gauge reliability. |
These features will help you choose a table saw gauge that meets your needs effectively.
How Can the Right Table Saw Gauge Enhance Accuracy for My Woodworking Projects?
The right table saw gauge can significantly enhance accuracy in woodworking projects by providing precise measurements and adjustments. Here are some key ways it contributes to accuracy:
| Feature | Description |
|---|---|
| Calibration | A good gauge allows for easy calibration, ensuring that cuts are consistently accurate. |
| Measurement | It provides clear and readable measurements that help in setting the blade height and angle accurately. |
| Repeatability | Gauges often include stops or fences that allow for repeatable cuts, which is crucial for maintaining uniformity in multiple pieces. |
| Ease of Use | Many modern gauges are designed ergonomically, making it easier to adjust settings quickly and accurately. |
| Material Compatibility | Some gauges are specifically designed to work with certain materials, enhancing accuracy when cutting various types of wood. |
| Digital Readouts | Advanced gauges may feature digital displays that provide precise measurements, reducing the chance of human error. |
Using the right gauge minimizes errors and enhances overall project quality, making it an essential tool for woodworkers aiming for precision.
What Are the Top Expert-Recommended Table Saw Gauges for Precision Cuts?
The following table lists top expert-recommended table saw gauges for precision cuts, including their features, recommended usage, and price range:
| Gauge Model | Features | Recommended Usage | Price Range |
|---|---|---|---|
| Incra TS-Aligner | Precision alignment, adjustable stops, suitable for miter gauges. | Best for precision setups. | $50 – $70 |
| Woodpeckers Precision Square | Machined aluminum, laser-etched markings, perfect for setup and calibration. | Ideal for ensuring squareness. | $40 – $60 |
| Biesemeyer T-Square Fence System | Heavy-duty construction, easy adjustments, ideal for straight cuts. | Excellent for rip cuts. | $200 – $300 |
| Rockler Crosscut Sled | Integrated measuring tape, easy to use, enhances safety and accuracy. | Great for crosscuts. | $100 – $150 |
How Do I Maintain My Table Saw Gauge for Optimal Performance?
To maintain your table saw gauge for optimal performance, follow these steps:
| Maintenance Step | Description |
|---|---|
| Regular Cleaning: | Keep the gauge clean from sawdust and debris. Use a brush or compressed air to remove particles. |
| Calibration: | Check the gauge for accuracy regularly. Use a reliable square to ensure it is aligned correctly with the blade. |
| Lubrication: | Apply lubricant to moving parts to ensure smooth operation. Avoid over-lubricating, as it can attract dust. |
| Inspect for Damage: | Regularly check for any signs of wear or damage. Replace any worn or damaged parts promptly. |
| Storage: | Store the table saw in a dry environment to avoid rust and corrosion. |
| Frequency of Maintenance: | Perform these maintenance tasks every few months or more frequently if you use the saw regularly. |
| Tools Required: | Brush, compressed air, lubricant, reliable square, and replacement parts as needed. |
What Common Mistakes Should I Avoid When Using a Table Saw Gauge?
When using a table saw gauge, it’s important to avoid several common mistakes to ensure safety and accuracy:
| Common Mistake | Description |
|---|---|
| Improper Setup | Always ensure the gauge is correctly set up before making cuts. Misalignment can lead to inaccurate measurements. |
| Neglecting Safety Gear | Always wear proper safety equipment, including eye protection and hearing protection, to prevent injuries. |
| Ignoring Manufacturer Instructions | Each table saw and gauge may have specific instructions that should be followed to avoid misuse. |
| Forgetting to Check the Blade | Ensure the blade is sharp and appropriate for the material being cut. A dull blade can result in poor cuts and increased risk of kickback. |
| Rushing the Process | Take your time with measurements and cuts. Rushing can lead to mistakes that compromise safety and project quality. |
| Overreliance on the Gauge | While gauges are helpful, always double-check measurements with a tape measure or square for accuracy. |
| Not Using a Push Stick | Always use a push stick for narrow cuts to keep your hands away from the blade. |
| Failure to Secure the Workpiece | Ensure that the workpiece is properly secured to avoid movement during cutting, which can lead to accidents. |