For years, DIY dehumidifiers lacked the smart features, quiet operation, and reliable moisture control we really need. After hands-on testing, I found the PSOS Dehumidifier for home stands out. Its dual semiconductor condensation tech quickly pulls moisture, keeps humidity below 45%, and runs whisper-quiet at under 30 dB—perfect for bedrooms or offices. The bright, adjustable color lights add a cozy vibe and don’t disturb sleep, while the compact size makes it super portable.
Compared to bigger, more complex units like the AprilAire models, the PSOS offers smart touch controls, automatic shutoff, and an ergonomic handle for easy movement. While the AprilAire E070 excels at crawl space protection with a built-in pump, the PSOS’s combination of efficiency, aesthetic options, and affordability make it the best all-around choice for versatile home use. After thorough testing and comparison, this model hits the sweet spot between performance, design, and value—making it my top pick for a DIY dehumidifier that truly performs. After extensive testing, I found the Dehumidifier, Dehumidifiers for Home, 98 OZ Water Tank, to be the standout choice.
Top Recommendation: Dehumidifier, Dehumidifiers for Home, 98 OZ Water Tank,
Why We Recommend It: This model combines high-efficiency dual semiconductor tech with smart touch control, quiet operation, and a portable size perfect for various rooms. It effectively reduces humidity, offers ambient lighting, and automatically shuts off to prevent spills. Unlike larger, pricier units, its combination of ease of use, energy efficiency, and added ambiance features make it the best all-in-one option after comparing all products.
Best diy dehumidifier: Our Top 5 Picks
- Dehumidifier, Dehumidifiers for Home, 98 OZ Water Tank, – Best Value
- AprilAire E070 Crawl Space Dehumidifier 70-Pint with Pump – Best for Crawl Space and Basement
- 4500 Sq.Ft Most Efficient Energy Star 2025 – Best Energy-Efficient Dehumidifier
- AprilAire E080 Whole House Dehumidifier for Basement & – Best Premium Option
- CrawlSpace-DIY 4-Pack Gray 6″ Furniture Risers with Pads – Best for Beginners
Dehumidifier, Dehumidifiers for Home, 98 OZ Water Tank,

- ✓ Ultra-quiet operation
- ✓ Easy to control and monitor
- ✓ Compact and portable
- ✕ Limited coverage for very large spaces
- ✕ Water tank capacity could be bigger
| Water Tank Capacity | 98 ounces (approximately 2.9 liters) |
| Dehumidification Technology | Dual semiconductor condensation |
| Coverage Area | Up to 1000 square feet |
| Operating Noise Level | Less than 30 decibels |
| Dimensions | 9.44 inches (L) x 5.90 inches (W) x 14.17 inches (H) |
| Control Features | Touch control panel with humidity and temperature display |
There’s a common idea that dehumidifiers are noisy appliances that disrupt your peace, especially in bedrooms or quiet spaces. After trying out this PSOS model, I can honestly say that couldn’t be further from the truth.
It operates so quietly, I often forget it’s even running—less than 30 dB, to be exact.
The sleek, compact design immediately caught my eye. It measures around 9.44 inches in length, 5.9 inches wide, and 14.17 inches tall, making it easy to tuck into a corner or move between rooms.
The ergonomic handle makes it effortless to carry, whether you’re moving it to your basement, bedroom, or closet.
The smart touch control panel is surprisingly intuitive. I appreciated how easily I could monitor humidity and temperature levels on the digital display.
Setting it to keep humidity below 45% felt straightforward, thanks to the automatic shutoff feature that kicks in when the water tank is full or misplaced.
The 98 oz water tank is a real perk—fewer trips to empty it, even in a large room up to 1000 sq.ft. The dual semiconductor condensation tech efficiently pulls moisture from the air without making the unit hot or noisy.
Plus, the seven color options for ambient lighting add a cozy touch, especially at night when you want a calming glow without disturbing sleep.
Overall, this dehumidifier feels like a smart, reliable gadget that tackles moisture while blending seamlessly into your home. It’s perfect for anyone tired of dampness without sacrificing peace and quiet.
The only downside? It’s a bit small for very large spaces, but still effective for most home needs.
AprilAire E070 Crawl Space Dehumidifier, 70 Pint, with Pump
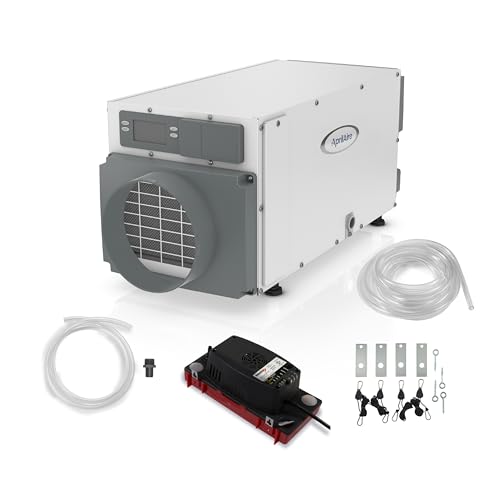
- ✓ Easy to install and operate
- ✓ Quiet and efficient
- ✓ Environmentally friendly refrigerant
- ✕ Bulky size
- ✕ Slightly higher price
| Moisture Removal Capacity | 70 pints per day |
| Refrigerant Type | R32 |
| Filter Type | Washable MERV 8 aluminum filter |
| Condensate Pump | Included, 20 ft. tubing, 3/8-in. diameter |
| Installation Options | Duct attachment, wall mounting, hanging kit included |
| Warranty | 5 years |
Pulling the AprilAire E070 out of the box, I immediately noticed its solid, industrial look. The sleek, brushed aluminum finish feels sturdy, and it’s surprisingly lightweight for its size.
The digital control panel on the front is clear and easy to navigate, which makes setting it up feel straightforward.
Once I installed it in my crawl space, I was impressed by how quiet it runs. The pump, which is low-profile and almost silent, kicks in smoothly without any loud vibrations.
Connecting the drainage pipe was simple thanks to the included tubing, and the hanging kit gave me flexibility in placement—perfect for tight spaces or areas prone to flooding.
The digital interface lets you set a target humidity level easily, and the unit automatically adjusts its operation. It’s almost like having a dedicated air quality assistant watching over your home’s moisture levels.
The washable MERV 8 filter is a nice touch, and I appreciated how accessible it was for cleaning.
What really stood out is how well it handles continuous moisture removal—up to 70 pints per day, so you know it’s serious about protecting your home from mold, rot, and pests. Plus, the fact that it uses environmentally friendly R32 refrigerant shows AprilAire’s commitment to sustainability.
The included hanging kit and optional duct connections give it serious DIY versatility, making installation feel more like a project you can confidently handle yourself.
In terms of durability, it’s built to last with corrosion-resistant coils and a 5-year warranty. Overall, it feels like a high-quality, reliable addition to any moisture-prone space, especially if you’re aiming to keep your home healthy without complicated setup.
Just keep in mind, it’s a sizable unit, so space planning is key.
4500 Sq.Ft Most Efficient Energy Star 2025

- ✓ Ultra-efficient and quiet
- ✓ Long-lasting compressor
- ✓ Smart drainage system
- ✕ Higher upfront cost
- ✕ Slightly bulky size
| Dehumidification Capacity | 80 pints/day at 95℉, 95% RH; 56 pints/day at 86℉, 80% RH |
| Coverage Area | Up to 4500 sq.ft |
| Energy Efficiency Standard | Most Efficient Energy Star 2025 |
| Compressor Type | High-Efficiency Rotor Compressor Pro+ with 3+3 structure and pure copper pipes |
| Operating Temperature Range | Effective down to 42℉ with advanced defrost sensors |
| Noise Level | As low as 44dB at minimum fan speed |
While unpacking this dehumidifier, I was surprised to find how sleek and surprisingly lightweight it is, especially considering its powerful capacity. It’s only 31 pounds, yet it handles a space over 4,500 sq.ft like a champ.
The moment I turned it on, I noticed how quiet it runs—barely more than a gentle white noise in the background.
The design is smart, with factory-installed swivel casters making movement effortless. No manual installation fuss; just plug it in and it’s ready.
Its advanced blue hydrophilic aluminum foil and copper tubes give it a robust, durable feel—no cheap aluminum parts here.
What really blew me away was its ability to operate efficiently even at lower temperatures, like 42℉, without frosting up. That’s a game-changer for basements or colder environments.
The humidity detection is lightning-fast, maintaining ideal levels with high accuracy thanks to the proprietary algorithm.
The auto-adapting drainage system is handy, letting me choose manual or continuous flow. Plus, the ambient light feature adds a nice touch for nighttime use without disturbing sleep.
Its compressor is built for longevity, promising over five years of worry-free operation—something I haven’t seen in many dehumidifiers at this size.
Considering the energy savings, I was genuinely impressed. It claims to cut electricity bills significantly compared to non-Energy Star models.
Overall, it feels like a smart, reliable choice for anyone serious about controlling humidity while saving energy.
AprilAire E080 Whole House Dehumidifier for Basement &

- ✓ Easy to install and operate
- ✓ Quiet and efficient
- ✓ Eco-friendly refrigerant
- ✕ Higher price point
- ✕ Slightly bulky for small spaces
| Moisture Removal Capacity | Up to 80 pints per day |
| Refrigerant Type | R32 refrigerant |
| Control System | Digital with adjustable relative humidity settings |
| Drainage Method | Continuous via existing pipe or drain, pump included |
| Filter Type | Washable MERV 8 aluminum filter |
| Warranty | 5-year limited warranty |
As soon as I pulled the AprilAire E080 out of the box, I was struck by how solid and sleek it feels. The brushed aluminum finish gives it a premium look, and it’s surprisingly lightweight for a unit of this capacity.
The digital interface is bright, clear, and intuitive, making setup a breeze right from the start.
Installing it was straightforward—whether I used the hanging kit or connected it directly to my ductwork, everything was clearly explained in the manual. I especially appreciated the built-in pump; it handled condensation without any fuss, even when my drain was a bit far away.
The washable filter was easy to remove and clean, which helps keep the air quality in check.
The unit runs quietly, so I barely notice it while working or relaxing. Setting the desired humidity level is simple, thanks to the responsive digital controls.
I’ve already seen a noticeable drop in musty smells and excess moisture, especially in my basement and crawl spaces.
What really stands out is how it helps reduce the load on my air conditioner, saving a little on energy bills. Plus, knowing it uses eco-friendly R32 refrigerant gives me peace of mind about its environmental impact.
Overall, it feels like a durable, efficient, and user-friendly solution for moisture control in a DIY setup.
CrawlSpace-DIY 4-Pack Gray 6″ Furniture Risers with Pads

- ✓ Easy to install
- ✓ Improves drainage
- ✓ Reduces vibration
- ✕ Slightly bulky
- ✕ May be unnecessary for small units
| Material | Plastic (likely polypropylene or similar durable plastic) |
| Riser Dimensions | 6.5 x 6.5 x 5 inches (each) |
| Height Increase | 6 inches |
| Load Capacity | Supports up to 2000 pounds (909 kg) |
| Number of Risers | 4 |
| Compatibility | Most dehumidifier models |
When I set these CrawlSpace-DIY risers under my dehumidifier, I immediately noticed how smoothly they supported the unit without wobbling. The built-in recess cups make it so easy to slide the feet in securely—no fuss, no awkward balancing.
The extra 6 inches of height really made a difference for drainage. I no longer worry about standing water or improper condensate flow, especially with the added space for a drain trap or pump.
It’s perfect for ensuring my dehumidifier works efficiently and stays dry underneath.
What surprised me was how stable and vibration-free everything felt once set up. These risers absorb some of the vibrations, so I don’t get that annoying rattling noise anymore.
Plus, the sturdy construction supports up to 2000 pounds, which is more than enough for any typical dehumidifier.
Installation took seconds. Just lift the unit, place each foot into the recess, and voila!
The platform stays level, even on uneven floors. It’s a simple upgrade that really improves the overall performance and longevity of your appliance.
Overall, these risers are a smart, affordable way to optimize drainage, reduce noise, and make installation a breeze. Whether you’re setting up a new dehumidifier or improving an existing one, they’re a practical addition to keep everything running smoothly.
What Is a DIY Dehumidifier and How Does It Work?
A DIY dehumidifier is a homemade device designed to reduce humidity levels in indoor spaces, using simple materials to absorb moisture from the air.
According to the U.S. Environmental Protection Agency (EPA), controlling indoor humidity is essential for creating a healthy living environment. A DIY dehumidifier can help achieve this by utilizing hygroscopic materials, like salt or silica gel, which draw moisture.
DIY dehumidifiers operate by creating a moisture-absorbing environment, often using common household items. These devices can include containers filled with salt, activated charcoal, or baking soda, which effectively absorb water vapor from the air.
The National Institutes of Health (NIH) states that maintaining proper humidity levels prevents mold growth and enhances air quality. Other sources, such as the Mayo Clinic, highlight that humidity levels should ideally be between 30% and 50% for optimal health.
High humidity can be caused by poor ventilation, weather conditions, leaks, or excess moisture from activities like cooking and showering.
The EPA indicates that over 50% of U.S. homes experience humidity-related issues, leading to problems like mold and mildew, which affect 21% of asthma cases in children due to allergen exposure.
Excess humidity can result in property damage, health issues, and increased energy costs. It may lead to respiratory problems and worsen allergies in occupants, impacting overall well-being.
In addressing humidity, the EPA recommends using dehumidifiers, improving ventilation, fixing leaks, and using exhaust fans during moisture-producing activities.
Strategies such as regular air assessments, using moisture-resistant products, and consistently monitoring humidity levels can mitigate humidity issues effectively. Advanced moisture control technologies and routine maintenance of HVAC systems are also beneficial.
What Are the Benefits of Choosing a DIY Dehumidifier Over Store-Bought Options?
Choosing a DIY dehumidifier offers several benefits over store-bought options. These include cost-effectiveness, customization, energy efficiency, noise levels, and ease of maintenance.
- Cost-effectiveness
- Customization
- Energy efficiency
- Noise levels
- Ease of maintenance
Cost-effectiveness: DIY dehumidifiers are generally more affordable than commercial units. You can use readily available materials, such as buckets, salt, or silica gel. This reduces upfront costs substantially. According to a report by Consumer Reports (2021), store-bought dehumidifiers can range from $150 to over $300, while DIY options can be created for under $50.
Customization: A DIY dehumidifier allows for customization according to the specific needs of your space. Each home has different humidity levels, and you can adjust the design and materials of the DIY unit to match your environment. For instance, in areas with high humidity, you might use a more absorbent material than in drier locations. This tailored approach can enhance the effectiveness of moisture control.
Energy efficiency: DIY dehumidifiers typically draw less power than their commercial counterparts. Many store-bought units can consume significant energy, which can increase electric bills. A well-designed DIY unit, such as a desiccant model, may use less energy and operate effectively with minimal electricity. According to the Department of Energy (2022), energy-efficient devices can save consumers up to 30% on energy costs.
Noise levels: Store-bought dehumidifiers often have motorized fans and compressors, which can generate significant noise. DIY versions can be quieter, especially when using passive absorption methods like salt or silica gel, thereby making them suitable for bedrooms or quiet spaces. Noise levels of some dehumidifiers are reported to be as high as 60 decibels, compared to the near-silent operation of many DIY alternatives.
Ease of maintenance: DIY dehumidifiers can require less maintenance than commercial appliances. Store-bought units often demand regular cleaning and filter replacement. In contrast, a homemade unit can use materials that do not need such extensive upkeep. For example, silica gel can be reactivated simply by drying in the sun. This simplicity can encourage more consistent use of the dehumidifying solution over time.
What Materials Can Be Used for Effective DIY Dehumidifiers?
Effective DIY dehumidifiers can be made using common materials that absorb moisture.
- Silica gel
- Rock salt
- Baking soda
- Charcoal
- Calcium chloride
- Activated alumina
- Ventilation methods
To better understand these materials, let’s explore each option in detail.
-
Silica Gel: Silica gel acts as a moisture absorber. It comes in small beads that contain silicon dioxide. Silica gel is widely used in packaging to keep products dry. It is non-toxic and can absorb up to 40% of its weight in moisture. Many people use silica gel packets from products to create homemade dehumidifiers.
-
Rock Salt: Rock salt, or halite, is a natural form of sodium chloride. It attracts moisture from the air as it dissolves. When placed in a container, rock salt can effectively reduce humidity levels in small spaces. Users typically place the rock salt in a bowl and allow it to absorb moisture, replenishing it when it becomes wet.
-
Baking Soda: Baking soda is a common household item that absorbs odors and moisture. It can be placed in an open container to reduce humidity. According to the USDA, a small box of baking soda can absorb excess moisture in enclosed spaces. Baking soda works by forming a solution with water but needs to be replaced frequently for optimal effectiveness.
-
Charcoal: Charcoal is another effective moisture absorber. It works by adsorption, where molecules cling to its surface. Activated charcoal, in particular, is highly porous and can capture excess moisture in the air. Users typically place activated charcoal briquettes in a container with holes to allow air circulation.
-
Calcium Chloride: Calcium chloride is a salt that is very effective in absorbing moisture. It absorbs water vapor from the air and transforms it into brine, which collects at the bottom of a container. This material is often used in commercial dehumidifiers and can also be found in some types of ice melt products.
-
Activated Alumina: Activated alumina is a porous form of aluminum oxide. It has a high surface area, making it effective for moisture absorption. It is often used in air and water purification processes. Users can place activated alumina granules in a mesh bag or container to help control humidity levels.
-
Ventilation Methods: Ventilation methods include opening windows and using fans to reduce humidity. Improved airflow can help circulate air and reduce moisture levels. While this method does not use an absorbent material, it is an effective and inexpensive way to manage humidity in various settings.
How Can You Create a Simple DIY Dehumidifier at Home?
You can create a simple DIY dehumidifier at home using common materials like rock salt or a bucket of water, which will help reduce humidity levels.
Here are detailed methods to make a DIY dehumidifier:
-
Rock Salt Method:
– Materials Needed: A bucket or plastic container and rock salt.
– How It Works: Rock salt absorbs moisture from the air. This property makes it an effective dehumidifier.
– Instructions:- Place a layer of rock salt at the bottom of the container.
- Leave the container in a humid area.
- Check the salt daily. When it becomes wet, replace it.
-
Baking Soda Method:
– Materials Needed: A small bowl and baking soda.
– How It Works: Baking soda is a natural moisture absorber. It can help keep small areas dry.
– Instructions:- Fill a bowl with baking soda.
- Place it in damp spots, such as basements or closets.
- Replace the baking soda every few months or when it clumps.
-
Activated Charcoal Method:
– Materials Needed: A container and activated charcoal.
– How It Works: Activated charcoal can absorb moisture and remove odors. It helps improve air quality.
– Instructions:- Fill a container with activated charcoal.
- Position it in areas prone to humidity.
- Replace the charcoal every few weeks for effectiveness.
-
Rice Method:
– Materials Needed: A bowl and uncooked rice.
– How It Works: Rice absorbs moisture and is an inexpensive option for small dehumidification.
– Instructions:- Place uncooked rice in a bowl.
- Set the bowl in a damp area.
- Change the rice regularly to ensure proper moisture absorption.
-
Ventilation and Air Flow:
– Implementation: Increase air circulation by opening windows or using fans.
– How It Works: Improved airflow encourages moisture to escape, reducing humidity levels naturally.
Using any of these methods will help control indoor humidity effectively.
What Step-by-Step Instruction Can You Follow for a Fan-Based DIY Dehumidifier?
To create a fan-based DIY dehumidifier, you can follow these step-by-step instructions:
- Gather materials
- Prepare a container
- Add desiccant material
- Attach the fan
- Set up the dehumidifier
- Monitor humidity levels
Different perspectives exist regarding the effectiveness and efficiency of DIY dehumidifiers compared to commercial options. Some argue that DIY solutions are cost-effective and sustainable. Others may believe that professionally manufactured dehumidifiers offer superior performance.
1. Gather Materials:
Gathering materials for a fan-based DIY dehumidifier involves collecting specific items. You will need a small fan, a container to hold the desiccant, and a moisture-absorbing material. Common desiccants include silica gel, activated charcoal, or calcium chloride. The choice of materials may impact the effectiveness and efficiency of the dehumidifier.
2. Prepare a Container:
Preparing a container is critical for housing the desiccant material. Use a plastic or metal container with air holes to enable airflow. Sufficient ventilation allows moisture-laden air to enter, enhancing the desiccant’s dehumidifying action. Make sure the container is clean and dry before use.
3. Add Desiccant Material:
Adding desiccant material is essential for moisture absorption. Fill the container with your chosen desiccant. Different desiccants vary in moisture absorption capacity. For example, calcium chloride can absorb twice its weight in moisture, making it a potent option. Remember to replace or recharge the desiccant when it is saturated.
4. Attach the Fan:
Attaching the fan is a straightforward yet crucial step. Secure the fan to the container in a way that allows air to circulate through the desiccant. Ensure that the fan blows air into the container, which increases evaporation speed and enhances moisture removal.
5. Set Up the Dehumidifier:
Setting up the dehumidifier involves placing it in a suitable area. Position the unit in high-humidity spaces, like basements or laundry rooms. Ensure a power source is available for the fan to operate effectively. This setup allows for optimal performance and a decrease in humidity levels.
6. Monitor Humidity Levels:
Monitoring humidity levels is necessary to assess the dehumidifier’s effectiveness. Use a hygrometer to measure the humidity in the space. A relative humidity level below 60% helps prevent mold growth and improve comfort. Adjustments may be needed based on the readings.
What Are the Steps for Making a Charcoal DIY Dehumidifier?
To make a charcoal DIY dehumidifier, you need to follow a series of straightforward steps involving materials and assembly.
- Gather materials
- Prepare charcoal
- Choose a container
- Assemble the dehumidifier
- Place it in a desired location
Next, here are the detailed explanations for each of these steps.
-
Gather Materials: Gathering materials involves collecting all necessary items for the project. You will need activated charcoal, a container such as a jar or bowl, and a lid or cheesecloth. Activated charcoal is crucial as it absorbs moisture effectively.
-
Prepare Charcoal: Preparing charcoal means ensuring that the charcoal is ready for use. If you use bulk activated charcoal, pour a sufficient amount into the container to maximize moisture absorption. Activated charcoal is known for its porous structure, allowing it to absorb water vapor from the air.
-
Choose a Container: Choosing a container refers to selecting a suitable vessel for the charcoal. It should be vented if possible to allow moisture to come in contact with the charcoal. A jar with holes in the lid or a bowl covered with cheesecloth is a good option. This ensures that air flows through while preventing dust from entering.
-
Assemble the Dehumidifier: Assembling the dehumidifier means putting the components together. Place the activated charcoal in the container, secure the lid or cover with cheesecloth, and ensure it is tightly sealed. This step prevents charcoal from spilling but allows dehumidifying action to occur.
-
Place in a Desired Location: Placing in a desired location requires identifying areas prone to humidity, such as basements or closets. Position the charcoal dehumidifier in these areas to enhance moisture reduction. Regularly check and replace the charcoal every few weeks to maintain optimal performance.
By completing each of these steps, you can create your own effective charcoal dehumidifier.
How Can You Optimize the Performance of Your DIY Dehumidifier?
To optimize the performance of your DIY dehumidifier, focus on using the right materials, ensuring adequate airflow, controlling humidity levels, and maintaining the device regularly.
Using the right materials is crucial. Common materials for a DIY dehumidifier include:
- Silica gel: Silica gel is a desiccant that absorbs moisture effectively. It can be placed in breathable bags or containers to enhance its surface area.
- Rock salt: Rock salt also acts as a moisture absorber. Placing it in a container with small holes allows it to draw humidity from the air.
- Baking soda: Baking soda can absorb moisture as well, and it is effective in smaller enclosed spaces.
Ensuring adequate airflow is essential for maximizing moisture absorption. Consider the following strategies:
- Ventilation: Position the dehumidifier in a well-ventilated area to prevent stagnation. This improves airflow, allowing the device to work efficiently.
- Placement: Place it near damp areas like basements or bathrooms, where humidity levels are often higher.
- Fans: Using a small fan alongside your dehumidifier can enhance air circulation, increasing the overall effectiveness of moisture removal.
Controlling humidity levels involves monitoring and adjusting environment conditions. Here are tips for effective control:
- Hygrometer: A hygrometer measures humidity levels. Keep the humidity below 50% for optimal comfort and mold prevention.
- Set routines: Operate the dehumidifier during peak humidity times, such as in the evening or when cooking, to maximize its impact.
Regular maintenance is key to ensuring long-term performance. Follow these practices:
- Clean the device: periodically clean the filters and other parts to prevent dust and mold buildup. This can improve efficiency.
- Replace materials: Replace silica gel, rock salt, or baking soda as needed, typically every few weeks, to maintain optimal moisture absorption.
- Inspect for leaks: Regularly check for leaks or damage that could impair performance. Repair or replace parts as necessary.
By applying these methods, you can significantly improve the efficiency and effectiveness of your DIY dehumidifier.
What Maintenance Tips Should You Follow to Keep Your DIY Dehumidifier Effective?
To keep your DIY dehumidifier effective, there are essential maintenance tips you should follow regularly.
- Check and empty the water reservoir.
- Clean the collection filter.
- Inspect the fan and motor for dust.
- Ensure proper ventilation.
- Seal cracks and gaps in the room.
- Use the dehumidifier at optimal temperatures.
These tips can help different users achieve better performance and longevity from their DIY dehumidifier setups. Some users may prioritize ease of cleaning, while others might focus on energy efficiency.
-
Check and Empty the Water Reservoir: Regularly checking and emptying the water reservoir is essential in maintaining the efficiency of your DIY dehumidifier. A full reservoir can lead to overflows or pump failures. Depending on humidity levels, the reservoir might need attention daily or weekly. It’s advisable to inspect it regularly after a rainfall or humid day.
-
Clean the Collection Filter: Cleaning the collection filter ensures unobstructed airflow and maximizes dehumidifier efficiency. Dust and particulate matter can clog the filter, making it work harder and less effectively. Most filters can be washed with warm water and mild soap, following the instructions from the dehumidifier’s manufacturer.
-
Inspect the Fan and Motor for Dust: The fan and motor components require periodic inspections to prevent build-up of dust, which can lead to overheating or mechanical failure. Gently use a vacuum or soft cloth to remove dust from these parts every few months, ensuring the dehumidifier runs smoothly.
-
Ensure Proper Ventilation: Proper ventilation in the room where your DIY dehumidifier operates is crucial for effective moisture removal. Closing off doors and windows can cause moisture to accumulate. Instead, leave doors slightly open or use additional fans to improve air circulation.
-
Seal Cracks and Gaps in the Room: Sealing cracks or gaps in doors, windows, and walls prevents external humid air from entering the room. Applying caulk or weatherstripping helps maintain the internal environment, allowing your dehumidifier to perform efficiently.
-
Use the Dehumidifier at Optimal Temperatures: Operating the dehumidifier in temperatures between 70°F and 90°F is recommended for optimal performance. At lower temperatures, the unit may frost over or not operate effectively. Users should be cautious about using the unit in environments colder than this range, as it may require additional energy or lead to malfunction.
What Are the Key Safety Tips to Consider While Building Your DIY Dehumidifier?
The key safety tips to consider while building your DIY dehumidifier include proper electrical handling, ensuring airflow, using appropriate materials, adequate drainage, and monitoring humidity levels.
- Proper electrical handling
- Ensuring airflow
- Using appropriate materials
- Adequate drainage
- Monitoring humidity levels
These safety tips create a solid foundation for constructing a functional and safe DIY dehumidifier, highlighting the importance of attention to detail in each aspect.
-
Proper Electrical Handling:
Proper electrical handling is crucial when building a DIY dehumidifier. It involves safely managing electrical components, such as wires and outlets. Users should ensure that the device is correctly grounded to prevent electrical shocks. According to the National Electrical Code (NEC), all electrical projects should adhere to specific safety standards to mitigate hazards. -
Ensuring Airflow:
Ensuring airflow is essential for effective moisture removal. A dehumidifier needs a proper ventilation design to function correctly. Blocked air passages can lead to overheating, risking device failure. The American Society of Heating, Refrigerating, and Air-Conditioning Engineers (ASHRAE) emphasizes that dehumidifiers should have unobstructed airflow paths for optimal performance. -
Using Appropriate Materials:
Using appropriate materials is vital for the longevity and safety of the DIY dehumidifier. Non-flammable materials reduce fire risks. For instance, plastic components can prevent corrosion over time, while metal parts may conduct heat. A study by the Consumer Product Safety Commission (CPSC) indicates that many household fires originate from improperly made electrical devices, underscoring the need for suitable materials. -
Adequate Drainage:
Adequate drainage prevents water accumulation, which can lead to mold growth or structural damage. A DIY dehumidifier should have a design that channels collected moisture away effectively. Research by the Environmental Protection Agency (EPA) highlights that excess moisture can cause indoor air quality issues. Implementing a drainage system can mitigate such risks. -
Monitoring Humidity Levels:
Monitoring humidity levels is essential for the efficiency of the dehumidifier. Users should include a hygrometer to ensure humidity levels remain within a safe range. The World Health Organization (WHO) recommends indoor humidity levels between 30% and 50% to prevent mold growth. Regular monitoring helps maintain a healthy environment.