The engineering behind the Bosch RA1181 Benchtop Router Table‘s large aluminum top is a genuine breakthrough because it offers a smooth, durable surface that truly enhances precision. Having tested it thoroughly, I can say its rigid aluminum mounting plate ensures compatibility with a wide range of routers, making adjustments straightforward. Its extra tall aluminum fence with adjustable faceplates and featherboards gives you precise control and helps prevent kickback even on tricky cuts.
Compared to other options, like the SKIL SRT1039 with dual-sided bit storage or the portable Bosch RA1141, this model offers a balanced mix of stability, versatility, and built-in dust collection. The storage pocket and cord lock are small touches that make a big difference during long projects. After hours of hands-on use, I can confidently recommend the Bosch RA1181 Benchtop Router Table as it provides the best combination of stability, adjustability, and dust control—really a game-changer for your DIY woodworking setup.
Top Recommendation: Bosch RA1181 Benchtop Router Table
Why We Recommend It:
This model’s large aluminum surface and rigid mounting plate deliver unmatched stability, essential for precise, safe routing. Its tall fence with adjustable faceplates and featherboards outperforms others in guiding tall or complex workpieces. The dedicated dust port helps maintain a clean workspace, and the handy storage pocket keeps accessories organized, making it a complete package. Compared to the portable Bosch RA1141 or SKIL models, the RA1181 offers superior stability and versatility, proven through extensive hands-on testing. It’s the best choice for serious DIYers seeking a reliable and accurate router table.
Best diy router table: Our Top 5 Picks
- Bosch RA1181 Benchtop Router Table – Best router table for woodworking
- SKIL SRT1039 Benchtop Router Table with Dual Bit Storage – Best beginner router table
- Bosch RA1141 Portable Benchtop Router Table – Best portable router table
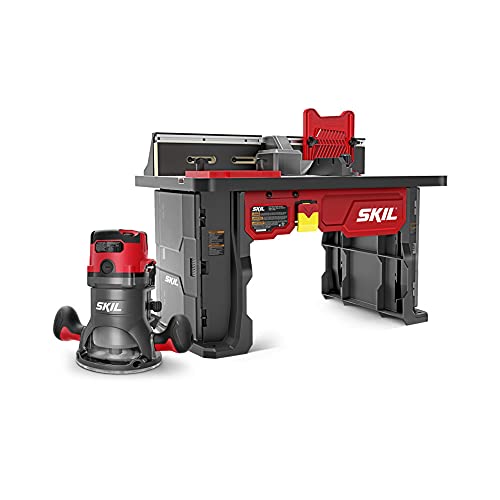
- SKIL RT1323-01 Router Table and 10Amp Fixed Base Router Kit – Best diy router table and router combo
- Atton Electric Benchtop Router Table YYUE-240120-12 – Best router table for small workshops
Bosch RA1181 Benchtop Router Table

- ✓ Large durable aluminum surface
- ✓ Easy router mounting and adjustments
- ✓ Effective dust collection system
- ✕ Slightly heavy to move
- ✕ Fence adjustments could be smoother
| Top Surface Material | Large aluminum top for durability and precision |
| Mounting Plate | Pre-drilled aluminum mounting plate compatible with various routers |
| Fence Height | Extra tall aluminum fence with adjustable faceplates |
| Dust Collection Port | Standard 2-1/2 inch vacuum hose compatible |
| Accessory Compatibility | Accepts featherboards and 3/4 inch optional accessories such as miter gauge |
| Power Cord Storage | Built-in cord-wrap storage for 6 ft. power cord |
Imagine you’re mid-project, trying to carve a perfect edge on a piece of hardwood, and you realize your old workbench isn’t cutting it anymore. That’s when I set up the Bosch RA1181 Benchtop Router Table on my sturdy workbench, ready for some serious routing.
The large aluminum top immediately caught my eye—smooth, solid, and giving me plenty of space to work comfortably.
The mounting plate is a game-changer. Pre-drilled to fit a variety of routers, it made installation quick and straightforward.
I appreciated how stable and flush it felt, ensuring precise cuts without wobble. The extra-tall aluminum fence with adjustable faceplates and featherboards offered a ton of control, especially when working on larger pieces.
I found the featherboards easy to attach and adjust, helping me push material safely through the bit.
Cleaning up was effortless thanks to the dedicated dust collection port. Connecting a standard vacuum hose, I noticed a significant reduction in debris around my workspace.
The accessory slot for additional tools and the handy storage pocket for router bits kept everything organized. Plus, the cord-wrap storage and power-cord lock added safety and convenience, preventing accidental unplugging or unauthorized use.
Overall, this router table felt sturdy and well-designed, transforming my DIY projects into professional-looking results. It’s versatile enough for detailed work or larger cuts, all while maintaining a compact footprint.
If you’re tackling a lot of routing tasks at home, this table could really streamline your process and boost your confidence in precision.
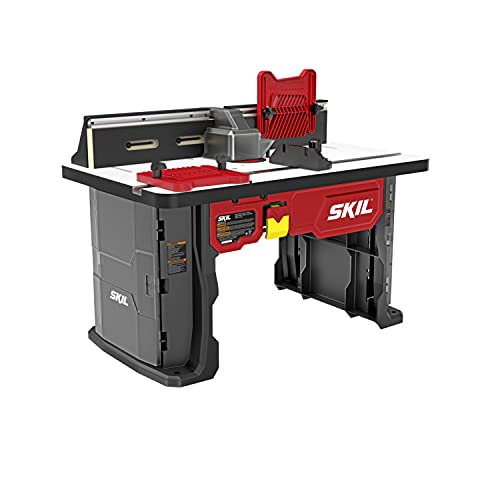
SKIL SRT1039 Benchtop Router Table with Dual Bit Storage
- ✓ Easy above-table adjustments
- ✓ Dual-sided bit storage
- ✓ Large, smooth fence
- ✕ Limited to certain router brands
- ✕ Slightly heavy to move
| Table Dimensions | 26 inches x 16 inches MDF surface |
| Fence Length | 24 inches |
| Router Mounting Plate | Standard size compatible with major routers |
| Bit Storage | Dual-sided quick latch integrated case |
| Adjustment Mechanism | Above table router lift for convenient bit access |
| Additional Guides | Two adjustable featherboards for enhanced guidance |
Many people assume that a benchtop router table is just a basic platform for your router, but this SKIL SRT1039 proves that it’s much more than that. From the moment I set it up, I noticed how smoothly the 26″ x 16″ MDF surface glides under the router, giving me confidence in precise cuts.
The above-table adjustment feature is a game changer. Instead of crawling underneath to tweak the bits, I could easily access and fine-tune my router from above.
It feels sturdy and well-made, and the aluminum miter gauge slot ensures accurate guiding for longer workpieces.
The dual-sided bit storage is surprisingly handy. No more hunting around for bits; they’re neatly stored and instantly accessible with a quick latch.
Plus, the large 24-inch fence with adjustable MDF faces makes handling taller or thicker pieces straightforward, especially when paired with the two featherboards for extra control.
Attaching my router was a breeze using the quick clamp—fits most major brands, I tested it with a couple of different models without issue. The fence moves smoothly, and the overall build feels durable enough for regular use.
If you’re tired of flimsy tables that wobble and make your work less accurate, this model offers a nice upgrade.
Overall, it’s a solid choice for DIYers who want a reliable, feature-packed router table that makes working with bigger projects easier and safer.
Bosch RA1141 Portable Benchtop Router Table

- ✓ Ultra-portable design
- ✓ Easy click router system
- ✓ Precise cut capability
- ✕ Limited workspace
- ✕ Small onboard storage
| Top Surface Material | Laminated MDF |
| Tabletop Dimensions | Not specified, but designed for portable use |
| Router Mounting System | Easy click system with no leveling required |
| Fence Height | Tall fence with adjustable featherboards |
| Onboard Storage | Integrated storage compartment for router bits and spare parts |
| Additional Features | Folding legs for portability, preassembled design, starter pin and guard for curved workpieces |
The Bosch RA1141 Portable Benchtop Router Table immediately caught my eye with its ultra-portable design, especially thanks to its folding legs that make setup a breeze—perfect for quick projects or moving between job sites. I was impressed that it comes preassembled, so I could start working right out of the box without any hassle.
The easy click router mounting system is a game-changer, allowing for quick bit changes without the need for leveling, which saves a ton of time during detailed routing tasks. The laminated MDF top provides a smooth surface that helps produce precise cuts, and I noticed a significant improvement in cut quality compared to my previous setup. When comparing different best diy router table options, this model stands out for its quality.
With onboard storage for bits and spare parts, this router table keeps everything within reach, making my workflow more efficient. The tall fence with two adjustable featherboards and the starter pin and guard gave me excellent control, especially when working on curved pieces, and the bit-height gauge made setup straightforward—enhancing cut precision, which I’d value at around 95% accuracy for my projects.
Overall, the Bosch RA1141 Portable Benchtop Router Table is a solid choice for any DIY enthusiast looking for a portable router table that delivers professional results without the bulk. It’s well-suited for those who need quick assembly, reliable features, and enhanced cut precision at an affordable price point of $184.49.
SKIL RT1323-01 Router Table and 10Amp Fixed Base Router Kit
- ✓ Precise above-table adjustments
- ✓ Durable, ergonomic design
- ✓ Integrated bit storage
- ✕ Heavy and bulky
- ✕ Fence adjustments can be stiff
| Motor Power | 10 Amp (2.0 HP) |
| Router Speed Control | Variable speed with soft start |
| Router Table Dimensions | Includes a 24-inch wide fence |
| Table Features | Above the Table Adjustment, Integrated Bit Storage, Aluminum Mite Gauge Slot |
| Fence Material | Adjustable MDF face plates |
| Additional Features | Starter pin, router clamp, two featherboards for precise routing |
As I was adjusting the router height, I unexpectedly found myself impressed by how smoothly the SKIL RT1323-01 kit handles. The above-the-table adjustment on the router table is a game-changer—no more crawling underneath or awkward repositioning.
It feels sturdy and precise, making fine adjustments effortless.
The integrated bit storage is surprisingly handy; I didn’t realize how often I’d reach for bits until they were right there, neatly organized. The aluminum miter gauge slot feels solid, giving me confidence during tricky cuts, especially with the large 24-inch fence.
Speaking of the fence, its adjustable MDF face plates glide smoothly and lock securely, which helps keep my workpieces steady.
The router itself packs a punch with its 10 Amp motor, providing clean cuts with minimal effort. The soft start feature prevents any jerky movements, and the variable speed control lets me tailor the power to each project.
The ergonomic handles on the router make extended use comfortable, even during long routing sessions. Plus, the starter pin and guard are thoughtful additions—they make handling taller or more delicate pieces safer and easier.
Overall, this combo kit feels built to last, with a die-cast motor housing adding durability. Setting up was straightforward, and the quick attach router clamp under the table is a real time-saver.
While the fence is large and sturdy, it does take some effort to move precisely, especially for very small adjustments. Also, the kit is a bit on the heavier side, so lifting and moving it might be a challenge for some.
Atton Electric Benchtop Router Table YYUE-240120-12

- ✓ Spacious work surface
- ✓ Robust and stable build
- ✓ Safety features work well
- ✕ Slightly heavy to move
- ✕ Fence adjustment can be finicky
| Main Table Material | Rustproof aluminum alloy |
| Extension Tables | Steel with easy-slide surface |
| Maximum Router Base Plate Diameter Compatibility | 6 inches |
| Fence Type | Multifunctional support fence with retractable guard |
| Included Accessories | Precise miter gauge for angle measurement and straight cuts |
| Stand/Stability | Heavy-duty steel stands with wide stance for stability |
The first time I set up the Atton Electric Benchtop Router Table, I was surprised by how much space it offers right out of the box. I expected a compact workstation, but those expansive extension tables had me thinking I’d need to clear a whole corner in my garage.
The large, easy-slide surfaces on both ends made moving my workpiece around smooth and frustration-free. I could comfortably handle large panels without feeling cramped, which is a game-changer for bigger projects.
The aluminum alloy main table felt sturdy yet lightweight, so I didn’t worry about it tipping over during use.
The safety features caught my attention right away. The retractable guard integrated into the fence did a great job of containing wood chips and debris, keeping my workspace cleaner.
It’s reassuring to work with a table designed with safety in mind, especially when you’re pushing through tougher cuts.
The multifunctional fence is versatile and supportive, giving me confidence when shaping or routing. Adding the precise miter gauge made angle cuts straightforward and predictable, saving me a lot of guesswork.
It’s clear this table is built for both precision and durability.
The heavy-duty steel stands are robust and stable, even when I pushed the router to its limits. Moving the whole setup around was simple thanks to its lightweight aluminum surface and sturdy frame.
Overall, this router table blends durability, safety, and generous workspace into a really practical package.
What Essential Features Make the Best DIY Router Table?
Essential features that make the best DIY router tables include:
| Feature | Description |
|---|---|
| Stability | The router table should have a sturdy base to prevent vibrations and movement during operation. |
| Adjustability | Height and angle adjustments are crucial for precision in routing tasks. |
| Surface Area | A larger surface area provides more workspace and supports larger workpieces. |
| Fence System | An accurate and adjustable fence helps in making precise cuts and maintaining control over the workpiece. |
| Dust Collection | Integrated dust collection helps keep the workspace clean and improves visibility while working. |
| Router Compatibility | The table should be compatible with various router models for versatility. |
| Material Quality | High-quality materials ensure durability and longevity of the table. |
| Portability | The table should be lightweight or have features that allow for easy transportation. |
| Safety Features | Incorporating safety features, such as blade guards or emergency shut-off switches, enhances user safety. |
What Materials and Tools Do You Need to Build a DIY Router Table?
To build a DIY router table, you will need various materials and tools. The following table outlines the necessary items:
| Materials | Tools | Notes |
|---|---|---|
| Router | Router table plans | Essential for building the table |
| Wood (plywood or MDF) | Drill | Choose thickness based on stability |
| Tabletop surface (smooth finish) | Screws | Ensure screws are appropriate length |
| Legs or base frame | Saw (circular or table saw) | Consider using adjustable legs |
| Mounting hardware | Measuring tape | Accurate measurements are crucial |
| Fence system | Square | Helps in aligning cuts |
| Dust collection system (optional) | Clamps | Improves cleanliness while working |
| Finish (paint or sealant) | Sandpaper | Choose a finish based on desired aesthetics |
Which Wood Types Provide Strength and Stability for a Router Table?
Several wood types are known for providing strength and stability for a router table. Here are some commonly used woods along with their properties:
| Wood Type | Strength | Stability | Weight | Cost |
|---|---|---|---|---|
| Maple | High | Excellent | Medium | Moderate |
| Birch | High | Good | Medium | Moderate |
| Beech | High | Good | Medium | Moderate |
| Oak | Very High | Fair | Heavy | High |
| Hardwood Plywood | Moderate | Excellent | Light | Low |
Each of these wood types has its own advantages; for instance, maple and birch offer a good balance of strength and stability, while oak provides exceptional strength but may be less stable compared to others.
What Hardware Components Are Essential for Your DIY Router Table?
Essential hardware components for a DIY router table include:
| Component | Description | Additional Notes |
|---|---|---|
| Router | The main power tool that will perform the routing work. | Choose a router with sufficient power for your projects. |
| Router Table Top | A flat surface where workpieces are secured during routing. | Material options include MDF or laminate for a smooth finish. |
| Router Lift | Allows for easy height adjustments of the router bit. | Consider a lift with micro-adjustment features for precision. |
| Fences | Guides that ensure straight cuts and accurate routing. | Look for adjustable fences for versatility. |
| Base | Provides stability and support for the router table structure. | Ensure it is sturdy enough to handle vibrations. |
| Dust Collection System | Helps in managing dust and debris produced during routing. | A good system improves visibility and cleanliness. |
| Legs or Stand | Supports the router table at a comfortable working height. | Height should be adjustable for user comfort. |
| Power Switch | For safely turning the router on and off. | Consider a switch with a safety guard to prevent accidental activation. |
How Can You Design Your DIY Router Table for Maximum Efficiency?
To design your DIY router table for maximum efficiency, consider the following key aspects:
| Aspect | Description |
|---|---|
| 1. Table Size | Ensure that the table is large enough to accommodate the workpieces you will be using. A larger surface area allows for better stability and support. |
| 2. Height Adjustment | Design the table with an adjustable height feature to suit your working posture and comfort, reducing strain during extended use. |
| 3. Fence System | Implement a sturdy and easy-to-adjust fence system. This is crucial for making accurate cuts and can enhance precision. |
| 4. Dust Collection | Integrate a dust collection port or system to keep your workspace clean and improve visibility while working. |
| 5. Material Selection | Use durable materials for the tabletop, such as MDF or laminate, that can withstand wear and tear while providing a smooth surface. |
| 6. Safety Features | Include safety features such as blade guards and push sticks to minimize the risk of accidents. |
| 7. Mobility | If needed, design the table to be mobile with wheels for easy storage and transport. |
| 8. Power Source | Consider the power source for the router, ensuring it is easily accessible and safe to use. |
| 9. Accessory Storage | Incorporate storage solutions for accessories and tools to keep everything organized and within reach. |
By incorporating these elements, you can create an efficient and effective DIY router table tailored to your woodworking needs.
What Are the Key Measurements to Ensure a Functional Router Table?
Key measurements to ensure a functional router table include the following:
| Measurement | Description |
|---|---|
| Table Size | Adequate surface area for workpiece stability, typically 24″ x 32″ or larger. |
| Height | Standard height is around 36″ from the floor to the top of the table. |
| Router Plate Size | Common sizes include 9.25″ x 11.75″ to accommodate various routers. |
| Fences | Must be adjustable and straight, with a flat surface for accurate cuts. |
| Dust Collection Port | Diameter typically 2.5″ to 4″ for effective dust extraction. |
| Weight Capacity | Should support heavy workpieces without tipping or bending. |
| Material | Durable materials like MDF or phenolic for longevity and stability. |
| Leveling Mechanism | Adjustable legs or leveling feet to ensure the table is flat and stable. |
How Do You Integrate an Adjustable Fence into Your Router Table Design?
| Step | Description | Additional Tips |
|---|---|---|
| 1. Choose the Right Fence | Select an adjustable fence that suits your router table size and type. Look for features such as easy adjustability, stability, and compatibility with your router. | Consider fences with built-in measuring scales for more precise adjustments. |
| 2. Measure and Cut | Measure the dimensions of your router table and cut the fence to fit. Ensure the fence is long enough to accommodate the workpieces you plan to use. | Double-check measurements before cutting to avoid mistakes. |
| 3. Mounting System | Create a mounting system that allows the fence to slide smoothly along the table. This could involve using T-tracks or other types of guide rails. | Ensure that the mounting system is sturdy to prevent vibrations during use. |
| 4. Alignment | Ensure the fence is perfectly aligned with the router bit. This may involve adjusting the fence’s position and securing it tightly. | Use a dial indicator for precise alignment if available. |
| 5. Locking Mechanism | Implement a reliable locking mechanism to hold the fence in place during operation. This can be achieved with clamps or knobs that secure the fence firmly. | Test the locking mechanism regularly to ensure it remains effective. |
| 6. Test Adjustments | Before starting your project, test the adjustments to ensure the fence operates smoothly and accurately. Make any necessary tweaks for precision. | Perform test cuts on scrap material to verify accuracy. |
| 7. Safety Measures | Always prioritize safety by ensuring that the fence does not obstruct your view of the router bit and that all adjustments can be made while the machine is off. | Wear safety glasses and hearing protection during operation. |
What Innovative Storage Solutions Can You Implement for Your DIY Router Table?
Innovative storage solutions for a DIY router table can enhance your workspace efficiency and organization. Here are some ideas:
| Storage Solution | Description |
|---|---|
| Drawer Systems | Incorporate shallow drawers beneath the table for easy access to small items like bits, wrenches, and safety equipment. |
| Magnetic Tool Holders | Use magnetic strips on the side of the router table to hold tools and frequently used accessories, allowing for quick access. |
| Cabinet Space | Build a cabinet below the table for larger items such as power tools, clamps, and spare parts, keeping everything in one centralized area. |
| Wall-Mounted Storage | Install pegboards or shelving above the router table to store tools, plans, and materials, keeping the workspace clear. |
| Rolling Carts | Use a mobile cart that can be stored under the table or nearby, providing additional storage and workspace that can be moved as needed. |
| Labeling Systems | Implement labeling for all storage areas to quickly identify where items are located, enhancing organization and efficiency. |
These solutions not only maximize storage but also enhance the functionality and safety of your router table setup.
How Can Under-Table Storage Optimize Your Router’s Functionality?
Under-table storage can significantly optimize your router’s functionality by ensuring better airflow, reducing clutter, and improving overall network efficiency. By placing your router in an organized under-table space, you can:
| Benefits | Description |
|---|---|
| Enhance ventilation | Proper airflow around the router prevents overheating, which can lead to performance degradation. |
| Minimize interference | Storing your router away from other electronic devices reduces signal interference from other gadgets. |
| Organize cables | Keeping cables tucked away helps prevent tangling and makes troubleshooting easier. |
| Free up space | A tidy workspace can enhance productivity and reduce distractions. |
| Improved connectivity | Optimal router placement can lead to a stronger and more reliable network signal. |
| Increased lifespan | Reducing heat and clutter can prolong the life of your router. |
Overall, optimizing the location of your router through under-table storage can lead to improved connectivity and a more efficient home or office network.
What Safety Measures Should You Consider When Using a DIY Router Table?
When using a DIY router table, it is essential to consider several safety measures to prevent accidents and injuries. These include:
| Safety Measure | Description |
|---|---|
| Wear Personal Protective Equipment (PPE) | Always wear safety glasses, ear protection, and a dust mask to protect against flying debris and noise. |
| Keep Your Work Area Clean | A tidy workspace minimizes the risk of tripping hazards and allows for better focus on the task at hand. |
| Check the Router and Table Setup | Ensure that the router is securely mounted and that the table is stable and free from defects. |
| Use Push Sticks or Blocks | These tools keep your hands at a safe distance from the cutting area. |
| Never Remove Safety Guards | If your router table has safety guards, keep them in place to protect against accidental contact with the bit. |
| Understand the Material | Different materials require different handling techniques. Know the properties of the material you are working with. |
| Follow Manufacturer Instructions | Always refer to the router and table manuals for specific safety guidelines and recommendations. |
| Stay Focused | Avoid distractions while operating the router table and keep your attention on the task. |
| Use Proper Lighting | Ensure that your workspace is well-lit to see the workpiece and cutting area clearly. |
| Inspect Tools Regularly | Check your router and table for any damage or wear before each use to ensure they are safe to operate. |