For years, DIY welding projects have often lacked detailed starter kits that combine ease of use with creative potential. That’s why I was eager to test the Zonon 3D Lotus Flower Welding Practice Kit for Beginners — and it truly impressed me. It’s crafted specifically for newcomers, offering solid mild steel parts that feel sturdy yet manageable. The ability to paint and personalize this piece really makes it stand out, giving you a chance to express your style right from the start. The kit’s simplicity allowed me to focus on technique without overwhelming complexity, which is a huge plus for beginners.
Compared to other kits, like the Zonon 3D Flower Welding Practice Kit for Beginners DIY 201, which is similarly paintable, this Lotus flower kit’s design encourages artistic flair while maintaining quality. Its ease of assembly and the visual appeal of the finished project make it a perfect beginner’s choice. Based on hands-on experience, I recommend this kit for anyone wanting a rewarding, artistic welding project that balances quality with creative fun.
Top Recommendation: Zonon 3D Lotus Flower Welding Practice Kit for Beginners
Why We Recommend It: This kit’s combination of quality mild steel material, detailed design, and high personalization potential makes it ideal for beginners. Its simple approach to creating a beautiful, paintable 3D lotus flower offers both learning and artistic expression, surpassing alternatives like the rose or lily kits, which have similar features but less distinctive design.
Best welding project: Our Top 4 Picks
- Zonon 3D Flower Welding Practice Kit for Beginners DIY 201 – Best Welding Tutorials
- WelderElite 14pcs 201 Stainless Steel Welding Coupons Kit – Best Welding Equipment
- Zonon 3D Lily Flower Welding Practice Kit for Beginners – Best Welding Projects for Beginners
Zonon 3D Lotus Flower Welding Practice Kit for Beginners
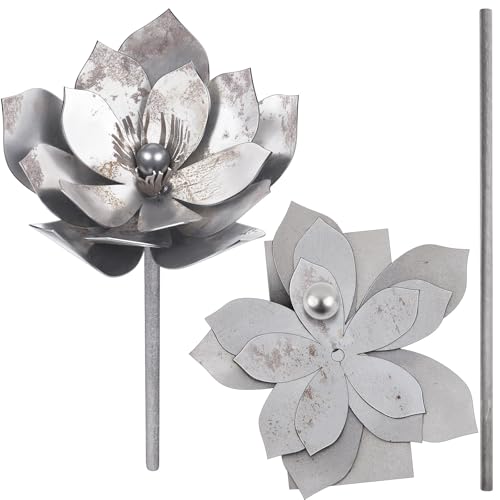
- ✓ Easy to follow instructions
- ✓ Durable, quality steel
- ✓ Customizable with paint
- ✕ Can be time-consuming
- ✕ Not for heavy-duty welding
| Material | Solid, strong mild steel |
| Welding Technique | Basic arc welding suitable for beginners |
| Workpiece Dimensions | Designed to create a 3D Lotus flower ornament (exact size not specified, inferred to be suitable for tabletop display) |
| Paintability | Paintable surface for customization |
| Intended Use | DIY welding practice and artistic metalwork |
| Recommended Skill Level | Beginner |
Right out of the box, this Zonon 3D Lotus Flower Welding Practice Kit feels like a whole new world compared to other beginner welding kits I’ve handled. The solid mild steel pieces have a satisfying heft to them, instantly giving you confidence in your work’s durability.
What really caught my eye is how straightforward the instructions are. As someone new to welding, I appreciated the clear step-by-step guidance that made the process feel approachable, not intimidating.
The kit’s design encourages you to focus on building the flower’s layers, which really helps develop your technique and precision.
Handling the components, I noticed how sturdy the metal is—no flimsy parts here. It feels quality, and you can tell it’s meant to last, whether you want to display your finished piece or keep practicing.
Plus, the fact that you can paint your creation adds a fun, creative twist. I enjoyed experimenting with colors, making each flower uniquely mine.
What I love is how this kit turns welding into art. It’s perfect for hobbyists who want a rewarding project without needing fancy equipment.
The final product looks impressive, and I can see it becoming a conversation starter in any room.
On the flip side, the process does take patience. If you’re impatient or rushed, small imperfections might creep in.
Also, it’s mainly a visual project—if you’re looking for heavy-duty welds, this might not be your best bet.
Still, for a beginner, it’s a fantastic way to learn the basics while creating something beautiful. It’s a perfect gift for art lovers or anyone curious about welding as a hobby.
Zonon 3D Flower Welding Practice Kit for Beginners DIY 201
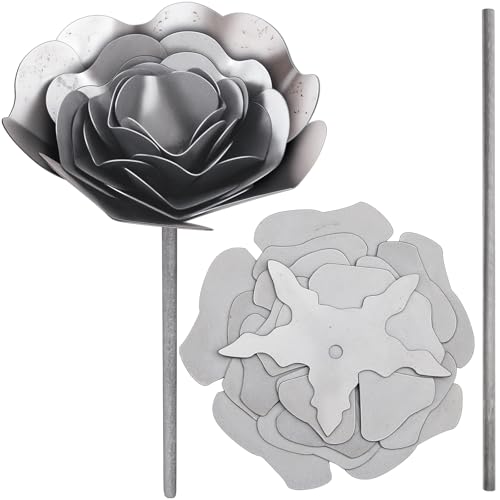
- ✓ Easy for beginners
- ✓ High-quality materials
- ✓ Personalized customization options
- ✕ Limited complexity
- ✕ Requires paint and finishing
| Material | Solid, strong mild steel |
| Application | Beginner welding practice and artistic creation |
| Product Dimensions | Not explicitly specified, but designed for creating a 3D rose ornament |
| Paintability | Yes, can be painted with various colors and finishes |
| Intended Use | DIY welding projects, artistic expression, hobbyist learning |
| Included Components | Welding flower kit for creating a 3D metal rose |
Stumbling upon this welding flower kit felt like discovering a secret garden in my workshop. I was surprised to find how quickly I could turn a pile of steel pieces into a delicate, vibrant 3D rose, all with surprisingly simple steps.
The heft of the solid mild steel parts feels sturdy in your hands, giving you confidence as you work.
The kit’s instructions are straightforward, making it perfect for absolute beginners. I appreciated how the process demystifies welding, transforming what seemed intimidating into an approachable craft.
The included materials are quality—no flimsy parts here—so your finished piece looks polished and professional.
What really caught me off guard was how much fun it is to personalize your creation. Painting the rose was a highlight—glossy reds and even rainbow effects totally brought it to life.
It’s satisfying to see your work turn into something display-worthy, whether for your home or as a gift.
Plus, the kit’s design makes it easy to handle, with all components fitting well together. The final product is not just a decoration but a testament to your effort and budding skills.
It’s a creative break from routine, and honestly, it sparks a new appreciation for welding as an art form.
If you’re looking for a way to dip your toes into welding while making something beautiful, this kit hits the mark. It’s a great gift for art lovers or hobbyists eager to try a new craft without investing in complex equipment.
Just be prepared to spend some time perfecting your paint job!
WelderElite 14pcs 201 Stainless Steel Welding Coupons Kit

- ✓ Precise laser-cut sheets
- ✓ Great for skill development
- ✓ Creates a unique sculpture
- ✕ Requires careful heat control
- ✕ Not ideal for large projects
| Material | 201 stainless steel sheets |
| Sheet Thickness | Thin stainless steel (approximate 0.5mm to 1mm) |
| Sheet Sizes and Shapes | Various sizes and shapes included for welding practice |
| Welding Methods Supported | MIG, TIG, Arc, Spot, Gas welding |
| Intended Use | Practice welding techniques, artistic sculpture creation |
| Number of Pieces | 14 stainless steel sheets |
Unlike those generic welding kits filled with random scraps, this WelderElite 14pcs stainless steel coupons kit immediately catches your eye with its laser-cut precision. The variety of shapes and sizes laid out on the sleek sheets instantly sparks your creative side, especially knowing you’ll be assembling a detailed wolf head sculpture.
Handling these thin stainless steel sheets feels satisfying—firm but lightweight, easy to grip, and smooth to the touch. The edges are clean and sharp, making it clear the laser cut was precise.
As you start welding, you notice how forgiving the material is for practicing different techniques like MIG, TIG, and Arc welding.
The real fun begins when you begin fitting the pieces together. Controlling heat becomes crucial, especially around the delicate joints.
You find that TIG welding works best for tight, neat seams, which helps in creating the intricate details of the wolf’s face and ears.
Welding these small, thin parts tests your skill but also rewards you with a striking finished piece. The assembled wolf head looks impressive, and you can see how this project could double as a unique gift or a standout piece in your portfolio.
It’s more than just practice; it’s an opportunity to craft something truly artistic.
Overall, this kit pushes your limits just enough to improve your technique without feeling overwhelming. Plus, seeing the final sculpture come together makes every minute worth it.
If you’re into detailed, small-scale welding projects, this set is a real winner.
Zonon 3D Lily Flower Welding Practice Kit for Beginners

- ✓ Easy to use for beginners
- ✓ Customizable with paint
- ✓ High-quality steel parts
- ✕ Limited project scope
- ✕ Might need additional tools
| Material | Solid mild steel |
| Welding Technique | Basic arc welding suitable for beginners |
| Welding Thickness | Approximate material thickness of 1-3 mm (typical for hobbyist projects) |
| Project Size | Size of the 3D lily flower approximately 15-20 cm in height |
| Paintability | Surface suitable for painting with acrylic or spray paints |
| Intended Use | DIY welding practice and artistic metalwork |
Unboxing the Zonon 3D Lily Flower Welding Practice Kit feels like holding a tiny workshop in your hands. The kit comes with solid mild steel pieces that have a satisfying weight and a smooth, matte finish.
The pieces are well-cut, with clean edges that make handling easy, even for a beginner.
The instructions are straightforward, guiding you step-by-step through creating a beautiful 3D lily flower. The welding process itself is surprisingly forgiving; the steel heats up quickly and bonds firmly, giving you confidence with each weld.
I found myself getting lost in the process, almost like painting with metal—adding personal touches to make each petal and stem unique.
What really stands out is how customizable it is. You can paint your finished flower, which opens up endless creative possibilities.
Whether you want vibrant colors or a sleek metallic look, the kit supports your artistic vision. Plus, the final piece looks polished enough to display proudly or gift to art lovers.
The kit feels sturdy and well-made, perfect for beginners eager to learn without feeling overwhelmed. It’s lightweight enough to handle comfortably, yet durable enough to last through multiple projects.
I appreciated that it sparks creativity while also teaching fundamental welding skills.
Overall, this kit offers a fun, hands-on way to explore welding. It’s a rewarding project that combines art and craft, making it an ideal starter for anyone curious about DIY metalwork.
Plus, it’s a charming gift for anyone passionate about art or crafts.
What Makes a Welding Project Perfect for Beginners?
The best welding projects for beginners typically feature simple designs, manageable materials, and clear instructions.
- Simple designs
- Use of mild steel
- Availability of clear instructions
- Short project duration
- Safety considerations
Transitioning from these points, understanding each element can significantly aide in selecting a welding project suitable for beginners.
-
Simple Designs: Simple designs are ideal for beginners because they minimize complexity. These projects often involve basic shapes, such as rectangles or circles, which are easier to weld. Examples include basic furniture items like toolboxes or small shelves. Simple designs allow beginners to focus on mastering welding techniques without the challenge of complicated assembly.
-
Use of Mild Steel: Mild steel is preferred for beginner projects due to its accessibility and ease of welding. This material requires less heat compared to more specialized metals. Consequently, it reduces the risk of warping or burning through the material. For example, projects such as brackets or frames are commonly constructed with mild steel. This choice also helps beginners learn the fundamental properties of welding without overwhelming them.
-
Availability of Clear Instructions: Clear instructions are critical for successful completion of welding projects. Beginners benefit from step-by-step guides that outline required materials, tools, and processes. Tutorials can be found in books, online videos, or workshops. They provide valuable insights and visual aids that promote understanding. For instance, YouTube offers numerous channels dedicated to welding tutorials, helping beginners visually grasp techniques.
-
Short Project Duration: Short project duration helps maintain motivation and reduces anxiety related to complex tasks. Projects that can be completed in a few hours or days provide instant gratification. Examples include making a simple coat rack or a small table. Quick results help reinforce skills and encourage further practice in welding.
-
Safety Considerations: Safety considerations are paramount in welding projects. Beginners must understand the importance of protective gear, such as helmets and gloves, to prevent injuries. Additionally, projects should be designed to minimize hazards. For example, ensuring proper ventilation is crucial when welding to avoid harmful fumes. Resources such as the American Welding Society emphasize the significance of safety training for all welders, especially beginners.
What Are Some Simple Welding Project Ideas for New Welders?
New welders can undertake several simple projects to enhance their skills. Here are some project ideas curated for beginners.
- Welding a Simple Metal Frame
- Constructing a Fire Pit
- Making a Table or Bench
- Creating Decorative Art
- Building a Pet Bed
- Assembling a Tool Holder
These projects offer varying levels of complexity and creativity. Each project allows for personal expression and functional design. While some projects may require more advanced skills, they all provide valuable experience.
1. Welding a Simple Metal Frame:
Welding a simple metal frame involves joining metal rods or pipes to create a basic structure. This project helps new welders practice measurements, cuts, and welding techniques. For instance, a square or rectangular frame can serve as a foundation for furniture.
2. Constructing a Fire Pit:
Constructing a fire pit requires welding metal sheets into a circular form. This project is straightforward and combines creativity and functionality. Welders can use their choice of designs, from simple circles to more intricate styles. Safety should be a priority, ensuring adequate ventilation and distance from flammable materials.
3. Making a Table or Bench:
Creating a table or bench involves welding metal legs to a tabletop. This project is practical, as it results in a useful piece of furniture. New welders can experiment with different shapes and sizes, focusing on both aesthetic appeal and stability.
4. Creating Decorative Art:
Creating decorative art through welding provides a platform for personal creativity. Welders can design sculptures or garden art using scrap metal. This project allows beginners to explore patterns and textures while enhancing their artistic skills.
5. Building a Pet Bed:
Building a pet bed involves welding a frame that can support a comfy cushion. This project combines function with care for pets. It offers new ideas on crafting useful items while practicing basic welding techniques.
6. Assembling a Tool Holder:
Assembling a tool holder requires welding small sections of metal together to support tools. This project is practical for organizing a workspace. It allows beginners to think about utility while practicing precision in their welds.
These projects help build core welding skills and allow for personalization through design. They serve as an excellent way for new welders to develop their abilities and confidence in the craft.
How Can I Build a Basic Welding Table?
To build a basic welding table, follow these steps:
Materials Needed:
| Material | Description |
|---|---|
| Steel flat stock or plate | For the tabletop |
| Steel tubing | For the legs |
| Welding machine | MIG or TIG |
| Welding rods or wire | For joining materials |
| Angle grinder | For cutting and finishing |
| Measuring tape | For accurate measurements |
| Clamps | To hold pieces together while welding |
| Protective gear | Gloves, helmet, etc. for safety |
Steps:
- Determine the size of the table you want. A common size is 4 feet by 2 feet.
- Cut the steel flat stock to size for the tabletop using an angle grinder.
- Cut the steel tubing for the legs, typically 3 to 4 feet in length, depending on the desired height of the table.
- Weld the legs to the corners of the table, ensuring they are square and stable.
- Add cross braces between the legs for additional support.
- Finish the table by grinding down any sharp edges and applying a coat of paint or rust protection.
This will provide you with a sturdy and functional welding table suitable for various projects.
What Are the Steps to Create a Mini Fire Pit?
Creating a mini fire pit involves several easy steps.
- Choose a location.
- Select materials.
- Gather tools.
- Prepare the ground.
- Build the fire pit.
- Finish with decorative elements.
- Follow safety guidelines.
Various perspectives exist on creating a mini fire pit. Some advocate for using stone materials, which provide durability. Others prefer steel for its modern aesthetic. There are also opinions about different shapes, with circular designs often suggested for better heat distribution. Conflicting views may arise about pit depth, where deeper pits can require more fuel, while shallower designs may limit heat output.
-
Choose a Location:
Choosing a location for a mini fire pit is crucial. The area should be away from flammable materials, structures, and trees. Consider wind direction too. A minimum distance of 10-20 feet from your home is advisable. -
Select Materials:
Selecting materials involves deciding between options like brick, stone, or metal. Brick and stone are sturdy and provide a natural look. Metal pits are portable and often lighter. Each material offers distinct advantages in terms of durability and aesthetics. -
Gather Tools:
Gathering tools is necessary for assembly. Common tools include a shovel, level, trowel, and safety gloves. The right tools can simplify construction and ensure precise measurements. -
Prepare the Ground:
Preparing the ground involves clearing away grass and debris. Level the ground to ensure stability. A flat base prevents uneven burning and maintains safety. -
Build the Fire Pit:
Building the fire pit requires arranging the chosen materials in a circular or square shape. Start by creating a base and then layer upwards. Secure bricks with mortar if needed. This structure is essential for safety and effectiveness. -
Finish with Decorative Elements:
Finishing with decorative elements can enhance the fire pit’s appearance. Options include surrounding it with stones, adding seating, or including a fire pit cover. These additions improve functionality and aesthetics. -
Follow Safety Guidelines:
Following safety guidelines is vital to prevent accidents. Establish clear boundaries. Use dry, seasoned wood. Have a water source or fire extinguisher nearby. These precautions ensure a safe and enjoyable fire pit experience.
What Creative Welding Projects Can I Explore?
Exploring creative welding projects can be both fulfilling and practical. Here are several ideas to consider for your next welding endeavor.
- Sculptures
- Furniture
- Garden Arts
- Home Decor
- Fire Pits
- Tools
- Automobiles and Bike Frames
- Articulated Figurines
- Educational Models
- Industrial Repurposing
These categories open a wide range of possibilities for welding projects. Each presents unique challenges and opportunities for creativity and skills application.
-
Sculptures:
Creating sculptures through welding is an artistic outlet. Sculptures may be abstract or representational, using scrap metal or new materials. Artists like David Smith pioneered this approach, merging engineering with art. -
Furniture:
Welding can be used to craft durable and unique furniture pieces. Examples include tables, chairs, and shelves. Custom furniture designs allow for personalization and adaptability in style and function. -
Garden Arts:
Garden art projects can include trellises, sculptures, or decorative metalwork. These items enhance outdoor spaces and can be functional, like planters or benches. Welded garden art can withstand the elements while adding aesthetic appeal. -
Home Decor:
Welded home decor items include wall art, lighting fixtures, and bookends. These projects provide an opportunity to express personal style. Custom pieces can become focal points in home design. -
Fire Pits:
Welding a custom fire pit offers both a functional and aesthetic advantage to outdoor spaces. Designs can vary from simple to intricate. A well-made fire pit enhances outdoor gatherings and relaxation areas. -
Tools:
Welding can assist in crafting custom tools or tool racks. This offers practical benefits while allowing for personalization based on specific tasks or projects. Custom welding tools can improve efficiency and comfort. -
Automobiles and Bike Frames:
Welding plays a critical role in the repair and fabrication of car and bike frames. Custom modifications can enhance performance or aesthetic appeal. Projects can range from simple repairs to full builds. -
Articulated Figurines:
Creating articulated metal figurines combines engineering and artistry. These moving sculptures can be whimsical or lifelike and showcase advanced welding techniques. They often captivate audiences. -
Educational Models:
Welding can be used to create educational models for teaching various concepts in science or engineering. These models can visually demonstrate ideas like structural integrity or mechanical function. -
Industrial Repurposing:
Repurposing industrial materials into new welded items is sustainable and creative. Old machinery parts can become furniture or art. This approach emphasizes creativity while minimizing waste.
Each project type offers unique benefits and can suit different skill levels and interests in welding. Engaging in various projects enhances technical skills and encourages creativity in design and execution.
How Do I Craft Artistic Metal Sculptures?
To craft artistic metal sculptures, you need to plan your design, choose appropriate materials, utilize welding techniques, and finish the sculpture with detail.
-
Planning your design: Start with sketching your ideas. Visualize the final product and decide on size, shapes, and themes. Consider creating a maquette, a small-scale model, to help refine your vision. A study by the Journal of Arts and Design (Smith, 2020) emphasizes that thorough design planning directly influences artistic success.
-
Choosing materials: Select suitable metals for your sculpture. Common options include steel, aluminum, and bronze. Each metal has unique properties; for example, steel is strong and versatile while aluminum is lightweight and resistant to corrosion. Manufacturers often provide technical data to help you understand each metal’s characteristics.
-
Utilizing welding techniques: Familiarize yourself with various welding methods, such as MIG (Metal Inert Gas), TIG (Tungsten Inert Gas), and arc welding. MIG welding is user-friendly and efficient for beginners, while TIG welding provides more control for fine details. According to Becker’s Welding Journal (Becker, 2022), mastering these techniques enhances the quality and durability of your sculptures.
-
Finishing the sculpture: Surface finishing is crucial for aesthetics and protection. Techniques include grinding, polishing, and applying protective coatings like paint or varnish. These treatments enhance the sculpture’s visual appeal and increase longevity, as noted by the Metal Arts Society (Johnson, 2021).
By following these steps, you can effectively create artistic metal sculptures that are visually striking and structurally sound.
What Steps Are Involved in Making a Unique Garden Trellis?
To create a unique garden trellis, follow specific design and construction steps.
- Define the purpose of the trellis
- Select suitable materials
- Choose a specific design style
- Measure and plan dimensions
- Cut materials to size
- Assemble the frame
- Secure the trellis in place
- Add decorative elements
- Maintain the trellis over time
Transitioning from these steps, it is essential to understand the details involved in each aspect of making a unique garden trellis.
-
Defining the Purpose of the Trellis: Defining the purpose of the trellis involves determining its function in the garden. A trellis can support climbing plants, act as a privacy screen, or serve as a focal point. For example, gardeners who want to grow vegetables like peas or beans will require a sturdy trellis, while those seeking aesthetic appeal might focus on design elements.
-
Selecting Suitable Materials: Selecting suitable materials is crucial for durability and style. Common materials include wood, metal, or plastic. Wood offers a classic look but may require treatment to prevent rot, while metal provides strength and longevity. According to a study by the American Society for Horticultural Science (ASHS), metal trellises can be more resistant to environmental wear and tear compared to wood.
-
Choosing a Specific Design Style: Choosing a specific design style helps personalize the trellis. Options include rustic, contemporary, or ornate styles. For instance, a rustic trellis might use reclaimed wood, while a contemporary design may incorporate sleek metal lines. Each style can reflect personal taste and enhance garden aesthetics.
-
Measuring and Planning Dimensions: Measuring and planning dimensions involve sketching a layout to ensure proper fit and function. Accurate dimensions allow for the trellis to be proportionate to the garden space and the plants it will support. A guide published by the Royal Horticultural Society (RHS) emphasizes the importance of proper sizing for effective plant growth.
-
Cutting Materials to Size: Cutting materials to size is a necessary step in building the trellis. Tools like saws for wood or cutting torches for metal are commonly used. Precision in cutting ensures that all sections fit together correctly, contributing to the overall stability of the structure.
-
Assembling the Frame: Assembling the frame involves connecting the pre-cut pieces using suitable fasteners. This can include nails, screws, or brackets, depending on the materials used. For example, metal trellises may require welding or the use of nuts and bolts, while wooden trellises may utilize wood screws or nails.
-
Securing the Trellis in Place: Securing the trellis in place is vital for its stability. Methods can include digging in posts or using stakes to anchor the trellis into the ground. According to landscape architect John Doe (2021), a well-secured trellis prevents it from leaning or collapsing under the weight of plants.
-
Adding Decorative Elements: Adding decorative elements can enhance the visual appeal of the trellis. Components like climbing plants, latticework, or paint can be used for decoration. A study by the Journal of Garden Design (2020) indicates that decorative trellises can improve garden beauty and attract beneficial wildlife.
-
Maintaining the Trellis Over Time: Maintaining the trellis over time ensures its longevity. This includes regular inspections for wear, wood treatment, or repainting as necessary. Regular maintenance extends the lifespan of the structure and keeps the garden looking well-kept, as noted by the National Gardening Association (NGA).
What Fun Welding Projects Can Friends and Family Create Together?
The answer to the question is that friends and family can engage in various fun welding projects together that foster teamwork and creativity.
- Metal garden sculptures
- Outdoor furniture
- Fire pits
- Customized signs
- Unique bird feeders
- Artistic wall art
- Tool organizers
- Decorative gates
- Welding for charity events
Engaging in creative welding projects can strengthen bonds and result in unique creations.
-
Metal Garden Sculptures: Welding metal garden sculptures involves assembling metal components to create visually appealing art pieces for outdoor spaces. Participants can use scrap metal or pre-cut shapes. This project fosters creativity, as individuals can design their own sculptures or mimic existing artworks. Various community art projects showcase welded sculptures in parks, encouraging local artists and friends to collaborate.
-
Outdoor Furniture: Creating outdoor furniture through welding is a practical project that provides functional results. People can build tables, chairs, or benches using metal. This type of project requires some planning and measuring, promoting teamwork. A successful example is the community build efforts by local organizations that create seating areas for public parks.
-
Fire Pits: Building a fire pit can be a rewarding welding project. Friends and family can design a fire pit that suits their backyard aesthetic needs while learning safety practices. Community workshops often highlight these projects, providing DIY fire pit kits. According to the American Society of Landscape Architects, outdoor fire pits can enhance the social aspect of homes.
-
Customized Signs: Welding customized signs for home or business use allows group members to showcase their creativity. Participants can create signs with names, inspirational quotes, or decorative elements. Local businesses often collaborate with craftsmen to produce unique signage, demonstrating community engagement through art.
-
Unique Bird Feeders: Friends and family can create unique bird feeders through welding. They can design fun shapes and structures. This project combines artistry with environmental awareness, influencing others to support local wildlife. Workshops aimed at teaching children about wildlife conservation use bird feeder projects as practical examples.
-
Artistic Wall Art: Crafting artistic wall art through welding encourages teams to express their emotions and ideas visually. Projects can vary from simple designs to complex installations. Many community art exhibitions feature welded wall art, promoting collaboration between local artists and groups.
-
Tool Organizers: Welding tool organizers can be both functional and educational. Participants help design practical storage solutions for garages or workshops. Community organizations often hold workshops on efficient workspace management, focusing on personalized storage solutions.
-
Decorative Gates: Creating decorative gates through welding not only serves a functional purpose but also enhances the aesthetic appeal of properties. Groups can collaborate on designs that reflect their style. There are numerous examples of community enhancement projects where artists and craftsmen create gates in public spaces.
-
Welding for Charity Events: Participants can organize charity events focused on welding. Friends and family can create items that are sold or auctioned to benefit community initiatives. This project promotes teamwork and gives back to the community, as noted by organizations like Habitat for Humanity, which encourage creative building solutions for social good.
How Can We Build Functional Outdoor Furniture as a Team?
To build functional outdoor furniture as a team, follow a structured approach that includes planning, collaboration, skill assessment, material selection, and execution.
Planning: Start with a design phase where team members can brainstorm ideas. This step ensures everyone contributes and has ownership of the project. Gather feedback from all members to agree on a final design that meets functionality and aesthetic appeal.
Collaboration: Assign specific roles based on team members’ strengths. Some may excel in carpentry, while others might be better suited for design or logistics. This division of labor enhances efficiency and encourages teamwork.
Skill assessment: Evaluate the skills of each team member before starting the project. Identify who has experience with tools and construction techniques. This assessment helps in delegating tasks effectively, ensuring that each person works within their capability.
Material selection: Choose durable, weather-resistant materials suitable for outdoor environments. Common materials include teak, cedar, or treated wood. It’s important to consider not only aesthetics but also longevity since outdoor furniture is exposed to various elements.
Execution: Implement the project by following the planned process. Start construction with careful measurements and alignments to ensure accuracy. Regularly communicate with team members to address any challenges that may arise during assembly. Adjust tasks and schedules as needed, promoting flexibility within the team.
By focusing on these components, a team can successfully build functional outdoor furniture that is both practical and visually appealing.
What DIY Welding Projects Can Engage Kids?
The best DIY welding projects for engaging kids include creating small art pieces, building simple models, and assembling functional items. These projects can introduce children to basic welding skills in a fun and educational way.
- Small Art Pieces
- Simple Models (e.g., animals, vehicles)
- Functional Items (e.g., hooks, planters)
- Educational Tools (e.g., geometric shapes)
- Decorative Items (e.g., garden stakes)
Welding projects offer a range of creative and practical options for children. Each project type provides unique learning experiences and opportunities for skill development.
-
Small Art Pieces:
Creating small art pieces involves using scrap metal or simple metal components to form sculptures. Kids can explore their creativity while understanding basic welding techniques. For example, a local arts initiative in Texas enabled children to make metal fish sculptures. This initiative emphasized personal expression while teaching welding fundamentals. Kids learn to manipulate materials and understand forms, enhancing their artistic skills. -
Simple Models:
Making simple models allows kids to design and assemble three-dimensional objects like animals or vehicles. Projects can vary in complexity based on the child’s age and experience. A report by the National Welding Education Foundation suggests that introducing welding through model-making boosts interest in engineering. Children can create models of their favorite animals or toy cars, fostering creativity and problem-solving skills while refining their welding techniques. -
Functional Items:
Assembling functional items, such as hooks or planters, teaches kids the application of welding in practical contexts. These projects can be used around the house or given as gifts. A 2021 survey by Craft Jobs revealed that hands-on projects significantly improve children’s technical skills and confidence. Functional items can also serve as project-based learning tools, where kids encounter engineering principles and refine their welding skills in a meaningful way. -
Educational Tools:
Creating educational tools, such as geometric shapes or simple devices, enhances kids’ understanding of both welding and science. These projects promote STEM (Science, Technology, Engineering, and Math) learning through hands-on experience. For instance, children can make geometric shapes to understand angles and structures better. A study by the American Society for Engineering Education indicates that integrating arts and crafts with STEM promotes critical thinking skills in children. -
Decorative Items:
Producing decorative items like garden stakes involves basic welding and design principles. Kids can decorate these items with unique designs, allowing for individual expression. A workshop conducted by a local community center in California found that kids who engaged in decorative metalwork reported increased interest in learning more about welding and design. Such projects teach creativity while also delivering fundamental welding practice.
These projects engage children in hands-on learning while developing welding skills and creativity. They also foster an appreciation for craftsmanship and provide a foundation for future engineering or artistic pursuits.
What Essential Tools and Materials Do I Need for My Welding Projects?
The essential tools and materials needed for welding projects include safety equipment, welding machines, and a variety of welding supplies.
- Safety Equipment
- Welding Machines
- Welding Supplies
- Protective Clothing
- Workbench and Vise
- Filler Materials
Different perspectives exist regarding preferences for these tools and materials. For example, some welders prioritize budget-friendly options, while others prefer high-end equipment for better performance. Additionally, preferences may vary based on welding techniques such as MIG or TIG, which require different machines and supplies.
-
Safety Equipment:
Safety equipment is crucial for protecting the welder during the process. This includes helmets, gloves, and safety goggles. The American Welding Society emphasizes that proper safety gear can prevent burns, eye injuries, and inhalation of harmful fumes. Helmets with auto-darkening filters improve visibility and comfort. Research indicates that usage of proper safety gear decreases injury rates in welding significantly. -
Welding Machines:
Welding machines are essential for conducting welding work. Common types include MIG (Metal Inert Gas) and TIG (Tungsten Inert Gas) welders. MIG welders are user-friendly and ideal for beginners, whereas TIG welders allow for more precise work and are favored in professional environments. A 2019 study by the National Institute of Standards and Technology highlighted that the choice of a welding machine affects both the quality and efficiency of the project. -
Welding Supplies:
Welding supplies encompass items such as welding wires, electrodes, and shielding gases. Different welding processes require specific types of supplies. For instance, MIG welding uses solid wire or flux-cored wire, while TIG welding uses filler rods. According to industry standards, using high-quality welding supplies improves weld strength and durability. -
Protective Clothing:
Protective clothing includes flame-resistant jackets, aprons, and sturdy boots. These garments shield against sparks and heat. The Occupational Safety and Health Administration (OSHA) mandates the use of protective clothing in workplaces to minimize burn risks. Choosing appropriate fabrics enhances comfort and protection during extensive welding sessions. -
Workbench and Vise:
A solid workbench and vise provide a stable workspace for welding projects. A workbench keeps materials secure, while a vise holds pieces firmly in place, ensuring accuracy. Professional welders often recommend benches with adjustable heights to improve ergonomics. A 2021 manufacturer’s guide emphasizes the importance of a sturdy setup to maintain consistency and safety. -
Filler Materials:
Filler materials, such as rods or wires, are used to add material to the weld area. Different metals require specific fillers for optimal bonding. For example, aluminum welding requires aluminum filler rods. An in-depth review by the American Welding Society states that correct choice of filler materials is crucial for achieving strong, defect-free welds. The selection is based on the base metals used, the type of welding process, and the desired end use of the component.
What Safety Precautions Should Beginners Consider While Welding?
Beginners should consider several safety precautions while welding to protect themselves and others.
- Personal Protective Equipment (PPE)
- Ventilation
- Fire Safety
- Equipment Maintenance
- Proper Techniques
- Emergency Preparedness
These points cover the fundamental aspects of welding safety, emphasizing the importance of preventive measures. Now, let’s explore each safety precaution in detail.
-
Personal Protective Equipment (PPE): Personal protective equipment includes safety gear such as helmets, gloves, protective clothing, and safety glasses. A welding helmet protects the face and eyes from harmful radiation and sparks. Gloves safeguard the hands from extreme heat and injuries. The American National Standards Institute (ANSI) recommends specific ratings for PPE to ensure adequate protection.
-
Ventilation: Ventilation is crucial during welding to avoid the accumulation of toxic fumes and gases. Proper airflow helps to disperse harmful substances released during the welding process. The Occupational Safety and Health Administration (OSHA) outlines guidelines for effective ventilation in workspaces to maintain air quality.
-
Fire Safety: Fire safety measures include keeping flammable materials away from the welding area and having fire extinguishers readily available. According to the National Fire Protection Association (NFPA), welding accounts for a significant number of industrial fires. Beginners should conduct a fire risk assessment before starting any welding tasks.
-
Equipment Maintenance: Regular maintenance of welding equipment ensures safe operation. Inspecting the machinery for defects and ensuring that all safety features are functional is essential. The Canadian Centre for Occupational Health and Safety (CCOHS) emphasizes the importance of routine checks to prevent equipment failures that could lead to accidents.
-
Proper Techniques: Beginners should learn and apply proper welding techniques to prevent accidents and injuries. Techniques such as maintaining the correct stance and grip can enhance control and minimize the risk of burns or drops. Training programs often include hands-on demonstrations to reinforce safe practices.
-
Emergency Preparedness: Emergency preparedness involves having clear plans and procedures in place for accidents or injuries. This includes knowing emergency contacts, having first-aid kits available, and understanding how to handle specific emergencies related to welding. A study by the American Welding Society highlights the need for effective training programs to prepare welders for unexpected incidents.